mirza syaikhul kamal dokumen
TRANSCRIPT
MIRZA SYAIKHUL KAMAL
DOKUMEN
Created with the Freeware Edition of HelpNDoc: Free PDF documentation generator

petunjuk
PERTAMA SAYA UCAPKAN TERIMA KASIH ATAS LUANG WAKTUANDA UNTUK MENGUNJUNGI PROGRAM KAMIMUDAH-MUDAHAN PROGRAM INI BERMANFAAT UNTUKANDA.HARAP TIDAK MERUBAH SEGALA ISI KONTENTERSEBUT,NAMUN ANDA BISA MEMPUBLIKASIKANNYA TANPAHARUS MEMBAYAR LICENSE ASAL TIDAK MENGUBAH ATAUMENGKOMERSILKANNYA.
BILA ANDA SANGAT KESULITAN ATAU MEMILIKI PROBLEMSEPUTAR KOMPUTER ANDA BISA KONSULTASIKAN PADA KAMI : MIRZA SYAIKHUL KAMAL (022)92392864
SHERIQUE soft
Saat kita akan mengedit registri, ada kalanya fungsi regedit di Windows tidak bisa diakses alias disable. Ini bisadikarenakan oleh virus, atau juga memang oleh sang Administrator telah di-disable untuk mencegah orang yang tidakberkepentingan mengutak-atik setting Windows. Kalau anda pernah mengalami kejadian seperti ini Registry Editing hasbeen disable by your Administrator ketika memasukkan perintah REGEDIT pada menu RUNsolusi mengatasi registri disable by administrator
Inilah solusi singkat yang mungkin bisa membantu anda mengatasi masalah seperti diatas.
-Klik Menu [Start] ದ [RUN] dan masukkan perintah : GPEdit.mscGPEDIT
- Akan muncul Windows Group Policy, selanjutnya arahkan ke [User Configuration] ದ [Administrative Templates]ದ [System].Group Policy
-Setelah itu pada jendela sebelah kanan (panel setting) Double Klik Prevent Access to Registry Editing Toolsdisable registry tools
-Pada jendela yang muncul pilih NOT CONFIGURED atau DISABLED, untuk mengaktifkan kembali fungsi regedit.Disable Regedit
-Klik OK
Sekarang coba anda akses registry editor lewat menu [RUN] - REGEDIT kalau masih belum berhasil, Restart Komputeranda dan coba akses lagi registry editor.
Bila ternyata Solusi tersebut masih juga kurang ampuh, Tinggal Download REGTOOLS dari Doug Knox, Save dankemudian jalankan regtools, ini berfungsi untuk meng-enable dan disable registry. Bila kondisi registry editor disable,maka regtool akan meng-enable-kannya, begitupun sebaliknya.
Selamat mencoba dan jangan lupa untuk mendapatkan update dan informasi terbaru dari tasikisme.com secara langsungke email, tinggal masukkan email anda di bawah ini dan klik subscribe!
Created with the Freeware Edition of HelpNDoc: Free PDF documentation generator

SHERIQUE soft
Membuka Regedit yang di Disable VirusBy: MIRZA SYAIKHUL KAMAL
Mungkin kita pernah mengalami kejadian ketika kita ingin membuka regedit, tapi ternyata ada pesan registry editor telahdi disable oleh administrator. Padahal administratornya ಫkan kita?! Kok nggak bisa ngedit sih! Mungkin aja (bukanmungkin lagi sih) itu di disable oleh virus. Nich, aku ada sedikit tips membuka regedit yang di disable oleh virus.
Cara Pertama :
1. Jalankan command prompt (start -> run -> cmd).
2. Ketikkan: ಯ reg delete HKCU\Software\Microsoft\Windows\CurrentVersion\Policies\System /vDisableRegistryTools ಯ
3. Ketika muncul konfirmasi, isikan: y
4. Jalankan regedit (start -> run -> regedit). Udah terbuka ಫkan!
Tapi ada beberapa virus yang mendisable command prompt juga. Nich, aku ada cara lagi untuk buka regedit.
Cara Kedua :
1. copy-paste regedit.exe ke directory lain
2. trus di rename aja hasil copy-an itu
3. sekarang double klik, dah kebuka belum (kadang cara ini bisa berfungsi, tapi kadang juga enggak)
Kalo belum kebuka juga, pakai cara ketiga.
Cara Ketiga :
1. Buka notepad.
2. Ketikkan:ರ REG add HKCU\Software\Microsoft\Windows\CurrentVersion\Policies\System /v DisableRegistREG_DWORD /d 0 /f ಯ
3. Simpan dengan File name enable_regedit.bat (atau namanya terserahlah asalkan pake *.bat) dan Save a type pilih AllFiles kemudian Save.
4. Setelah itu close notepadnya terus jalankan file tersebut.
�����7LQN�WRQNಹ�6HNDUDQJ�EXND�VWDU��!�UXQ��!�UHJHGLW�
$VWDJDಹ��0DVLK�EHOXP�ELVD�MXJD��SDNDL�FDUD�NHHPSDW�DMD�
Cara Keempat :
1. Buka notepad.
2. Ketikkan :
[Version]
Signature=ರ $Chicago$ರ
Provider=Thinkerboy
[DefaultInstall]
Created with the Freeware Edition of HelpNDoc: Free PDF documentation generator
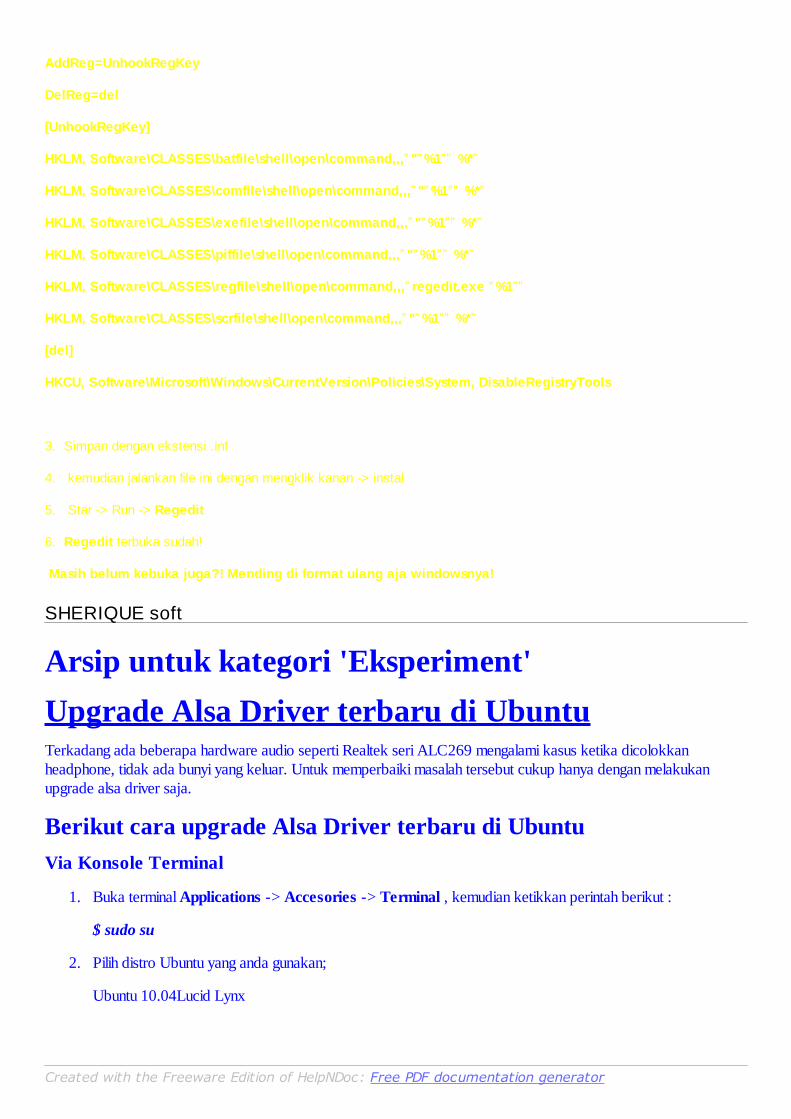
AddReg=UnhookRegKey
DelReg=del
[UnhookRegKey]
HKLM, Software\CLASSES\batfile\shell\open\command,,,ರ "ರ%1ೀರ %*ರ
HKLM, Software\CLASSES\comfile\shell\open\command,,,ರ "ರ%1ೀರ %*ರ
HKLM, Software\CLASSES\exefile\shell\open\command,,,ರ "ರ%1ೀರ %*ರ
HKLM, Software\CLASSES\piffile\shell\open\command,,,ರ "ರ%1ೀರ %*ರ
HKLM, Software\CLASSES\regfile\shell\open\command,,,ರ regedit.exe ಯ%1ೀರ
HKLM, Software\CLASSES\scrfile\shell\open\command,,,ರ "ರ%1ೀರ %*ರ
[del]
HKCU, Software\Microsoft\Windows\CurrentVersion\Policies\System, DisableRegistryTools
3. Simpan dengan ekstensi .inf
4. kemudian jalankan file ini dengan mengklik kanan -> instal
5. Star -> Run -> Regedit
6. Regedit terbuka sudah!
Masih belum kebuka juga?! Mending di format ulang aja windowsnya!
SHERIQUE soft
Arsip untuk kategori 'Eksperiment'
Upgrade Alsa Driver terbaru di UbuntuTerkadang ada beberapa hardware audio seperti Realtek seri ALC269 mengalami kasus ketika dicolokkanheadphone, tidak ada bunyi yang keluar. Untuk memperbaiki masalah tersebut cukup hanya dengan melakukanupgrade alsa driver saja.
Berikut cara upgrade Alsa Driver terbaru di Ubuntu
Via Konsole Terminal
1. Buka terminal Applications -> Accesories -> Terminal , kemudian ketikkan perintah berikut :
$ sudo su
2. Pilih distro Ubuntu yang anda gunakan;
Ubuntu 10.04Lucid Lynx
Created with the Freeware Edition of HelpNDoc: Free PDF documentation generator

# echo "deb http://repo.ugm.ac.id/ppa.launchpad.net/ubuntu-audio-dev/ lucid main">> /etc/apt/sources.list
Untuk kemanan jangan lupa untuk keluar dari mode root, dengan mengetikkan perintah :
# exit
3. Download key signature dan menambahkan key ke sistem;
$ wget ftp://repo.ugm.ac.id/ekstra/.ugos_tools/key_audio
$ sudo apt-key add key_sound
4. Selanjutnya, lakukan update list paket & instalasi dengan mengetikkan perintah berikut:
$ sudo apt-get update
$ sudo apt-get install linux-alsa-driver-modules-$(uname -r)
Via Grafis
1. Jalankan aplikasi manajemen paket dengan meng-klik menu System -> Administration -> SynapticPackage Manager;
2. Pada Synaptic Package Manager, klik menu Settings -> Repositories;
3. Pada dialog yang muncul klik tab Third Party Software, kemudian klik tombol Add maka akan munculdialog entry untuk memasukkan source list;
Created with the Freeware Edition of HelpNDoc: Free PDF documentation generator

4. Copy paste daftar dibawah ini dan klik tombol Add Source;
Sesuaikan dengan distro Ubuntu yang anda pakai
Ubuntu 10.04 Lucid Lynx
deb http://repo.ugm.ac.id/ppa.launchpad.net/ubuntu-audio-dev/ lucid main
5. Save link as GPG key firefox yang disediakan lokal repo UGM
6. Pada tab Authentication, klik Import Key File.. dan add file key yang sudah anda save tadi;
7. Setelah di tambahkan klik tombol Reload pada Synaptic Package Manager;
8. Langkah terakhir search aplikasi bernama ಯlinux-alsa-driver-modules-(kernel yang sedang terpakai)ರ ,klik kanan pada paket nama paket tersebut dan pilih Mark for Upgrade;
Created with the Freeware Edition of HelpNDoc: Free PDF documentation generator

9. Klik tombol Apply untuk memulai proses penginstalan;
Menjalankan :
Restart komputer Anda dan secara automatis audio Anda sudah berfungsi sebagaimana mestinya.
Referensi :https://launchpad.nethttps://wiki.ubuntu.com/Audio/
Cara Menghapus Kernel Lama di Ubuntu LucidLynxSetelah melakukan update kernel, ubuntu tidak menghapus kernel lama untuk berjaga-jaga jika kernel yang barutidak berkerja. Tapi jika kernel yang baru berjalan dengan baik menghapus yang lama bisa mengurangi spaceharddisk yang lumayan, juga mengurangi tampilan grub menu yang panjang.
Berikut langkahnya :
1. Jalankan konsole terminla, lihat kernel yang dipakai saat ini dengan perintah berikut ;
$ uname -r2.6.32-24-generic
2. Untuk melihat kernel yang terinstall, gunakan filter (' 2.6.3ಿ) dari hasil uname -r diatas ;
$ dpkg --get-selections | grep 2.6.31linux-headers-2.6.31-21 installlinux-headers-2.6.31-21-generic installlinux-headers-2.6.32-24 installlinux-headers-2.6.32-24-generic installlinux-image-2.6.31-21-generic installlinux-image-2.6.32-24-generic install
3. Terlihat masih ada 2 kernel lama yang terinstall yaitu 2.6.31-21, hapus kedua kernel lama tersebut denganperintah ;
Created with the Freeware Edition of HelpNDoc: Free PDF documentation generator

$ sudo apt-get remove --purge 2.6.31-21-*
Selamat Mencoba.
Install Driver Wireless Laptop MSI U230 diUbuntu Karmic Koala
Gambar diambil dari http://www.itechnews.net/
Laptop buatan MSI dengan tipe U230 dapat berjalan dengan baik di Ubuntu 9.10 karmic Koala, namun adabeberapa kendala yaitu wireless tidak terdeteksi dengan baik. Untuk itu ada beberapa langkah instalasi dankonfigurasi driver untuk bisa menggunakan wireless.Langkah-langkahnya sebagai berikut :
1. Download driver wirelessnya
2. Instalasi paket hasil downloadtan tadi dengan cara double klik pada file atau menggunakan perintah konsoleterminal berikut ;
$ sudo dpkg -i rt3090-dkms_2.3.1.3-0ubuntu0~ppa1_all.deb
3. Langkah berikutnya, edit file /etc/modules dengan perintah berikut ;
$ sudo gedit /etc/modules
4. Kemudian, tambahkan baris berikut ;
rt3090sta
Catatan :Yang perlu diingat kernel yang di gunakan versi 2.6.31-14 (default), jangan lakukan upgrade kernel, karenabeberapa kasus mouse dan keyboard hang tidak bisa digunakan.
Installasi Ubuntu Kamic Koala di MacBook 5,2
Created with the Freeware Edition of HelpNDoc: Free PDF documentation generator

Jika anda sudah biasa melakukan instalasi Ubuntu Kamic Koala di PC, Notebook, bahkan netbook, maka installasiUbuntu di MacBook perlu menggunakan cara yang berbeda. Berikut langkah-langkah yang sudah pernah kami coba.
Hasil dari panduan kami ini akan menghasilkan macbook anda berjalan dual-boot antara MacOS dengan LinuxUbuntu. Walaupun panduan kami ini spesifik untuk Ubuntu Kamic Koala 9.10 pada MacBook 5,2, semoga untukUbuntu versi kedepannya dan macBook terbaru, tidak terdapat banyak perubahan.
Pertama-tama, anda siapkan dahulu freespace untuk menempatkan partisi Linux-nya. Partisi ini harus disiapkandahulu dari mac-nya menggunakan BootCamp. Ikuti langkah disana. BootCamp di mac memang menyediakandualboot untuk Windows, oleh karena itu, nama partisi yang baru akan langsung diberinama Windows danmenggunakan jenis partisi FAT32. Silahkan sesuaikan berapa ukuran space baru yang ingin digunakan. Harapdiingat, space yang baru ini juga termasuk untuk digunakan sebagai swap untuk Linux. Setelah selesai, partisi yangbaru akan di kenali dengan nama BOOTCAMP di desktop Mac. Apabila partisi berhasil dibentuk, untuk pengaturanpartisi selanjutnya akan diatur melalui Linuxnya saja.
Melakukan Installasi rEFIt Boot Loader1. rEFit ini lah yan akan membantu dalam melakukan boot ke CD dan untuk proses dualboot kembali ke
MacOS. Oleh karena itu, GRUB Bootloader jangan diinstalkan ke MBR;
2. Silahkan download rEFit terbaru dari http://refit.sourceforge.net/;
3. Buka file rEFIt-0.13.dmg untuk masuk kedalamnya. Angka pada file rEFIt-0.13.dmg bisa berubahmenyesuaikan dengan versi terbaru yang anda ambil;
4. Klik dua kali pada file paket ಯrEFIt.mpkgರ;
5. Kemudian ikuti instruksi yang tertampil disana;
6. Jika semuanya lancar, matikan dahulu MacBook anda. Ya, MacBook memang harus mati shutdown dahuluagar perubahannya kentara, jika anda hanya melakukan reboot, maka perubahannya tidak terasa apa-apa.Matikan dahulu, dan biarkan sebentar untuk beberapa saat;
7. Installasi rEFIt dikatakan berhasil jika anda menemui menu rEFIt pada saat MacBook dinyalakan.
Created with the Freeware Edition of HelpNDoc: Free PDF documentation generator

Melakukan Installasi Linux1. Masukkan CD Ubuntu Kamic Koala. Kami sarankan yang versi desktop saja, agar dalam melakukan
modifikasi partisi dapat lebih mudah. Selain itu pula, kami belum meriset installasi menggunakan versialternate. Pada saat MacBook menyala, tekan tombol ಯdರ agak rEFIt dapat mengeluarkan menu boot dariCD;
2. Harap perhatikan dalam proses memasukkan dan mengeluarkan CD. Karena MacBook tidak menggunakansystem tray, maka apabila ingin mengganti CD atau mengeluarkan CD, perlu untuk masuk ke MacOS duluuntuk melakukan eject CD;
3. Begitu pilihan boot Linux dari CD muncul, anda akan memasuki proses installasi Ubuntu seperti yang biasaanda temui;
4. Agar proses installasi yang anda lakukan berjalan sesuai dengan kebiasaan anda, silahkan siapkan jugamouse USB agar bisa melakukan klik kanan di lingkunan Ubuntu LiveCD;
5. Agar booting Linux LiveCD berjalan lancar, perlu ditambahkan opsi boot sebagai berikut ಯnoapic nolapicirqpoll maxcpus=1ಯ. Opsi berikut dapat dituliskan dengan menekan tombol F6 setelah memilih bahasa, lalutekan ECS, agar anda dapat mengakses pada text-field pada boot option. Apabila ingin mengamatiprosesnya dengan mantab, anda bisa menghapus opsi ಯquiet splashರ yang secara default tertulis disana;
6. Setelah desktop Ubuntu LiveCD dapat menyala secara penuh, silahkan buka gparted dahulu untuk mengaturpartisinya. Gparted dapat dibuka dengan perintah ಯsudo gpartedರ pada konsole, atau pada menuSystem->Administration->Gparted;
7. Dari partisi yang terlihat, partisi FAT32 yang ada dibelakang, adalah partisi yang baru dibuat denganbootcamp, dan pada partisi itulah, nantinya sistem linux terinstall. Jika anda perhatikan, ada jarak sekitar129MB antara partisi HFSPlus milik Mac dan partisi FAT32 dari bootcamp. Kami sendiri belum memahamilebih lanjut, apakah jarak antar partisi ini harus ada atau bisa dihilangkan. Pada riset yang kami lakukan, kamitetap mempertahankan jarak antar partisi ini.
8. Setelah partisi FAT32 yang dibelakang dihapus, maka anda akan mendapatkan satu gelondong partisikosong. Buatlah partisi baru, boleh dengan EXT4 atau ReiserFS, dengan memberikan jarak di depan sebesar129MB. Atur ukuran sesuai yang anda inginkan, dan atur seperti bagaimana anda biasa dalammengalokasikan space pada installasi Ubuntu. Jangan lupa, partisi swap juga jangan sampai terlewat untukdibuat.
9. Setelah partisi sudah di apply, silahkan jalankan proses installasi ubuntu seperti biasanya anda menginstall;
10. Satu lagi langkah yang perlu diingat, setelah selesai mendefiniskan partisi pada proses Installasi, dan pada saat
Created with the Freeware Edition of HelpNDoc: Free PDF documentation generator

konfirmasi akhir di jendela ಯReady to Installಯ, silahkan tekan tombol Advanced untuk membuka menuinstallasi GRUB. Nah, dikarenakan MBR sudah berisi rEFIt, maka GRUB diinstall pada partisi system Linuxberada. Jika sistem linux anda terletak di /dev/sda3 maka pasanglah GRUB di /dev/sda3;
11. Setelah installasi selesai, silahkan MacBook di-reboot.
Menyambungkan rEFIt dengan GRUB1. Setelah reboot, dan layar menampilkan menu rEFIt, jangan buru-buru langsung boot ke linux, kita perlu
menyambungkan dahulu agar GRUB bisa dihubungi oleh rEFIt;
2. Masuklah pada menu Partition Tool;
3. rEFIt secara otomatis akan melakukan probing partisi dan menampilkan tabel partisi, dan susunan boot saatsebelumnya, dan tabel partisi yang rencananya baru akan diperbarui oleh rEFIt;
4. Anda hanya diberi dua pilihan Yes dan No. Tentunya agar tersambung, hanya ada ada pilihan Yes yang bisaada berikan ke rEFIt.
5. Setelah itu, matikan dulu beberapa saat, agar perangkat-perangkat pada MacBook dapat clean shutdown,dan siap untuk boot sistem baru. Selain itu pula, silahkan anda menarik nafas dalam-dalam dahulu sebelumkita melakukan konfigurasi GRUB2 di Ubuntu Karmic Koala.
Menambahkan Boot Option pada GRUB2
1. Saat setelah anda memilih menu di rEFIt, akan muncul menu GRUB2.
2. Jangan langsung di enter, tapi tekan tombol ಯ eರ untuk menambahkan boot option yang ada.
3. Tambahkan opsi boot sebagai berikut ಯnoapic nolapic irqpoll maxcpus=1ಯ. Apabila ingin mengamatiprosesnya dengan mantab, anda bisa menghapus opsi ಯquiet splashರ yang secara default tertulis disana.Setelah itu tekan CTRL+X untuk boot dengan opsi tersebut.
4. Setelah gdm Ubuntu sudah tertampil penuh, ada baiknya kita perbaiki dahulu GRUB agar proses restartberikutnya tidak merepotkan.
5. Silahkan buka konsole, dan ketikkan ಯsudo nano /etc/default/grubಯ. Kemudian pada bagianGRUB_CMDLINE_LINUX=ರ " ubah menjadi GRUB_CMDLINE_LINUX=ರ noapic nolapic irqpollmaxcpus=1ೀ .
6. Setelah itu jalankan perintah ಯ sudo update-grubರ
7. Untuk memastikan grub sudah terset dengan benar, anda dapat mereboot MacBook anda, atau dapatlangsung meneruskan ke konfigurasi selanjutnya.
Menentukan repositoriSudah hal yang wajar, jika anda setelah menginstall Ubuntu untuk mengganti repository software ke arah penyediarepository yang lebih anda minati. Misalkan saja ke http://repo.ugm.ac.id/ubuntu/. Hal ini perlu dipersiapkan terlebihdahulu mengingat beberapa konfigurasi memerlukan paket yang diinstall melalui repository.
Konfigurasi driver vgaVGA di MacBook menggunakan chipset keluaran NVIDIA, beruntunglah pada versi karmic, anda tidak perlurepot-repot harus mengunduh dari web NVIDIA, tpai cukup memberikan persetujuan untuk menginstall driver dai
Created with the Freeware Edition of HelpNDoc: Free PDF documentation generator

NVIDIA. Caranya adalah masuk ke menu System -> Administration -> Hardware Driver lalu aktifkan driveruntuk NVIDIA. Tunggu beberapa saat, biarkan ubuntu menginstallkan sendiri untuk driver NVIDIA. Setelah selesai,silahkan melakukan reboot jika ingin melihat hasilnya, atau meneruskan ke langkah konfigurasi selanjutnya.Dengan terinstallnya dirver VGA NVIDIA, maka Efek Compiz dapat berjalan, TwinView untuk presentasi, dan logoApple di cover MacBook dapat menyala.
Konfigurasi Wireless LANWireless LAN di MacBook menggunakan chipset Broadcom, caranya kurang lebih sama dengan installasi driverNVIDIA, jadi silahkan menuju ke System -> Administration -> Hardware Driver, kemudian berikan persetujuaninstallasinya. Setelah selesai, silahkan melakukan reboot jika ingin melihat hasilnya, atau meneruskan ke langkahkonfigurasi selanjutnya. Dengan terinstallnya Driver Wireless, maka wireless lan akan menyala secara otomatis dansiap untuk digunakan.
Konfigurasi SuaraUntuk mengaktifkannya, install paket linux-backports-modules-alsa-karmic-generic. Setelah terinstall, lalu edit filealsa-base.conf yang terletak di /etc/modprobe.d/alsa-base.conf. Pada baris yang terdapat ಫoptions snd-hda-intelಫtambahkan ಫmodel=mb31ಫ . Setelah itu reboot, agar perubahan bisa berpengaruh.
Konfigurasi Kamera/WebCamPada dasarnya, kamera pada macbook bisa langsung bekerja. Kendala yang ada itu karena pada Karmic, secaradefault tidak tersedia firmware dari kamera tersebut. Jika sistem MacOS anda masih terinstall atau dual-boot, makaanda dapat dengan mudah untuk mengambil firmware kamera yang tersimpan dalam partisi di system MacOS. DiMacOS, firmware kamera tersimpan di /System/Library/Extensions/IOUSBFamily.kext/Contents/PlugIns/AppleUSBVideoSupport.kext/Contents/MacOS/AppleUSBVideoSupport, apabila MacBook terlanjut terinstall Ubuntu secara tunggal, maka anda dapatmengambilnya dari MacOS yang lain dan menyimpannya kedalam flash disk.Jika sistem MacOS masih terinstall, silakan sistem MacOS di mount terlebih dahulu.
$ sudo mkdir /media/MacOS
$ sudo mount -v -t hfsplus /dev/sda2 /media/MacOS
Secara umum, MacOS akan terinstall di /dev/sda2, apabila MacOS pernah tercustomisasi, mungkin akan terinstall diurutan partisi yang lain. Kemudian install paket isight-firmware-tools, pada proses installasi, anda akan ditanyai pathke arah firmware kamera tersebut. Masukkan /media/MacOS/System/Library/Extಹ. Apabila anda salah dalammemasukkan path-nya, maka paket isight-firmware-tools harus diinstall ulang dengan purge, agar path dapat kembalidimasukkan.
$ sudo apt-get purge isight-firmware-tools
$ sudo apt-get install isight-firmware-tools
Untuk melihat apakah firmware sudah terpasang, silahkan cek dengan perintah ;
$ ls -l /lib/firmware/isight.fw
kemudian install paket cheese untuk dapat memanfaatkan camera yang ada. Jika firmware kamera beres terinstall,maka begitu anda membuka aplikasi cheese, wajah anda akan langsung terpampang disana.
Trackpad
Created with the Freeware Edition of HelpNDoc: Free PDF documentation generator

Trackpad MacBook di Ubuntu jadi terasa agak aneh. Tiap-tiap MacBook akan menghasilkan keanehan yangberbeda-beda, yang pada intinya trackpad itu tidak bekerja sebagaimana wajarnya saat di MacOS, tapi ini jugabukan berarti trackpad MacBook tidak bekerja sama sekali. Hal ini dapat diperbaiki dengan masuk ke System->Preferences ->Mouse lalu ubah kecepatan dan akselerasinya sesuai yang anda inginkan.
Suspen dan HibernateSuspend masih ada sedikit bermasalah, yaitu apabila kabel power dilepas, maka sistem Ubuntu akan menganggapnyamesin mati. Hal ini diperbaiki dengan memanggil gconf-editor, lalu masuk ke bagian apps->gnome-power-manager->actions, kemudian hilangkan tanda centhang pada pilihanಯ event_when_closed_batteryರ
KeyboardUntuk tombol seperti pengatur suara, tombol play, dan eject dapat bekerja dengan baik, tapi untuk tombol brightnessbelum.Apabila anda ingin menekan tombol F1, F2, F7 dan sebagainya, misalkan anda ingin masuk ke bagian CLI-nyaUbuntu, jika pada komputer biasa anda menekan, CTRL+ALT+F1, jika pada MacBook, maka tombol yang andatekan menjadi OPTION+CONTROL+FN+F1. Tombol kombinasnya jadi bertambah satu.
Demikian konfigurasi yang perlu dilakukan agar MacBook anda nyaman dalam menjalankan Ubuntu. Jelas, masihbanyak fungsi-fungsi lain yang berfungsi aneh di MacBook, tapi karena keterbatasan kami dalam melakukankonfigurasi dan kebutuhan saat itu, maka jika ada yang menemukannya, silahkan berbagi degnan kami.
Selamat mencoba.
Percobaan ini di ambil dengan referensi dari http://fosswire.com dan https://help.ubuntu.com.
Fitur yang tidak berjalan di UGOSToolsUGOSTools untuk distro Ubuntu Hardy, Intrepid, dan Jaunty ada beberapa fitur yang tidak berjalan untuk saat iniantara lain :
1. Upgrade OpenOffice.org versi terbaru menggunakan repository;
2. Upgrade pidgin versi terbaru.
Keterangan dan Solusi ;
1. Untuk fitur yang pertama, alasan tidak bisa bekerjanya UGOSTool karena pihak developer menghapusrepository OpenOffice.org 3.1.0 untuk Hardy dan intrepid. Sedangkan OpenOffice.org 3.1.1 hanya tersediauntuk Ubuntu Jaunty, sumber bisa di baca di sini. Solusinya install manual OpenOffice.org versi deb, panduanbisa di baca di sini;
2. Fitur yang kedua, repo lokal dalam tahap maintenance untuk menggunakan repo luar tambahkan list ini padasource.list anda dan lakukan upgrade;
deb http://ppa.launchpad.net/pidgin-developers/ppa/ubuntu intrepid main
Semoga bermanfaat..
Created with the Freeware Edition of HelpNDoc: Free PDF documentation generator

Trouble Shooting Sound ATI di HP CompaqCQ40 ದ 401 di Ubuntu 9.04 Jaunty JackalopeSemua driver Compaq Presario CQ40-401 hampir semuanya sudah kompatibel dengan Ubuntu 9.04 JauntyJackalope. Namun untuk dukungan suara sedikit bermasalah dan membutuhkan beberapa konfigurasi untuk bisabekerja.Untuk mengatasinya, ikuti langkah-langkah berikut :
1. Jalankan aplikasi terminal pada menu Applications -> Accesories -> Terminal;
$ sudo gedit /etc/modprobe.d/alsa-base.conf
2. Pada baris akhir alsa-base.conf tambahkan baris-baris berikut ini;
alias snd-card-0 snd-hda-intelalias sound-slot-0 snd-hda-inteloptions snd-hda-intel model=dell-m4-1options snd-hda-intel enable_msi=1
3. Selanjutnya buka System -> Preferences -> Sound Pilih semua settingan ke ALSA lalu klik OK;
4. Kembali lagi ke terminal dan edit file /etc/group dengan perintah berikut;
$ sudo gedit /etc/group
audio:x:29:pulse
Menjadi
audio:x:29:[user_login],pulse
contoh
audio:x:29:ugos,pulse
5. Setelah selesai save file di atas kemudian restart Ubuntu Anda, jika pada saat memasuki welcome screenmengeluarkan suara berarti konfigurasi anda berhasil, jika belum berhasil coba cek satu persatu file yang tadi
Created with the Freeware Edition of HelpNDoc: Free PDF documentation generator

anda rubah samakan dengan settingan di atas.
Semoga berhasil!!
Referensi :http://pasteku.com/zol
SMS Gratis Menggunakan Pidgin InternetMessengerPidgin Internet Messenger terbaru versi 2.6.1 mempunyai fitur untuk melakukan sms menggunakan protokol Yahoo. Sebenarnya ini merupakan fitur Yahoo Messenger yang sudah lama ada, namun penulis membahas bagaimanacaranya jika menggunakan Pidgin sebagai aplikasi pengirim pesannya. Untuk mengetahui bagaimana caranya ikutilangkah-langkahnya sebagai berikut :
1. Pastikan pidgin Anda versi minimal Pidgin 2.6.1, klik pada menu Help -> About;
2. Bagi Anda yang masih menggunakan pidgin versi lama, langkah upgradenya bisa di baca di sini. Atau caramudahnya menggunakan UGOS Tool, panduannya bisa di baca di sini;
3. Jangan lupa login menggunakan account Yahoo Anda, buat percakapan baru dengan meng-klik menuBuddies -> New Instan Messageಹ Kemudian ketikkan nomor HP teman atau saudara Anda, dengan diawali kode negara contoh : +622292392864
Created with the Freeware Edition of HelpNDoc: Free PDF documentation generator

4. Nah selanjutnya pada kotak dialog conversation mulailah mengetikkan pesan, kemudian tekan enter.
Catatan :Tidak semua operator bisa menggunakan layanan ini, penulis menggunakan nomor Indosat untuk melakukanpengetesan. Sms dibatasi hanya bisa mengirim pesan sebanyak 3 kali sms ke nomor yang sama. Setelah itu Andatidak bisa kirim pesan lagi, kecuali si penerima membalas pesan sms Anda (biaya sms : Rp.500).
Selamat Mencoba!!
Created with the Freeware Edition of HelpNDoc: Free PDF documentation generator

experiment
MENJALANKAN MULTIMEDIA DI UBUNTU
Audacious Audio Player
Audacious merupakan aplikasi audio player (support mp3) yang memiliki fungsi sama dengan winamp di Windows.Secara tampilan audacious sama dengan winamp, serta cara penggunaannya pun 95% sama.Instalasi
1. Buka aplikasi Synaptic Package Manager dengan meng-klik menu System âಯ> Administrations âಯ>Synaptic Package Manager;
2. Search dengan keyword ಯaudaciousಯ;
3. Klik kanan pada paket audacious dan pilih Mark For Installation dan klik tombol Apply;
4. Atau melalui terminal, dengan mengetikkan perintah berikut :
$ sudo apt-get install audacious
PenggunaanUntuk menjalankan aplikasi audacious klik menu Applications âಳ Sound & Video âಳ Audacious.
Audacious Skins
Audacious skin merupakan kumpulan skin diantaranya seperti skin winamp.Instalasi
1. Paket audacious skin berisi skin player salah satunya adalah skin winamp;
2. Download paket audacious skin
3. Double klik pada paket yang sudah Anda download tadi maka sebuah jendela Package Installer akanmuncul. Klik pada tombol Install Package untuk menginstal Audacious Skins;
4. Klik kanan pada player audacious kemudian pilih menu Preferences;
5. Pada tab Appearance pilihÃಭ skin Winamp5-XMMS, kemudian klik tombol Close untuk menutup jendelaPreferences;
6. Berikut tampilan Audacious yang telah menggunakan winamp skin.
Totem Movie Player
Totem Movie Player merupakan default player video pada Ubuntu. Namun untuk menjalankan video file berformatavi atau mpeg harus menginstall beberapa codecs agar bisa memainkan file tersebut.Instalasi Codecs
1. Buka aplikasi Synaptic Package Manager dengan meng-klik menu System âಯ> Administrations âಯ>Synaptic Package Manager;
2. Search dengan keyword ಯgstreamerಯ;
Created with the Freeware Edition of HelpNDoc: Free PDF documentation generator

3. Klik kanan pada paket gstreamer0.10-ffmpeg, gstreamer0.10-pitfdll, gstreamer0.10-plugins-bad,gstreamer0.10-plugins-bad-multiverse, gstreamer0.10-plugins-ugly,gstreamer0.10-plugins-ugly-multiverse, dan pilih Mark For Installation dan klik tombol Apply;
4. Atau melalui terminal, dengan mengetikkan perintah berikut :
$ sudo apt-get install gstreamer0.10-ffmpeg gstreamer0.10-pitfdll gstreamer0.10-plugins-badgstreamer0.10-plugins-bad-multiverse gstreamer0
PenggunaanUntuk menjalankan aplikasi audacious klik menu Applications âಳ Sound & Video âಳ Movie Player.
SMPlayer
Merupakan aplikasi alternative front end dari aplikasi Mplayer, tampilan lebih user friendly dan navigasinya cukupmudah digunakan.Instalasi
1. Buka aplikasi Synaptic Package Manager dengan meng-klik menu System âಯ> Administrations âಯ>Synaptic Package Manager;
2. Search dengan keyword ಯmplayer-noguiರ dan ಯsmplayerರ ;
3. Klik kanan pada paket mplayer-nogui dan smplayer, kemudian pilih Mark For Installation dan klik tombolApply;
4. Atau melalui terminal, dengan mengetikkan perintah berikut :
$ sudo apt-get install mplayer-nogui smplayer
PenggunaanUntuk menjalankan aplikasi audacious klik menu Applications âಳ Sound & Video âಳ SMPlayer.
Win32 codec
Merupakan codec Win32 yang digunakan oleh SMPlayer.Instalasi
1. Download paket Win32 codec di sini.;
2. Double klik pada paket yang sudah Anda download tadi maka sebuah jendela Package Installer akanmuncul. Klik pada tombol Install Package untuk menginstal Win32 codec;
3. Untuk uji coba codec, buka file video atau movie yang berformat avi dengan mengklik kanan file dan pilihmenu Open with ಯ SMPlayerರ .
Semoga Bermanfaat!!
Referensi :
http://ugos.ugm.ac.id/wiki/panduan:ubuntu_8.10_intrepid_ibex:video_dan_musik_di_ubuntu
Created with the Freeware Edition of HelpNDoc: Free PDF documentation generator

SHERIQUE soft
Penasaran nggak sob dengan judul Tips Membuat Komputer Kita Berbicara?? pasti penasaran kan?? Emangkomputer bisa berbicara?? Dibilang nggak ya nggak dibilang bisa ya bisa, aduhhh, gimana sih?? jadi bingung ni. Oke,kalau binGung mendingan kita coba praktikan aja, biar lebih mudeng. Talk Less Do More,,, Hehehe
1. Pertama, buka notepad.
2. Copy-Paste script berikut :Dim msg, sapimsg = InputBox ( "Apa yang Anda ingin saya katakan?", "Masukan kata-kata")Set sapi = CreateObject ( "sapi.spvoice")sapi.Speak msg
3. Save as, kemudian pilih all files lalu kasih nama mirza.vbs
4. Selesai
Coba sekarang anda klik 2x.. Gimana?? keren kan?? hehe
Atau kalau yang nggak mau menggunakan InputBox (Jadi pas di klik 2x langsung berbicara tanpa perlu memasukankata-kata). Scriptnya seperti ini :
Dim msg, sapimsg = "Ganti dengan kata-kata anda"Set sapi = CreateObject ( "sapi.spvoice")sapi.Speak msg
Created with the Freeware Edition of HelpNDoc: Free PDF documentation generator

Tips ini sudah saya coba dan hasilnya : 100% Tested n Worked..!!
Selamat Mencoba
SHERIQUE soft
Remaster Ubuntu LiveCD Dengan ReconstructorOn Sunday, 2 March 2008 Category: Remaster LiveCD, Ubuntu GNU/LinuxTags:reconstructor, remaster, ubuntu
Beberapa waktu yang lalu kita sudah mencoba me-remaster Ubuntu LiveCD menggunakan metode manual. kali inisaya akan mengajak anda melakukan remaster menggunakan reconstructor. Reconstructor adalah tools GUI untukmeremaster HANYA Ubuntu/Xubuntu LiveCD atau installer.
Apa Sih Reconstructor Itu?
Reconstructor is an Ubuntu GNU/Linux CD Creator.It uses the Desktop(Live), Alternate(Install), or Server disc as a base, and then allows for usercustomization.For the Ubuntu Desktop base, you can customize the entire environment. For instance, you canadd/remove software, change the default look (splash, themes, fonts, wallpaper, etc.), add desktop links,etc.For the Alternate and Server bases, you can add any additional software to the disc that you would likeinstalled.Reconstructor is written in python and is licensed under the GNU General Public License (GPL).
Mengapa hanya bisa digunakan untuk Ubuntu/Xubuntu?
Karena Ubuntu/Xubuntu menggunakan desktop berbasis GTK dan menggunakan Display Manager yang sama(GDM), jadi pengguna yang paling banyak mendapatkan keuntungan dari Reconstructor adalah anda yangme-remaster Ubuntu atau Xubuntu LiveCD/Install CD saja.
Sedangkan anda yang menggunakan Kubuntu atau lainnya, hanya mampu melakukan beberapa kustomasi saja.
Langkah 1. Menginstall Reconstructor
Silahkan mendownload recostructor di http://reconstructor.aperantis.com.
Saat artikel ini ditulis, tersedia recontructor versi 2.7.
Untuk menginstall, lakukan:
sudo dpkg -i path/reconstructor-xx.deb
Untuk menjalankan reconstructor, Start Menu >> Application >> System Tools>> Reconstructor
Langkah 2. Pre-check (modul, dependency)
Setelah dijalankan, reconstructor akan membuka sebuah terminal. Saat ini reconstructor akan mengecek keberadaan paket-paket dantools serta modul yang terinstal di sistem anda. Perhatikan pesan yang dikeluarkan reconstructor, pastikan anda melengkapi lebihdulu kekurangan paket sebelum memulai.
Langkah 3. Select task live or install
Created with the Freeware Edition of HelpNDoc: Free PDF documentation generator

Saat ini anda diijinkan memilih task atau pekerjaan apa yang akan dibuat. Di sini kta akan memilih LiveCD.
Langkah 4. Create direktori (working dir, live root)
Reconstructor akan membuat beberapa direktori di home folder anda. Secara default, reconstructor akan membuat sebuah direktori,reconstructor. dan didalamnya akan dibuat tiga direktori lagi:
· root untuk mengkopi isi filesystem.squashfs atau live system
· initrd untuk mengkompilasi intrd yang baru
· remaster untuk meletakkan file-file kopian dari CD yang akan dikompilasi menjadi ISO
Langkah 5. Copying LiveCD
Langkah 6. Extracting Squashfs fs
Langkah 5 dan 6 serta langkah terakhir ini memakan waktu cukup lama. hampir semua resource PC digunakan.
Langkah 7. Customizing
· Customizing Boot Usplash dan GNOME Splash
Saat ini anda harus menyiapkan sebuah file png dengan ukuran 640 x 400 pixel dan indexed 16 color untuk Dapper.Sedangkan untuk Gutsy anda perlu menyiapkan sebuah file png dengan ukuran 800×600 dan 256 warna indexed.
Klik tombol generate untuk membuat/mengkonversi file png anda menjadi file usplash.so. Kemudian masukkan lokasinya difield usplash location.
Sedangkan untuk GNOME splash, silahkan ikuti tutorial ini.
· Customizing Gnome
Di sini sepertinya tidak ada masalah. Anda pasti bisa melakukannya. Jika anda memiliki ikon set sendiri, letakkan di direktori/usr/share/icons/ pada direktori kerja reconstructor anda (root).
Jika anda ingin merubah ikon start menu, ikuti tutorial ini.
· Customizing Apt Sources
· Optimizing Boot Process
· Customizing Reconstructor Modules
Modul-modul yang terdaftar di tab ini akan didownload, jadi siapkan koneksi internet anda.
· Customizing User
Saya rasa ini juga mudah. Silahkan manfaatkan sesukanya. Jika anda set password, anda akan menghadapi login screenlebih dulu (? not tested yet)
Langkah 8. Using Reconstructor Terminal
Bagaimana menggunakan reconstructor terminal untuk kustomasi? Klik ikon terminal di bawah jendela reconstructor.
Langkah 9. Manual Customizing
Jika anda memiliki paket sendiri yang sudah anda download atau kompilasi sendiri dan akan anda install, kopikan file tersebut kedirektori kerja reconstructor/root/ dan eksekusi menggunakan dpkg.
Jika anda menggunakan repository lokal (DVD/ISO), gunakan perintah berikut ini:
Download paket-paket dari repo lokal:
sudo apt-get -d install
Created with the Freeware Edition of HelpNDoc: Free PDF documentation generator

Kopi file hasi download ke direktori kerja reconstructor, pada contoh lomuntu-tmp.
cp /var/cache/apt/archive/* /home/amrinz/reconstructor/root/lomuntu-tmp/
Kemudian untuk menginstallnya, lakukan ini dari reconstructor terminal.
cd lomuntu-tmp
dpkg -i *
Jika program yang akan anda tambahkan bukan paket deb, seperti xampp dan flash plugin. Gunakan cara ini. Kopi kan folder lamppke direktori /opt di direktori kerja reconstructor (root/opt). Untuk mengkopi, anda bisa menggunakan thunar atau nautilus sebagairoot.
Screnshoot dibawah ini menunjukkan proses instalasi flash plugin dari adobe.
Langkah yang sama juga berlaku untuk paket lain, misalnya wine.
Langkah 10. Building ISO files
Ini adalah langkah terakhir, jika anda sudah siap, silahkan klik rebuild.
Catatan:Milik saya sendiri mengalami error, metacity tidak berjalan saat masuk desktop, jadi window tidak memiliki dekorasi border.
Lampiran:
· Screenshot
Finish!
Writen by mirza syaikhul kamalPermalinks: Remaster Ubuntu LiveCD Dengan Reconstructor
Artikel ini ditulis dengan harapan bisa memberi manfaat bagi anda. Anda DIIJINKAN untuk mem-publikasi-kanulang artikel ini dengan atau tanpa modifikasi untuk keperluan NON-KOMERSIAL
Created with the Freeware Edition of HelpNDoc: Free PDF documentation generator

SHERIQUE soft
Wine for Debian Lenny, Squeeze and Sid Debian-based distributions utilize a special tool for managing packages known as APT. APT is able to automagicallyinstall all of the needed dependencies for a software package, as well as keep the package up to date, by scanningwhat are known as APT repositories. Debian-based distributions have their own repositories of software that includeWine, however we keep our own repository of the latest available beta packages here for download.
Warning: These are beta packagesThis means they will periodically suffer from regressions, and as a result an update may breakfunctionality in Wine. If the latest stable release of Wine (currently Wine 1.2) works for you, then youmay not want to use these beta packages.
This repository contains packages for i386 and amd64 architecture.
To install wine packages you can use two methods: add the repository or download a .deb package and manuallyinstall it, but first of all you have to remove older wine version. If you use the first method you'll have wineautomatically upgraded by apt, otherwise you'll need to manually download and install every new version.
Remove old versionOpen a terminalsu #to log as rootapt-get remove libwine wine #to remove outdated version of wine
Method 1: Add the repositoryOpen a terminalsu #to log as rootgedit /etc/apt/sources.list #to open repository file with a text editor (you can use gedit or another)Add this line for Lenny: deb http://www.lamaresh.net/apt lenny mainAdd this line for Squeeze: deb http://www.lamaresh.net/apt squeeze mainAdd this line for Sid: deb http://www.lamaresh.net/apt sid mainSave and close sources.listwget -O - http://www.lamaresh.net/apt/key.gpg | apt-key add - #to add gpg keyapt-get update #to update package listapt-get install wine #to install latest wine version
Method 2: Download .deb and manually install itChose a .deb package from binary list and save it in your home directoryOpen a terminalcd ~ #to go to your home directorysu #to log as rootdpkg -i wine_1.1.xxx.deb #change xxx with your chosen package, this will install wineHomepage: http://www.lamaresh.net/Repository maintainer: Maurilio GenovesePackage builder: Ben Klein
genisoimage is a pre-mastering program to generate ISO9660/Joliet/HFS hybrid filesystems.
genisoimage is capable of generating the System Use Sharing Protocol records (SUSP) specified by the RockRidge Interchange Protocol. This is used to further describe the files in the ISO9660 filesystem to a Unix host, and
Created with the Freeware Edition of HelpNDoc: Free PDF documentation generator

provides information such as long filenames, UID/GID, POSIX permissions, symbolic links, and block and characterdevice files.
If Joliet or HFS hybrid command line options are specified, genisoimage will create the additional filesystemmetadata needed for Joliet or HFS. Otherwise genisoimage will generate a pure ISO9660 filesystem.
genisoimage can generate a true (or shared) HFS hybrid filesystem. The same files are seen as HFS files whenaccessed from a Macintosh and as ISO9660 files when accessed from other machines. HFS stands for HierarchicalFile System and is the native filesystem used on Macintosh computers.
As an alternative, genisoimage can generate the Apple Extensions to ISO9660 for each file. These extensionsprovide each file with CREATOR, TYPE and certain Finder flags when accessed from a Macintosh. See the HFSMACINTOSH FILE FORMATS section below.
genisoimage takes a snapshot of a given directory tree, and generates a binary image which will correspond to anISO9660 and/or HFS filesystem when written to a block device.
Each file written to the ISO9660 filesystem must have a filename in the 8.3 format (up to 8 characters, period, up to3 characters, all uppercase), even if Rock Ridge is in use. This filename is used on systems that are not able to makeuse of the Rock Ridge extensions (such as MS-DOS), and each filename in each directory must be different from theother filenames in the same directory. genisoimage generally tries to form correct names by forcing the Unix filenameto uppercase and truncating as required, but often this yields unsatisfactory results when the truncated names are notall unique. genisoimage assigns weightings to each filename, and if two names that are otherwise the same are found,the name with the lower priority is renamed to include a 3-digit number (guaranteed to be unique). For example, thetwo files foo.bar and foo.bar.~1~ could be rendered as FOO.BAR;1 and FOO000.BAR;1.
When used with various HFS options, genisoimage will attempt to recognise files stored in a number of Apple/Unixfile formats and will copy the data and resource forks as well as any relevant Finder information. See the HFSMACINTOSH FILE FORMATS section below for more about formats genisoimage supports.
Note that genisoimage is not designed to communicate with the writer directly. Most writers have proprietarycommand sets which vary from one manufacturer to another, and you need a specialized tool to actually burn thedisc. wodim is one such tool. The latest version of wodim is available from http://www.cdrkit.org/.
pathspec is the path of the directory tree to be copied into the ISO9660 filesystem. Multiple paths can be specified,and genisoimage will merge the files found in all of the specified path components to form the filesystem image.
If the option -graft-points has been specified, it is possible to graft the paths at points other than the root directory,and it is possible to graft files or directories onto the cdrom image with names different than what they have in thesource filesystem. This is easiest to illustrate with a couple of examples. Let's start by assuming that a local file ../old.lis exists, and you wish to include it in the cdrom image.
foo/bar/=../old.lis
will include old.lis in the cdrom image at /foo/bar/old.lis, while
foo/bar/xxx=../old.lis
will include old.lis in the cdrom image at /foo/bar/xxx. The same sort of syntax can be used with directories as well.genisoimage will create any directories required such that the graft points exist on the cdrom image -- the directoriesdo not need to appear in one of the paths. By default, any directories that are created on the fly like this will havepermissions 0555 and appear to be owned by the person running genisoimage. If you wish other permissions orowners of the intermediate directories, see -uid, -gid, -dir-mode, -file-mode and -new-dir-mode.
genisoimage will also run on Windows machines when compiled with Cygnus' cygwin (available fromhttp://www.cygwin.com/). Therefore most references in this man page to Unix can be replaced with Win32.
Created with the Freeware Edition of HelpNDoc: Free PDF documentation generator

OptionsSeveral options can be specified as defaults in a .genisoimagerc configuration file, as well as on the command line. Ifa parameter is specified in both places, the setting from the command line is used. For details on the format andpossible locations of this file, see genisoimagerc(5).
-abstract file Specifies the abstract filename. There is space for 37 characters. Equivalent to ABST in the .genisoimagercfile.
-A application_id Specifies a text string that will be written into the volume header. This should describe the application that willbe on the disc. There is space for 128 characters. Equivalent to APPI in the .genisoimagerc file.
-allow-limited-size When processing files larger than 2GiB which cannot be easily represented in ISO9660, add them with ashrunk visible file size to ISO9660 and with the correct visible file size to the UDF system. The result is aninconsistent filesystem and users need to make sure that they really use UDF rather than ISO9660 driver toread a such disk. Implies enabling -udf.
-allow-leading-dots -ldots
Allow ISO9660 filenames to begin with a period. Usually, a leading dot is replaced with an underscore inorder to maintain MS-DOS compatibility.This violates the ISO9660 standard, but it happens to work on many systems. Use with caution.
-allow-lowercase This options allows lowercase characters to appear in ISO9660 filenames.This violates the ISO9660 standard, but it happens to work on some systems. Use with caution.
-allow-multidot This options allows more than one dot to appear in ISO9660 filenames. A leading dot is not affected by thisoption, it may be allowed separately using -allow-leading-dots.This violates the ISO9660 standard, but it happens to work on many systems. Use with caution.
-biblio file Specifies the bibliographic filename. There is space for 37 characters. Equivalent to BIBL in the.genisoimagerc file.
-cache-inodes -no-cache-inodes
Enable or disable caching inode and device numbers to find hard links to files. If genisoimage finds a hardlink (a file with multiple names), the file will also be hard-linked on the CD, so the file contents only appearonce. This helps to save space. -cache-inodes is default on Unix-like operating systems, but-no-cache-inodes is default on some other systems such as Cygwin, because it is not safe to assume thatinode numbers are unique on those systems. (Some versions of Cygwin create fake inode numbers using aweak hashing algorithm, which may produce duplicates.) If two files have the same inode number but are nothard links to the same file, genisoimage -cache-inodes will not behave correctly. -no-cache-inodes is safein all situations, but in that case genisoimage cannot detect hard links, so the resulting CD image may belarger than necessary.
-alpha-bootalpha_boot_image Specifies the path and filename of the boot image to be used when making an Alpha/SRM bootable CD. Thepathname must be relative to the source path specified to genisoimage.
-hppa-bootloader hppa_bootloader_image Specifies the path and filename of the boot image to be used when making an HPPA bootable CD. Thepathname must be relative to the source path specified to genisoimage. Other options are required, at thevery least a kernel filename and a boot command line. See the HPPA NOTES section below for moreinformation.
-hppa-cmdline hppa_boot_command_line
Created with the Freeware Edition of HelpNDoc: Free PDF documentation generator

Specifies the command line to be passed to the HPPA boot loader when making a bootable CD. Separatethe parameters with spaces or commas. More options must be passed to genisoimage, at the very least akernel filename and the boot loader filename. See the HPPA NOTES section below for more information.
-hppa-kernel-32 hppa_kernel_32 -hppa-kernel-64hppa_kernel_64
Specifies the path and filename of the 32-bit and/or 64-bit kernel images to be used when making an HPPAbootable CD. The pathnames must be relative to the source path specified to genisoimage. Other optionsare required, at the very least the boot loader filename and the boot command line. See the HPPA NOTESsection below for more information.
-hppa-ramdiskhppa_ramdisk_image Specifies the path and filename of the ramdisk image to be used when making an HPPA bootable CD. Thepathname must be relative to the source path specified to genisoimage. This parameter is optional. Otheroptions are required, at the very least a kernel filename and the boot command line. See the HPPA NOTESsection below for more information.
-mips-boot mips_boot_image Specifies the path and filename of the boot image to be used when making an SGI/big-endian MIPS bootableCD. The pathname must be relative to the source path specified to genisoimage. This option may bespecified several times, to store up to 15 boot images.
-mipsel-boot mipsel_boot_image Specifies the path and filename of the boot image to be used when making an DEC/little-endian MIPSbootable CD. The pathname must be relative to the source path specified to genisoimage.
-B img_sun4,img_sun4c,img_sun4m,img_sun4d,img_sun4e -sparc-boot img_sun4,img_sun4c,img_sun4m,img_sun4d,img_sun4e
Specifies a comma-separated list of boot images that are needed to make a bootable CD for SPARCsystems. Partition 0 is used for the ISO9660 image, the first image file is mapped to partition 1. Thecomma-separated list may have up to 7 fields, including empty fields. This option is required to make abootable CD for Sun SPARC systems. If -B or -sparc-boot has been specified, the first sector of theresulting image will contain a Sun disk label. This disk label specifies slice 0 for the ISO9660 image and slices1 to 7 for the boot images that have been specified with this option. Byte offsets 512 to 8191 within each ofthe additional boot images must contain a primary boot that works for the appropriate SPARC architecture.The rest of each of the images usually contains a UFS filesystem used for the primary kernel boot stage.
The implemented boot method is the one found with SunOS 4.x and SunOS 5.x. However, it does not depend on SunOS internals but only on properties of the Open Boot prom, so it shouldbe usable for any OS for SPARC systems. For more information also see the NOTES section below.
If the special filename ... is used, the actual and all following boot partitions are mapped to the previous partition. If genisoimage iscalled with -G image -B ... all boot partitions are mapped to the partition that contains the ISO9660filesystem image and the generic boot image that is located in the first 16 sectors of the disc is used for allarchitectures.
-G generic_boot_image Specifies the path and filename of the generic boot image to be used when making a generic bootable CD.The boot image will be placed on the first 16 sectors of the CD, before the ISO9660 primary volumedescriptor. If this option is used together with -sparc-boot, the Sun disk label will overlay the first 512 bytesof the generic boot image.
-b eltorito_boot_image Specifies the path and filename of the boot image to be used when making an El Torito bootable CD for x86PCs. The pathname must be relative to the source path specified to genisoimage. This option is required tomake an El Torito bootable CD. The boot image must be exactly 1200 kB, 1440 kB or 2880 kB, and genisoimage will use this size when creating the output ISO9660 filesystem. The PC BIOS will use theimage to emulate a floppy disk, so the first 512-byte sector should contain PC boot code. This will work, forexample, if the boot image is a LILO-based boot floppy.
If the boot image is not an image of a floppy, you need to add either
Created with the Freeware Edition of HelpNDoc: Free PDF documentation generator

-hard-disk-boot or -no-emul-boot. If the system should not boot off the emulated disk, use -no-boot. If
-sort has not been specified, the boot images are sorted with low priority (+2) to the beginning of themedium. If you don't like this, you need to specify a sort weight of 0 for the boot images.
-eltorito-alt-boot Start with a new set of El Torito boot parameters. Up to 63 El Torito boot entries may be stored on a singleCD.
-hard-disk-boot Specifies that the boot image used to create El Torito bootable CDs is a hard disk image. The image mustbegin with a master boot record that contains a single partition.
-no-emul-boot Specifies that the boot image used to create El Torito bootable CDs is a "no emulation" image. The systemwill load and execute this image without performing any disk emulation.
-no-boot Specifies that the created El Torito CD should be marked as not bootable. The system will provide anemulated drive for the image, but will boot off a standard boot device.
-boot-load-seg segment_address Specifies the load segment address of the boot image for no-emulation El Torito CDs.
-boot-load-sizeload_sectors Specifies the number of "virtual" (512-byte) sectors to load in no-emulation mode. The default is to load theentire boot file. Some BIOSes may have problems if this is not a multiple of 4.
-boot-info-table Specifies that a 56-byte table with information of the CD-ROM layout will be patched in at offset 8 in theboot file. If this option is given, the boot file is modified in the source filesystem, so make a copy of this fileif it cannot be easily regenerated! See the EL TORITO BOOT INFO TABLE section for a description ofthis table.
-C last_sess_start,next_sess_start This option is needed to create a CD Extra or the image of a second session or a higher-level session for amultisession disc. -C takes two numbers separated by a comma. The first is the first sector in the last sessionof the disc that should be appended to. The second number is the starting sector number of the new session.The correct numbers may be retrieved by calling wodim -msinfo ... If -C is used in conjunction with -M,genisoimage will create a filesystem image that is intended to be a continuation of the previous session. If -Cis used without -M, genisoimage will create a filesystem image that is intended to be used for a secondsession on a CD Extra. This is a multisession CD that holds audio data in the first session and an ISO9660filesystem in the second session.
-c boot_catalog Specifies the path and filename of the boot catalog, which is required for an El Torito bootable CD. Thepathname must be relative to the source path specified to genisoimage. This file will be inserted into theoutput tree and not created in the source filesystem, so be sure the specified filename does not conflict withan existing file, or it will be excluded. Usually a name like boot.catalog is chosen.
If -sort has not been specified, the boot catalog sorted with low priority (+1) to the beginning of the medium. Ifyou don't like this, you need to specify a sort weight of 0 for the boot catalog.
-check-oldnames Check all filenames imported from the old session for compliance with the ISO9660 file naming rules.Without this option, only names longer than 31 characters are checked, as these files are a serious violation ofthe ISO9660 standard.
-check-sessionfile Check all old sessions for compliance with actual genisoimage ISO9660 file naming rules. This is ahigh-level option that combines -M file -C 0,0 -check-oldnames. For the parameter file, see the descriptionof -M.
-copyrightfile
Created with the Freeware Edition of HelpNDoc: Free PDF documentation generator

Specifies copyright information, typically a filename on the disc. There is space for 37 characters. Equivalentto COPY in the .genisoimagerc file.
-d Do not append a period to files that do not have one.This violates the ISO9660 standard, but it happens to work on many systems. Use with caution.
-D Do not use deep directory relocation, and instead just pack them in the way we see them.If ISO9660:1999 has not been selected, this violates the ISO9660 standard, but it happens to work on manysystems. Use with caution.
-dir-mode mode Overrides the mode of directories used to create the image to mode, specified as 4 digits of permission bitsas in chmod(1). This option automatically enables Rock Ridge extensions.
-dvd-video Generate a DVD-Video compliant UDF filesystem. This is done by sorting the order of the content of theappropriate files and by adding padding between the files if needed. Note that the sorting only works if theDVD-Video filenames include uppercase characters only.
Note that in order to get a DVD-Video compliant filesystem image, you need to prepare a DVD-Video compliant directory tree. This requires a directory VIDEO_TS (all caps) inthe root directory of the resulting DVD, and usually another directory AUDIO_TS. VIDEO_TS needs toinclude all needed files (filenames must be all caps) for a compliant DVD-Video filesystem.
-f Follow symbolic links when generating the filesystem. When this option is not in use, symbolic links will beentered using Rock Ridge if enabled, otherwise they will be ignored.
-file-mode mode Overrides the mode of regular files used to create the image to mode, specified as 4 digits of permission bitsas in chmod(1). This option automatically enables Rock Ridge extensions.
-gid gid Overrides the group ID read from the source files to the value of gid. Specifying this option automaticallyenables Rock Ridge extensions.
-gui Switch the behaviour for a GUI. This currently makes the output more verbose but may have other effects inthe future.
-graft-points Allow use of graft points for filenames. If this option is used, all filenames are checked for graft points. Thefilename is divided at the first unescaped equal sign. All occurrences of 'rs' and '=' characters must beescaped with 'rs' if -graft-points has been specified.
-hide glob Hide any files matching glob, a shell wildcard pattern, from being seen in the ISO9660 or Rock Ridgedirectory. glob may match any part of the filename or path. If glob matches a directory, the contents of thatdirectory will be hidden. In order to match a directory name, make sure the pathname does not include atrailing '/' character. All the hidden files will still be written to the output CD image file. See also -hide-joliet,and README.hide. This option may be used multiple times.
-hide-list file A file containing a list of shell wildcards to be hidden. See -hide.
-hidden glob Add the hidden (existence) ISO9660 directory attribute for files and directories matching glob, a shellwildcard pattern. This attribute will prevent the files from being shown by some MS-DOS and Windowscommands. glob may match any part of the filename or path. In order to match a directory name, make surethe pathname does not include a trailing '/' character. This option may be used multiple times.
-hidden-list file A file containing a list of shell wildcards to get the hidden attribute. See -hidden.
-hide-joliet glob
Created with the Freeware Edition of HelpNDoc: Free PDF documentation generator

Hide files and directories matching glob, a shell wildcard pattern, from being seen in the Joliet directory. globmay match any part of the filename or path. If glob matches a directory, the contents of that directory will behidden. In order to match a directory name, make sure the pathname does not include a trailing '/' character.All the hidden files will still be written to the output CD image file. This option is usually used with -hide. Seealso README.hide. This option may be used multiple times.
-hide-joliet-list file A file containing a list of shell wildcards to be hidden from the Joliet tree. See -hide-joliet.
-hide-joliet-trans-tbl Hide the TRANS.TBL files from the Joliet tree. These files usually don't make sense in the Joliet world as theylist the real name and the ISO9660 name which may both be different from the Joliet name.
-hide-rr-moved Rename the directory RR_MOVED to .rr_moved in the Rock Ridge tree. It seems to be impossible tocompletely hide the RR_MOVED directory from the Rock Ridge tree. This option only makes the visible treeless confusing for people who don't know what this directory is for. If you need to have no RR_MOVEDdirectory at all, you should use -D. Note that if -D has been specified, the resulting filesystem is not ISO9660level-1 compliant and will not be readable on MS-DOS. See also the NOTES section.
-input-charset charset Input charset that defines the characters used in local filenames. To get a list of valid charset names, call genisoimage -input-charset help. To get a 1:1 mapping, you may use default as charset name. The defaultinitial values are cp437 on DOS-based systems and iso8859-1 on all other systems. See theCHARACTER SETS section below for more details.
-output-charset charset Output charset that defines the characters that will be used in Rock Ridge filenames. Defaults to the inputcharset. See CHARACTER SETS section below for more details.
-iso-level level Set the ISO9660 conformance level. Valid numbers are 1 to 4.
With level 1, files may only consist of one section and filenames are restricted to 8.3 characters.
With level 2, files may only consist of one section. With level 3, no restrictions (other than ISO-9660:1988) do apply. With all ISO9660 levels from 1 to 3, all filenames are restricted to
uppercase letters, numbers and underscores (_). Filenames are limited to 31 characters, directory nesting islimited to 8 levels, and pathnames are limited to 255 characters.
Level 4 officially does not exist but genisoimage maps it to ISO-9660:1999, which is ISO9660 version 2.
With level 4, an enhanced volume descriptor with version number and file structure version number set to 2 is emitted. Directory nesting is not limited to 8 levels, there is noneed for a file to contain a dot and the dot has no special meaning, filenames do not have version numbers,and filenames can be up to 207 characters long, or 197 characters if Rock Ridge is used.
When creating Version 2 images, genisoimage emits an enhanced volume descriptor, similar but not identical to a primary volume descriptor.Be careful not to use broken software to make ISO9660 images bootable by assuming a second PVD copyand patching this putative PVD copy into an El Torito VD.
-J Generate Joliet directory records in addition to regular ISO9660 filenames. This is primarily useful when thediscs are to be used on Windows machines. Joliet filenames are specified in Unicode and each pathcomponent can be up to 64 Unicode characters long. Note that Joliet is not a standard -- only MicrosoftWindows and Linux systems can read Joliet extensions. For greater portability, consider using both Joliet andRock Ridge extensions.
-joliet-long Allow Joliet filenames to be up to 103 Unicode characters, instead of 64. This breaks the Joliet specification,but appears to work. Use with caution.
Created with the Freeware Edition of HelpNDoc: Free PDF documentation generator

-jcharset charset A combination of -J -input-charset charset. See the CHARACTER SETS section below for moredetails.
-l Allow full 31-character filenames. Normally the ISO9660 filename will be in an 8.3 format which iscompatible with MS-DOS, even though the ISO9660 standard allows filenames of up to 31 characters. Ifyou use this option, the disc may be difficult to use on a MS-DOS system, but will work on most othersystems. Use with caution.
-L Outdated option; use -allow-leading-dots instead.
-jigdo-jigdo jigdo_file Produce a jigdo .jigdo metadata file as well as the filesystem image. See the JIGDO NOTES section belowfor more information.
-jigdo-template template_file Produce a jigdo .template file as well as the filesystem image. See the JIGDO NOTES section below formore information.
-jigdo-min-file-size size Specify the minimum size for a file to be listed in the .jigdo file. Default (and minimum allowed) is 1KB. Seethe JIGDO NOTES section below for more information.
-jigdo-force-md5path Specify a file pattern where files must be contained in the externally-supplied MD5 list as supplied by-md5-list. See the JIGDO NOTES section below for more information.
-jigdo-exclude path Specify a file pattern where files will not be listed in the .jigdo file. See the JIGDO NOTES section belowfor more information.
-jigdo-map path Specify a pattern mapping for the jigdo file (e.g. Debian=/mirror/debian). See the JIGDO NOTES sectionbelow for more information.
-md5-list md5_file Specify a file containing the MD5sums, sizes and pathnames of the files to be included in the .jigdo file. Seethe JIGDO NOTES section below for more information.
-log-file log_file Redirect all error, warning and informational messages to log_file instead of the standard error.
-mglob Exclude files matching glob, a shell wildcard pattern, from being written to CD-ROM. glob may match eitherthe filename component or the full pathname. This option may be used multiple times. For example:
genisoimage -o rom -m '*.o' -m core -m foobar
would exclude all files ending in '.o', or called core or foobar from the image. Note that if you had a directorycalled foobar, it too (and of course all its descendants) would be excluded.
-exclude-list file A file containing a list of shell wildcards to be excluded. See -m.
-max-iso9660-filenames Allow ISO9660 filenames to be up to 37 characters long. This option enables -N as the extra name space istaken from the space reserved for file version numbers.This violates the ISO9660 standard, but it happens to work on many systems. Although a conformingapplication needs to provide a buffer space of at least 37 characters, discs created with this option may causea buffer overflow in the reading operating system. Use with extreme care.
-M path -Mdevice -dev device
Specifies path to existing ISO9660 image to be merged. The alternate form takes a SCSI device specifier
Created with the Freeware Edition of HelpNDoc: Free PDF documentation generator

that uses the same syntax as the dev= parameter of wodim. The output of genisoimage will be a newsession which should get written to the end of the image specified in -M. Typically this requires multisessioncapability for the CD recorder used to write the image. This option may only be used in conjunction with -C.
-N Omit version numbers from ISO9660 filenames.This violates the ISO9660 standard, but no one really uses the version numbers anyway. Use with caution.
-new-dir-mode mode Specify the mode, a 4-digit number as used in chmod(1), to use when creating new directories in thefilesystem image. The default is 0555.
-nobak -no-bak
Exclude backup files files on the ISO9660 filesystem; that is, filenames that contain the characters '~' or '#' orend in .bak. These are typically backup files for Unix text editors.
-force-rr Do not use the automatic Rock Ridge attributes recognition for previous sessions. This can work aroundproblems with images created by, e.g., NERO Burning ROM.
-no-rr Do not use the Rock Ridge attributes from previous sessions. This may help to avoid problems when genisoimage finds illegal Rock Ridge signatures on an old session.
-no-split-symlink-components Don't split the symlink components, but begin a new Continuation Area (CE) instead. This may waste somespace, but the SunOS 4.1.4 cdrom driver has a bug in reading split symlink components.
It is questionable whether this option is useful nowadays. -no-split-symlink-fields
Don't split the symlink fields, but begin a new Continuation Area (CE) instead. This may waste some space,but the SunOS 4.1.4 and Solaris 2.5.1 cdrom driver have a bug in reading split symlink fields (a '/' can bedropped).
It is questionable whether this option is useful nowadays. -o filename
Specify the output file for the the ISO9660 filesystem image. This can be a disk file, a tape drive, or it cancorrespond directly to the device name of the optical disc writer. If not specified, stdout is used. Note thatthe output can also be a block device for a regular disk partition, in which case the ISO9660 filesystem canbe mounted normally to verify that it was generated correctly.
-pad Pad the end of the whole image by 150 sectors (300 kB). This option is enabled by default. If used incombination with -B, padding is inserted between the ISO9660 partition and the boot partitions, such that thefirst boot partition starts on a sector number that is a multiple of 16.
The padding is needed as many operating systems (e.g. Linux) implement read-ahead bugs in their filesystem I/O. These bugs result in read errors on files that are locatednear the end of a track, particularly if the disc is written in Track At Once mode, or where a CD audio trackfollows the data track.
-no-pad Do not pad the end by 150 sectors (300 kB) and do not make the the boot partitions start on a multiple of16 sectors.
-path-list file A file containing a list of pathspec directories and filenames to be added to the ISO9660 filesystem. This listof pathspecs are processed after any that appear on the command line. If the argument is -, the list is readfrom the standard input.
-P Outdated option; use -publisher instead.
-publisher publisher_id Specifies a text string that will be written into the volume header. This should describe the publisher of the
Created with the Freeware Edition of HelpNDoc: Free PDF documentation generator

CD-ROM, usually with a mailing address and phone number. There is space for 128 characters. Equivalentto PUBL in the .genisoimagerc file.
-p preparer_id Specifies a text string that will be written into the volume header. This should describe the preparer of theCD-ROM, usually with a mailing address and phone number. There is space for 128 characters. Equivalentto PREP in the .genisoimagerc file.
-print-size Print estimated filesystem size in multiples of the sector size (2048 bytes) and exit. This option is needed forDisk At Once mode and with some CD-R drives when piping directly into wodim, cases where wodimneeds to know the size of the filesystem image in advance. Old versions of mkisofs wrote this information(among other information) to stderr. As this turns out to be hard to parse, the number without any otherinformation is now printed on stdout too. If you like to write a simple shell script, redirect stderr and catchthe number from stdout. This may be done with:
cdblocks=' genisoimage -print-size -quiet ... '
genisoimage ... | wodim ... tsize=${cdblocks}s -
-quiet This makes genisoimage even less verbose. No progress output will be provided.
-R Generate SUSP and RR records using the Rock Ridge protocol to further describe the files on the ISO9660filesystem.
-r This is like the -R option, but file ownership and modes are set to more useful values. The uid and gid are setto zero, because they are usually only useful on the author's system, and not useful to the client. All the fileread bits are set true, so that files and directories are globally readable on the client. If any execute bit is setfor a file, set all of the execute bits, so that executables are globally executable on the client. If any search bitis set for a directory, set all of the search bits, so that directories are globally searchable on the client. Allwrite bits are cleared, because the filesystem will be mounted read-only in any case. If any of the specialmode bits are set, clear them, because file locks are not useful on a read-only filesystem, and set-id bits arenot desirable for uid 0 or gid 0. When used on Win32, the execute bit is set on all files. This is a result of thelack of file permissions on Win32 and the Cygwin POSIX emulation layer. See also -uid, -gid, -dir-mode,-file-mode and -new-dir-mode.
-relaxed-filenames Allows ISO9660 filenames to include all 7-bit ASCII characters except lowercase letters.This violates the ISO9660 standard, but it happens to work on many systems. Use with caution.
-root dir Moves all files and directories into dir in the image. This is essentially the same as using -graft-points andadding dir in front of every pathspec, but is easier to use. dir may actually be several levels deep. It iscreated with the same permissions as other graft points.
-old-root dir This option is necessary when writing a multisession image and the previous (or even older) session waswritten with -root dir. Using a directory name not found in the previous session causes genisoimage toabort with an error. Without this option, genisoimage would not be able to find unmodified files and wouldbe forced to write their data into the image once more. -root and -old-root are meant to be used together todo incremental backups. The initial session would e.g. use: genisoimage -root backup_1 dirs. The nextincremental backup with genisoimage -root backup_2 -old-root backup_1 dirs would take anothersnapshot of these directories. The first snapshot would be found in backup_1, the second one in backup_2,but only modified or new files need to be written into the second session. Without these options, new fileswould be added and old ones would be preserved. But old ones would be overwritten if the file wasmodified. Recovering the files by copying the whole directory back from CD would also restore files thatwere deleted intentionally. Accessing several older versions of a file requires support by the operating systemto choose which sessions are to be mounted.
Created with the Freeware Edition of HelpNDoc: Free PDF documentation generator

-sortsort_file Sort file locations on the media. Sorting is controlled by a file that contains pairs of filenames and sortingoffset weighting. If the weighting is higher, the file will be located closer to the beginning of the media, if theweighting is lower, the file will be located closer to the end of the media. There must be only one space ortabs character between the filename and the weight and the weight must be the last characters on a line. Thefilename is taken to include all the characters up to, but not including the last space or tab character on a line.This is to allow for space characters to be in, or at the end of a filename. This option does not sort the orderof the filenames that appear in the ISO9660 directory. It sorts the order in which the file data is written to theCD image, which is useful in order to optimize the data layout on a CD. See README.sort for moredetails.
-sparc-bootimg_sun4,img_sun4c,img_sun4m,img_sun4d,img_sun4e See -B above.
-sparc-labellabel Set the Sun disk label name for the Sun disk label that is created with -sparc-boot.
-split-output Split the output image into several files of approximately 1 GB each. This helps to create DVD-sizedISO9660 images on operating systems without large file support. wodim will concatenate more than one fileinto a single track if writing to a DVD. To make -split-output work, -o filename must be specified. Theresulting output images will be named: filename_00, filename_01, filename_02....
-stream-media-size # Select streaming operation and set the media size to # sectors. This allows you to pipe the output of the tar(1) program into genisoimage and to create an ISO9660 filesystem without the need of an intermediatetar archive file. If this option has been specified, genisoimage reads from stdin and creates a file with thename STREAM.IMG. The maximum size of the file (with padding) is 200 sectors less than the specifiedmedia size. If -no-pad has been specified, the file size is 50 sectors less than the specified media size. If thefile is smaller, genisoimage will write padding. This may take awhile.
The option -stream-media-size creates simple ISO9660 filesystems only and may not used together with multisessionor hybrid filesystem options.
-stream-file-namename Reserved for future use.
-sunx86-boot UFS_img,,,AUX1_img Specifies a comma-separated list of filesystem images that are needed to make a bootable CD for Solarisx86 systems.
Note that partition 1 is used for the ISO9660 image and that partition 2 is the whole disk, so partition 1 and 2 may not be used by external partition data. The first image file is mappedto partition 0. There may be empty fields in the comma-separated list, and list entries for partition 1 and 2must be empty. The maximum number of supported partitions is 8 (although the Solaris x86 partition tablecould support up to 16 partitions), so it is impossible to specify more than 6 partition images. This option isrequired to make a bootable CD for Solaris x86 systems.
If -sunx86-boot has been specified, the first sector of the resulting image will contain a PC fdisk label with aSolaris type 0x82 fdisk partition that starts at offset 512 and spans the whole CD. In addition, for the Solaristype 0x82 fdisk partition, there is a SVr4 disk label at offset 1024 in the first sector of the CD. This disk labelspecifies slice 0 for the first (usually UFS type) filesystem image that is used to boot the PC and slice 1 for theISO9660 image. Slice 2 spans the whole CD slice 3 ... slice 7 may be used for additional filesystem imagesthat have been specified with this option.
A Solaris x86 boot CD uses a 1024 byte sized primary boot that uses the El-Torito no-emulation boot mode and a secondary generic boot that is in CD sectors 1..15. For thisreason, both -b bootimage -no-emul-boot and -Ggenboot must be specified.
-sunx86-label label Set the SVr4 disk label name for the SVr4 disk label that is created with -sunx86-boot.
Created with the Freeware Edition of HelpNDoc: Free PDF documentation generator

-sysid ID Specifies the system ID. There is space for 32 characters. Equivalent to SYSI in the .genisoimagerc file.
-T Generate a file TRANS.TBL in each directory on the CD-ROM, which can be used on non-RockRidge-capable systems to help establish the correct filenames. There is also information present in the file thatindicates the major and minor numbers for block and character devices, and each symlink has the name ofthe link file given.
-table-name table_name Alternative translation table filename (see above). Implies -T. If you are creating a multisession image youmust use the same name as in the previous session.
-ucs-level level Set Unicode conformance level in the Joliet SVD. The default level is 3. It may be set to 1..3 using thisoption.
-udf Include UDF filesystem support in the generated filesystem image. UDF support is currently in alpha statusand for this reason, it is not possible to create UDF-only images. UDF data structures are currently coupledto the Joliet structures, so there are many pitfalls with the current implementation. There is no UID/GIDsupport, there is no POSIX permission support, there is no support for symlinks. Note that UDF wastes thespace from sector ~20 to sector 256 at the beginning of the disc in addition to the space needed for realUDF data structures.
-uid uid Overrides the uid read from the source files to the value of uid. Specifying this option automatically enablesRock Ridge extensions.
-use-fileversion The option -use-fileversion allows genisoimage to use file version numbers from the filesystem. If theoption is not specified, genisoimage creates a version number of 1 for all files. File versions are strings in therange ;1 to ;32767 This option is the default on VMS.
-U Allows "untranslated" filenames, completely violating the ISO9660 standards described above. Enables thefollowing flags: -d -l -N -allow-leading-dots -relaxed-filenames -allow-lowercase -allow-multidot-no-iso-translate. Allows more than one '.' character in the filename, as well as mixed-case filenames. This isuseful on HP-UX, where the built-in cdfs filesystem does not recognize any extensions. Use with extremecaution.
-no-iso-translate Do not translate the characters '#' and '~' which are invalid for ISO9660 filenames. Although invalid, thesecharacters are often used by Microsoft systems.This violates the ISO9660 standard, but it happens to work on many systems. Use with caution.
-V volid Specifies the volume ID (volume name or label) to be written into the master block. There is space for 32characters. Equivalent to VOLI in the .genisoimagerc file. The volume ID is used as the mount point by theSolaris volume manager and as a label assigned to a disc on various other platforms such as Windows andApple Mac OS.
-volsetID Specifies the volume set ID. There is space for 128 characters. Equivalent to VOLS in the .genisoimagercfile.
-volset-size # Sets the volume set size to #. The volume set size is the number of CDs that are in a CD volume set. Avolume set is a collection of one or more volumes, on which a set of files is recorded.
Volume Sets are not intended to be used to create a set numbered CDs that are part of e.g. a Operation System installation set of CDs. Volume Sets are rather used to record a bigdirectory tree that would not fit on a single volume. Each volume of a Volume Set contains a description of allthe directories and files that are recorded on the volumes where the sequence numbers are less than, or equal
Created with the Freeware Edition of HelpNDoc: Free PDF documentation generator

to, the assigned Volume Set Size of the current volume. genisoimage
currently does not support a -volset-size that is larger than 1. The option
-volset-size must be specified before -volset-seqno on each command line. -volset-seqno #
Sets the volume set sequence number to #. The volume set sequence number is the index number of thecurrent CD in a CD set. The option -volset-size must be specified before -volset-seqno on each commandline.
-v Verbose execution. If given twice on the command line, extra debug information will be printed.
-x glob Identical to -m glob.
-z Generate special RRIP records for transparently compressed files. This is only of use and interest for hoststhat support transparent decompression, such as Linux 2.4.14 or later. You must specify -R or -r to enableRock Ridge, and generate compressed files using the mkzftree utility before running genisoimage. Notethat transparent compression is a nonstandard Rock Ridge extension. The resulting disks are onlytransparently readable if used on Linux. On other operating systems you will need to call mkzftree by handto decompress the files.
Hfs Options-hfs
Create an ISO9660/HFS hybrid CD. This option should be used in conjunction with the -map, -magicand/or the various double dash options given below.
-apple Create an ISO9660 CD with Apple's extensions. Similar to -hfs, except that the Apple Extensions toISO9660 are added instead of creating an HFS hybrid volume. Former genisoimage versions did includeRock Ridge attributes by default if -apple was specified. This versions of genisoimage does not do thisanymore. If you like to have Rock Ridge attributes, you need to specify this separately.
-map mapping_file Use the mapping_file to set the CREATOR and TYPE information for a file based on the filename'sextension. A filename is mapped only if it is not one of the know Apple/Unix file formats. See the HFSCREATOR/TYPE section below.
-magic magic_file The CREATOR and TYPE information is set by using a file's magic number (usually the first few bytes of afile). The magic_file is only used if a file is not one of the known Apple/Unix file formats, or the filenameextension has not been mapped using -map. See the HFS CREATOR/TYPE section below for moredetails.
-hfs-creator creator Set the default CREATOR for all files. Must be exactly 4 characters. See the HFS CREATOR/TYPEsection below for more details.
-hfs-type type Set the default TYPE for all files. Must be exactly 4 characters. See the HFS CREATOR/TYPE sectionbelow for more details.
-probe Search the contents of files for all the known Apple/Unix file formats. See the HFS MACINTOSH FILEFORMATS section below for more about these formats. However, the only way to check for MacBinaryand AppleSingle files is to open and read them, so this option may increase processing time. It is better touse one or more double dash options given below if the Apple/Unix formats in use are known.
-no-desktop Do not create (empty) Desktop files. New HFS Desktop files will be created when the CD is used on a
Created with the Freeware Edition of HelpNDoc: Free PDF documentation generator

Macintosh (and stored in the System Folder). By default, empty Desktop files are added to the HFSvolume.
-mac-name Use the HFS filename as the starting point for the ISO9660, Joliet and Rock Ridge filenames. See the HFSMACINTOSH FILENAMES section below for more information.
-boot-hfs-file driver_file Installs the driver_file that may make the CD bootable on a Macintosh. See the HFS BOOT DRIVERsection below. (Alpha).
-part Generate an HFS partition table. By default, no partition table is generated, but some older MacintoshCD-ROM drivers need an HFS partition table on the CD-ROM to be able to recognize a hybridCD-ROM.
-auto AutoStart_file Make the HFS CD use the QuickTime 2.0 Autostart feature to launch an application or document. The givenfilename must be the name of a document or application located at the top level of the CD. The filename mustbe less than 12 characters. (Alpha).
-cluster-sizesize Set the size in bytes of the cluster or allocation units of PC Exchange files. Implies --exchange. See the HFSMACINTOSH FILE FORMATS section below.
-hide-hfs glob Hide glob, a shell wildcard pattern, from the HFS volume. The file or directory will still exist in the ISO9660and/or Joliet directory. glob may match any part of the filename. Multiple globs may be excluded. Example:
genisoimage -o rom -hfs -hide-hfs '*.o' -hide-hfs foobar
would exclude all files ending in '.o' or called foobar from the HFS volume. Note that if you had a directorycalled foobar, it too (and of course all its descendants) would be excluded. The glob can also be a pathname relative to the source directories given on the command line. Example:
genisoimage -o rom -hfs -hide-hfs src/html src
would exclude just the file or directory called html from the src directory. Any other file or directory calledhtml in the tree will not be excluded. Should be used with -hide and/or -hide-joliet. In order to match adirectory name, make sure the pattern does not include a trailing '/' character. See README.hide for moredetails.
-hide-hfs-list file Specify a file containing a list of wildcard patterns to be hidden as in -hide-hfs.
-hfs-volid hfs_volid Volume name for the HFS partition. This is the name that is assigned to the disc on a Macintosh and replacesthe volid used with -V.
-icon-position Use the icon position information, if it exists, from the Apple/Unix file. The icons will appear in the sameposition as they would on a Macintosh desktop. Folder location and size on screen, its scroll positions, folderView (view as Icons, Small Icons, etc.) are also preserved. (Alpha).
-root-infofile Set the location, size on screen, scroll positions, folder View etc. for the root folder of an HFS volume. See README.rootinfo for more information. (Alpha)
-prep-boot file PReP boot image file. Up to 4 are allowed. See README.prep_boot for more information. (Alpha)
-input-hfs-charset charset Input charset that defines the characters used in HFS filenames when used with -mac-name. The defaultcharset is cp10000 (Mac Roman). See the CHARACTER SETS and HFS MACINTOSHFILENAMES sections below for more details.
Created with the Freeware Edition of HelpNDoc: Free PDF documentation generator

-output-hfs-charset charset Output charset that defines the characters that will be used in the HFS filenames. Defaults to the inputcharset. See the CHARACTER SETS section below for more details.
-hfs-unlock By default, genisoimage will create an HFS volume that is locked. This option leaves the volume unlockedso that other applications (e.g. hfsutils) can modify the volume. See the HFSPROBLEMS/LIMITATIONS section below for warnings about using this option.
-hfs-bless folder_name "Bless" the given directory (folder). This is usually the System Folder and is used in creating HFS bootableCDs. The name of the directory must be the whole path name as genisoimage sees it. E.g., if the givenpathspec is ./cddata and the required folder is called System Folder, the whole path name isdq/cddata/System Folderdq (remember to use quotes if the name contains spaces).
-hfs-parms parameters Override certain parameters used to create the HFS filesystem. Unlikely to be used in normal circumstances.See the libhfs_iso/hybrid.h source file for details.
--cap Look for AUFS CAP Macintosh files. Search for CAP Apple/Unix file formats only. Searching for the otherpossible Apple/Unix file formats is disabled, unless other double dash options are given.
--netatalk Look for NETATALK Macintosh files
--double Look for AppleDouble Macintosh files
--ethershare Look for Helios EtherShare Macintosh files
--ushare Look for IPT UShare Macintosh files
--exchange Look for PC Exchange Macintosh files
--sgi Look for SGI Macintosh files
--xinet Look for XINET Macintosh files
--macbin Look for MacBinary Macintosh files
--single Look for AppleSingle Macintosh files
--dave Look for Thursby Software Systems DAVE Macintosh files
--sfm Look for Microsoft's Services for Macintosh files (NT only) (Alpha)
--osx-double Look for Mac OS X AppleDouble Macintosh files
--osx-hfs Look for Mac OS X HFS Macintosh files
Character Setsgenisoimage processes filenames in a POSIX-compliant way as strings of 8-bit characters. To represent all codingsfor all languages, 8-bit characters are not sufficient. Unicode or ISO-10646 define character codings that need atleast 21 bits to represent all known languages. They may be represented with UTF-32, UTF-16 or UTF-8 coding.UTF-32 uses a plain 32-bit coding but seems to be uncommon. UTF-16 is used by Microsoft with Win32 with thedisadvantage that 16-bit characters are not compliant with the POSIX filesystem interface.
Created with the Freeware Edition of HelpNDoc: Free PDF documentation generator

Modern Unix operating systems may use UTF-8 coding for filenames. Each 32-bit character is represented by oneor more 8-bit characters. If a character is coded in ISO-8859-1 (used in Central Europe and North America) is maps1:1 to a UTF-32 or UTF-16 coded Unicode character. If a character is coded in 7-Bit ASCII (used in USA andother countries with limited character set) is maps 1:1 to a UTF-32, UTF-16 or UTF-8 coded Unicode character.Character codes that cannot be represented as a single byte in UTF-8 (if the value is > 0x7F) use escape sequencesthat map to more than one 8-bit character.
If all operating systems used UTF-8, genisoimage would not need to recode characters in filenames. Unfortunately,Apple uses completely nonstandard codings and Microsoft uses a Unicode coding that is not compatible with thePOSIX filename interface.
For all non-UTF-8-coded operating systems, the actual character that each byte represents depends on the character set or codepage (the name used by Microsoft) used by the local operating system -- the characters in acharacter set will reflect the region or natural language set by the user.
Usually character codes 0x00-0x1f are control characters, codes 0x20-0x7f are the 7-bit ASCII characters and (onPCs and Macs) 0x80-0xff are used for other characters.
As there are a lot more than 256 characters/symbols in use, only a small subset are represented in a character set.Therefore the same character code may represent a different character in different character sets. So a filenamegenerated, say in central Europe, may not display the same character when viewed on a machine in, say easternEurope.
To make matters more complicated, different operating systems use different character sets for the region orlanguage. For example, the character code for ''e' (small e with acute accent) may be character code 0x82 on a PC,code 0x8e on a Macintosh, code 0xe9 on a Unix system in western Europe, and code 0x000e9 in Unicode.
As long as not all operating systems and applications use the same character set as the basis for filenames, it may benecessary to specify which character set your filenames use in and which character set the filenames should appear onthe CD.
There are four options to specify the character sets you want to use:
-input-charset Defines the local character set you are using on your host machine. Any character set conversions that takeplace will use this character set as the starting point. The default input character sets are cp437 onMS-DOS-based systems and iso8859-1 on all other systems. If -J is given, the Unicode equivalents of theinput character set will be used in the Joliet directory. -jcharset is the same as -input-charset -J.
-output-charset Defines the character set that will be used with for the Rock Ridge names on the CD. Defaults to the inputcharacter set.
-input-hfs-charset Defines the HFS character set used for HFS filenames decoded from any of the various Apple/Unix fileformats. Only useful when used with -mac-name. See the HFS MACINTOSH FILENAMES for moreinformation. Defaults to cp10000 (Mac Roman).
-output-hfs-charset Defines the HFS character set used to create HFS filenames from the input character set in use. In mostcases this will be from the character set given with -input-charset. Defaults to the input HFS character set.
There are a number of character sets built in to genisoimage. To get a listing, use -input-charset help. This listdoesn't include the charset derived from the current locale, if genisoimage is built with iconv support.
Additional character sets can be read from file for any of the character set options by giving a filename as theargument to the options. The given file will only be read if its name does not match one of the built-in character sets.
Created with the Freeware Edition of HelpNDoc: Free PDF documentation generator

The format of the character set files is the same as the mapping files available from http://www.unicode.org/Public/MAPPINGS. This format is:
Column #1 is the input byte code (in hex as 0xXX)
Column #2 is the Unicode (in hex as 0xXXXX)The rest of the line is ignored.
Any blank line, line without two (or more) columns in the above format or comments lines (starting with the #character) are ignored without any warnings. Any missing input code is mapped to Unicode character 0x0000.
Note that, while UTF-8 is supported, other Unicode encodings such as UCS-2/UTF-16 and UCS-4/UTF-32 arenot, as POSIX operating systems cannot handle them natively.
A 1:1 character set mapping can be defined by using the keyword default as the argument to any of the character setoptions. This is the behaviour of old versions of mkisofs.
The ISO9660 filenames generated from the input filenames are not converted from the input character set. TheISO9660 character set is a very limited subset of the ASCII characters, so any conversion would be pointless.
Any character that genisoimage cannot convert will be replaced with a '_' character.
Hfs Creator/TypeA Macintosh file has two properties associated with it which define which application created the file, the CREATORand what data the file contains, the TYPE. Both are (exactly) 4 letter strings. Usually this allows a Macintosh user todouble-click on a file and launch the correct application etc. The CREATOR and TYPE of a particular file can befound by using something like ResEdit (or similar) on a Macintosh.
The CREATOR and TYPE information is stored in all the various Apple/Unix encoded files. For other files it ispossible to base the CREATOR and TYPE on the filename's extension using a mapping file (with -map) and/orusing the magic number (usually a signature in the first few bytes) of a file (with -magic). If both these options aregiven, their order on the command line is significant. If -map is given first, a filename extension match is attemptedbefore a magic number match. However, if -magic is given first, a magic number match is attempted before afilename extension match.
If a mapping or magic file is not used, or no match is found, the default CREATOR and TYPE for all regular files canbe set by using entries in the .genisoimagerc file or using -hfs-creator and/or -hfs-type, otherwise the defaultCREATOR and TYPE are Unix and TEXT.
The format of the mapping file is the same afpfile format as used by aufs. This file has five columns for theextension, file translation, CREATOR, TYPE and Comment. Lines starting with the '#' character are commentlines and are ignored. An example file would be like:
# Example filename mapping file # # EXTN XLate CREATOR TYPE Comment .tif Raw '8BIM' 'TIFF' "Photoshop TIFF image" .hqx Ascii 'BnHq' 'TEXT' "BinHex file" .doc Raw 'MSWD' 'WDBN' "Word file" .mov Raw 'TVOD' 'MooV' "QuickTime Movie" * Ascii 'ttxt' 'TEXT' "Text file"
Where:
The first column EXTN defines the Unix filename extension to be mapped. The default mapping for any filename extension thatdoesn't match is defined with the '*' character.
Created with the Freeware Edition of HelpNDoc: Free PDF documentation generator

The Xlate column defines the type of text translation between the Unix and Macintosh file it is ignored bygenisoimage, but is kept to be compatible with aufs(1). Although genisoimage does not alter the contentsof a file, if a binary file has its TYPE set as TEXT, it may be read incorrectly on a Macintosh. Therefore abetter choice for the default TYPE may be ????.
The CREATOR and TYPE keywords must be 4 characters long and enclosed in single quotes.
The comment field is enclosed in double quotes -- it is ignored by genisoimage, but is kept to be compatible with aufs.
The format of the magic file is almost identical to the magic(5) file used by the file(1) command.
This file has four tab-separated columns for the byte offset, type, test and message. Lines starting with the '#'character are comment lines and are ignored. An example file would be like:
# Example magic file # # off type test message 0 string GIF8 8BIM GIFf GIF image 0 beshort 0xffd8 8BIM JPEG image data 0 string SIT! SIT! SIT! StuffIt Archive 0 string rs037rs235 LZIV ZIVU standard Unix compress 0 string rs037rs213 GNUz ZIVU gzip compressed data 0 string %! ASPS TEXT Postscript 0 string rs004%! ASPS TEXT PC Postscript with a ^D to start 4 string moov txtt MooV QuickTime movie file (moov) 4 string mdat txtt MooV QuickTime movie file (mdat)
The format of the file is described in magic(5). The only difference here is that for each entry in the magic file, themessage for the initial offset must be be 4 characters for the CREATOR followed by 4 characters for the TYPE --white space is optional between them. Any other characters on this line are ignored. Continuation lines (starting with a'>') are also ignored, i.e., only the initial offset lines are used.
Using -magic may significantly increase processing time as each file has to opened and read to find its magic number.
In summary, for all files, the default CREATOR is Unix and the default TYPE is TEXT. These can be changed byusing entries in the .genisoimagerc file or by using -hfs-creator and/or -hfs-type.
If the a file is in one of the known Apple/Unix formats (and the format has been selected), the CREATOR and TYPEare taken from the values stored in the Apple/Unix file.
Other files can have their CREATOR and TYPE set from their filename extension (with -map), or their magic number(with -magic). If the default match is used in the mapping file, these values override the default CREATOR andTYPE.
A full CREATOR/TYPE database can be found at http://www.angelfire.com/il/szekely/.
Hfs Macintosh File FormatsMacintosh files have two parts called the Data and Resource fork. Either may be empty. Unix (and many otherOSs) can only cope with files having one part (or fork). To add to this, Macintosh files have a number of attributesassociated with them -- probably the most important are the TYPE and CREATOR. Again, Unix has no concept ofthese types of attributes.
E.g., a Macintosh file may be a JPEG image where the image is stored in the Data fork and a desktop thumbnailstored in the Resource fork. It is usually the information in the data fork that is useful across platforms.
Created with the Freeware Edition of HelpNDoc: Free PDF documentation generator

Therefore to store a Macintosh file on a Unix filesystem, a way has to be found to cope with the two forks and theextra attributes (which are referred to as the Finder info). Unfortunately, it seems that every software package thatstores Macintosh files on Unix has chosen a completely different storage method.
The Apple/Unix formats that genisoimage (partially) supports are:
CAP AUFS format Data fork stored in a file. Resource fork in subdirectory .resource with same filename as data fork. Finderinfo in subdirectory .finderinfo with same filename.
AppleDouble/Netatalk Data fork stored in a file. Resource fork stored in a file with same name prefixed with '%'. Finder info alsostored in same '%' file. Netatalk uses the same format, but the resource fork/Finder info stored insubdirectory .AppleDouble with same filename as data fork.
AppleSingle Data structures similar to above, except both forks and Finder info are stored in one file.
Helios EtherShare Data fork stored in a file. Resource fork and Finder info together in subdirectory .rsrc with same filename asdata fork.
IPT UShare Like the EtherShare format, but the Finder info is stored slightly differently.
MacBinary Both forks and Finder info stored in one file.
Apple PC Exchange Used by Macintoshes to store Apple files on DOS (FAT) disks. Data fork stored in a file. Resource fork insubdirectory resource.frk (or RESOURCE.FRK). Finder info as one record in file finder.dat (orFINDER.DAT). Separate finder.dat for each data fork directory.
Note: genisoimage needs to know the native FAT cluster size of the disk that the PC Exchange files are on (orhave been copied from). This size is given by -cluster-size. The cluster or allocation size can be found byusing the DOS utility chkdsk.
May not work with PC Exchange v2.2 or higher files (available with MacOS 8.1). DOS media containing PC Exchange files should be mounted as type msdos (not vfat) when using Linux.
SGI/XINET Used by SGI machines when they mount HFS disks. Data fork stored in a file. Resource fork insubdirectory .HSResource with same filename. Finder info as one record in file .HSancillary. Separate.HSancillary for each data fork directory.
Thursby Software Systems DAVE Allows Macintoshes to store Apple files on SMB servers. Data fork stored in a file. Resource fork insubdirectory resource.frk. Uses the AppleDouble format to store resource fork.
Services for Macintosh Format of files stored by NT Servers on NTFS filesystems. Data fork is stored as filename. Resource forkstored as a NTFS stream called filename:AFP_Resource. The Finder info is stored as a NTFS streamcalled filename:Afp_AfpInfo. NTFS streams are normally invisible to the user.
Warning: genisoimage only partially supports the SFM format. If an HFS file or folder stored on the NT servercontains an illegal NT character in its name, NT converts these characters to Private Use Unicodecharacters. The characters are: dq * / < > ? rs | and a space or period if it is the last character of the filename,character codes 0x01 to 0x1f (control characters) and Apple's apple logo.
Unfortunately, these private Unicode characters are not readable by the genisoimage NT executable. Therefore any file or directory name containing these characters will beignored -- including the contents of any such directory.
Mac OS X AppleDouble When HFS/HFS+ files are copied or saved by Mac OS X on to a non-HFS filesystem (e.g. UFS, NFS
Created with the Freeware Edition of HelpNDoc: Free PDF documentation generator

etc.), the files are stored in AppleDouble format. Data fork stored in a file. Resource fork stored in a file withsame name prefixed with '._'. Finder info also stored in same '._' file.
Mac OS X HFS (Alpha) Not really an Apple/Unix encoding, but actual HFS/HFS+ files on a Mac OS X system. Data fork stored ina file. Resource fork stored in a pseudo file with the same name with the suffix /rsrc. The Finder info is onlyavailable via a Mac OS X library call.
See also README.macosx.
Only works when used on Mac OS X. If a file is found with a zero
length resource fork and empty finderinfo, it is assumed not to have any Apple/Unix encoding -- therefore aTYPE and CREATOR can be set using other methods.
genisoimage will attempt to set the CREATOR, TYPE, date and possibly other flags from the finder info.Additionally, if it exists, the Macintosh filename is set from the finder info, otherwise the Macintosh name is based onthe Unix filename -- see the HFS MACINTOSH FILENAMES section below.
When using -apple, the TYPE and CREATOR are stored in the optional System Use or SUSP field in the ISO9660Directory Record -- in much the same way as the Rock Ridge attributes are. In fact to make life easy, the Appleextensions are added at the beginning of the existing Rock Ridge attributes (i.e., to get the Apple extensions you getthe Rock Ridge extensions as well).
The Apple extensions require the resource fork to be stored as an ISO9660 associated file. This is just like anynormal file stored in the ISO9660 filesystem except that the associated file flag is set in the Directory Record (bit 2).This file has the same name as the data fork (the file seen by non-Apple machines). Associated files are normallyignored by other OSs
When using -hfs, the TYPE and CREATOR plus other finder info, are stored in a separate HFS directory, not visibleon the ISO9660 volume. The HFS directory references the same data and resource fork files described above.
In most cases, it is better to use -hfs instead of -apple, as the latter imposes the limited ISO9660 characters allowedin filenames. However, the Apple extensions do give the advantage that the files are packed on the disk moreefficiently and it may be possible to fit more files on a CD.
Hfs Macintosh FilenamesWhere possible, the HFS filename that is stored with an Apple/Unix file is used for the HFS part of the CD.However, not all the Apple/Unix encodings store the HFS filename with the finderinfo. In these cases, the Unixfilename is used -- with escaped special characters. Special characters include '/' and characters with codes over127.
AUFS escapes these characters by using ':' followed by the character code as two hex digits. Netatalk andEtherShare have a similar scheme, but uses '%' instead of a ':'.
If genisoimage cannot find an HFS filename, it uses the Unix name, with any %xx or :xx characters (xx are two hexdigits) converted to a single character code. If xx are not hex digits ([0-9a-fA-F]), they are left alone -- although anyremaining ':' is converted to '%', as ':' is the HFS directory separator. Care must be taken, as an ordinary Unix filewith %xx or :xx will also be converted. e.g.
This:2fFile converted to This/File
This:File converted to This%File
This:t7File converted to This%t7File
Although HFS filenames appear to support uppercase and lowercase letters, the filesystem is case-insensitive, i.e.,the filenames aBc and AbC are the same. If a file is found in a directory with the same HFS name, genisoimage will
Created with the Freeware Edition of HelpNDoc: Free PDF documentation generator

attempt to make a unique name by adding '_' characters to one of the filenames.
If an HFS filename exists for a file, genisoimage can use this name as the starting point for the ISO9660, Joliet andRock Ridge filenames using -mac-name. Normal Unix files without an HFS name will still use their Unix name. e.g.
If a MacBinary (or PC Exchange) file is stored as someimage.gif.bin on the Unix filesystem, but contains a HFS filecalled someimage.gif, this is the name that would appear on the HFS part of the CD. However, as genisoimageuses the Unix name as the starting point for the other names, the ISO9660 name generated will probably be SOMEIMAG.BIN and the Joliet/Rock Ridge would be someimage.gif.bin. This option will use the HFS filename asthe starting point and the ISO9660 name will probably be SOMEIMAG.GIF and the Joliet/Rock Ridge would besomeimage.gif.
-mac-name will not currently work with -T -- the Unix name will be used in the TRANS.TBL file, not the Macintoshname.
The character set used to convert any HFS filename to a Joliet/Rock Ridge filename defaults to cp10000 (MacRoman). The character set used can be specified using -input-hfs-charset. Other built-in HFS character sets are:cp10006 (MacGreek), cp10007 (MacCyrillic), cp10029 (MacLatin2), cp10079 (MacIcelandandic) and cp10081(MacTurkish).
Note: the character codes used by HFS filenames taken from the various Apple/Unix formats will not be convertedas they are assumed to be in the correct Apple character set. Only the Joliet/Rock Ridge names derived from theHFS filenames will be converted.
The existing genisoimage code will filter out any illegal characters for the ISO9660 and Joliet filenames, but asgenisoimage expects to be dealing directly with Unix names, it leaves the Rock Ridge names as is. But as '/' is alegal HFS filename character, -mac-name converts '/' to a '_' in Rock Ridge filenames.
If the Apple extensions are used, only the ISO9660 filenames will appear on the Macintosh. However, as theMacintosh ISO9660 drivers can use Level 2 filenames, you can use options like -allow-multidot without problemson a Macintosh -- still take care over the names, for example this.file.name will be converted to THIS.FILE i.e.only have one '.', also filename abcdefgh will be seen as ABCDEFGH but abcdefghi will be seen as ABCDEFGHI.i.e. with a '.' at the end -- don't know if this is a Macintosh problem or a genisoimage/mkhybrid problem. Allfilenames will be in uppercase when viewed on a Macintosh. Of course, DOS/Win3.X machines will not be able tosee Level 2 filenames...
Hfs Custom Volume/Folder IconsTo give a HFS CD a custom icon, make sure the root (top level) folder includes a standard Macintosh volume iconfile. To give a volume a custom icon on a Macintosh, an icon has to be pasted over the volume's icon in the "Get Info"box of the volume. This creates an invisible file called Iconrsr ('rsr' is the carriage return character) in the root folder.
A custom folder icon is very similar -- an invisible file called Iconrsr exists in the folder itself.
Probably the easiest way to create a custom icon that genisoimage can use is to format a blank HFS floppy disk ona Mac and paste an icon to its "Get Info" box. If using Linux with the HFS module installed, mount the floppy:
mount -t hfs /dev/fd0 /mnt/floppy
The floppy will be mounted as a CAP filesystem by default. Then run genisoimage using something like:
genisoimage --cap -o output source_dir /mnt/floppy
If you are not using Linux, you can use hfsutils to copy the icon file from the floppy. However, care has to be taken,as the icon file contains a control character. For example:
hmount /dev/fd0
Created with the Freeware Edition of HelpNDoc: Free PDF documentation generator

hdir -ahcopy -m Icon^V^M icon_dir/icon
Where '^V^M' is control-V followed by control-M. Then run genisoimage by using something like:
genisoimage --macbin -o output source_dir icon_dir
The procedure for creating/using custom folder icons is very similar -- paste an icon to folder's "Get Info" box andtransfer the resulting Iconrsr file to the relevant directory in the genisoimage source tree.
You may want to hide the icon files from the ISO9660 and Joliet trees.
To give a custom icon to a Joliet CD, follow the instructions found at http://www.cdrfaq.org/faq03.html#S3-21-1.
Hfs Boot DriverIt may be possible to make the hybrid CD bootable on a Macintosh.
A bootable HFS CD requires an Apple CD-ROM (or compatible) driver, a bootable HFS partition and thenecessary System, Finder, etc. files.
A driver can be obtained from any other Macintosh bootable CD-ROM using the apple_driver utility. This file canthen be used with -boot-hfs-file.
The HFS partition (i.e. the hybrid disk in our case) must contain a suitable System Folder, again from anotherCD-ROM or disk.
For a partition to be bootable, it must have its boot block set. The boot block is in the first two blocks of a partition.For a non-bootable partition the boot block is full of zeros. Normally, when a System file is copied to partition on aMacintosh disk, the boot block is filled with a number of required settings -- unfortunately I don't know the full specfor the boot block, so I'm guessing that the following will work.
Therefore, the utility apple_driver also extracts the boot block from the first HFS partition it finds on the givenCD-ROM and this is used for the HFS partition created by genisoimage.
Please note: By using a driver from an Apple CD and copying Apple software to your CD, you become liable toobey Apple Computer, Inc. Software License Agreements.
El Torito Boot Information TableWhen -boot-info-table is given, genisoimage will modify the boot file specified by -b by inserting a 56-byte bootinformation table at offset 8 in the file. This modification is done in the source filesystem, so make sure you use a copyif this file is not easily recreated! This file contains pointers which may not be easily or reliably obtained at boot time.
The format of this table is as follows; all integers are in section 7.3.1 ("little endian") format.
Offset Name Size Meaning 8 bi_pvd 4 bytes LBA of primary volume descriptor12 bi_file 4 bytes LBA of boot file16 bi_length 4 bytes Boot file length in bytes20 bi_csum 4 bytes 32-bit checksum24 bi_reserved 40 bytes ReservedThe 32-bit checksum is the sum of all the 32-bit words in the boot
file starting at byte offset 64. All linear block addresses (LBAs) are given in CD sectors (normally 2048bytes).
Hppa NotesTo make a bootable CD for HPPA, at the very least a boot loader file (-hppa-bootloader), a kernel image file(32-bit, 64-bit, or both, depending on hardware) and a boot command line (-hppa-cmdline) must be specified.Some systems can boot either a 32- or a 64-bit kernel, and the firmware will choose one if both are present.
Created with the Freeware Edition of HelpNDoc: Free PDF documentation generator

Optionally, a ramdisk can be used for the root filesystem using -hppa-cmdline.
Jigdo NotesJigdo is a tool to help in the distribution of large files like CD and DVD images; see http://atterer.net/jigdo/ for moredetails. Debian CDs and DVD ISO images are published on the web in jigdo format to allow end users to downloadthem more efficiently.
To create jigdo and template files alongside the ISO image from genisoimage, you must first generate a list of thefiles that will be used, in the following format:
MD5sum File size Path32 chars 12 chars to end of lineThe MD5sum should be written in jigdo's pseudo-base64 format. The file
size should be in decimal, and the path to the file must be absolute.
Once you have this file, call genisoimage with all of your normal command-line parameters. Specify the outputfilenames for the jigdo and template files using -jigdo-jigdo and -jigdo-template, and pass in the location of yourMD5 list with -md5-list.
If there are files that you do NOT want to be added into the jigdo file (e.g. if they are likely to change often), specifythem using -jigdo-ignore. If you want to verify some of the files as they are written into the image, specify them using-jigdo-force-md5. If any files don't match, genisoimage will then abort. Both of these options take regularexpressions as input. It is possible to restrict the set of files that will be used further based on size -- use the-jigdo-min-file-size option.
Finally, the jigdo code needs to know how to map the files it is given onto a mirror-style configuration. Specify howto map paths using -jigdo-map. Using Debian=/mirror/debian will cause all paths starting with /mirror/debian tobe mapped to Debian:<file> in the output jigdo file.
ExamplesTo create a vanilla ISO9660 filesystem image in the file cd.iso, where the directory cd_dir will become the rootdirectory if the CD, call:
% genisoimage -o cd.iso cd_dir
To create a CD with Rock Ridge extensions of the source directory cd_dir:
% genisoimage -o cd.iso -R cd_dir
To create a CD with Rock Ridge extensions of the source directory cd_dir where all files have at least readpermission and all files are owned by root, call:
% genisoimage -o cd.iso -r cd_dir
To write a tar archive directly to a CD that will later contain a simple ISO9660 filesystem with the tar archive call:
% tar cf - . | genisoimage -stream-media-size 333000 | rs
wodim dev=b,t,l -dao tsize=333000s -
To create a HFS hybrid CD with the Joliet and Rock Ridge extensions of the source directory cd_dir:
% genisoimage -o cd.iso -R -J -hfs cd_dir
To create a HFS hybrid CD from the source directory cd_dir that contains Netatalk Apple/Unix files:
% genisoimage -o cd.iso --netatalk cd_dir
To create a HFS hybrid CD from the source directory cd_dir, giving all files CREATOR and TYPES based on justtheir filename extensions listed in the file "mapping".:
% genisoimage -o cd.iso -map mapping cd_dir
Created with the Freeware Edition of HelpNDoc: Free PDF documentation generator

To create a CD with the Apple Extensions to ISO9660, from the source directories cd_dir and another_dir. Files inall the known Apple/Unix format are decoded and any other files are given CREATOR and TYPE based on theirmagic number given in the file magic:
% genisoimage -o cd.iso -apple -magic magic -probe rs
cd_dir another_dir
The following example puts different files on the CD that all have the name README, but have different contentswhen seen as a ISO9660/Rock Ridge, Joliet or HFS CD.
Current directory contains:
% ls -F
README.hfs README.joliet README.Unix cd_dir/
The following command puts the contents of the directory cd_dir on the CD along with the three README files --but only one will be seen from each of the three filesystems:
% genisoimage -o cd.iso -hfs -J -r -graft-points rs
-hide README.hfs -hide README.joliet rs
-hide-joliet README.hfs -hide-joliet README.Unix rs
-hide-hfs README.joliet -hide-hfs README.Unix rs
README=README.hfs README=README.joliet rs
README=README.Unix cd_dir
i.e. the file README.hfs will be seen as README on the HFS CD and the other two README files will behidden. Similarly for the Joliet and ISO9660/Rock Ridge CD.
There are probably all sorts of strange results possible with combinations of the hide options ...
Notesgenisoimage may safely be installed suid root. This may be needed to allow genisoimage to read the previoussession when creating a multisession image.
If genisoimage is creating a filesystem image with Rock Ridge attributes and the directory nesting level of the sourcedirectory tree is too much for ISO9660, genisoimage will do deep directory relocation. This results in a directorycalled RR_MOVED in the root directory of the CD. You cannot avoid this directory.
Many boot code options for different platforms are mutualy exclusive because the boot blocks cannot coexist, ie.different platforms share the same data locations in the image. See http://lists.debian.org/debian-cd/2006/12/msg00109.html for details.
BugsAny files that have hard links to files not in the tree being copied to the ISO9660 filesystem will have an incorrect filereference count.
Does not check for SUSP record(s) in '.' entry of the root directory to verify the existence of Rock Ridgeenhancements. This problem is present when reading old sessions while adding data in multisession mode.
Created with the Freeware Edition of HelpNDoc: Free PDF documentation generator

Does not properly read relocated directories in multisession mode when adding data. Any relocated deep directory islost if the new session does not include the deep directory.
Does not re-use RR_MOVED when doing multisession from TRANS.TBL.
Does not create whole_name entry for RR_MOVED in multisession mode.
There may be other bugs. Please, report them to the maintainers.
Hfs Problems/LimitationsI have had to make several assumptions on how I expect the modified libhfs routines to work, however there may besituations that either I haven't thought of, or come across when these assumptions fail. Therefore I can't guaranteethat genisoimage will work as expected (although I haven't had a major problem yet). Most of the HFS featureswork fine, but some are not fully tested. These are marked as Alpha above.
Although HFS filenames appear to support uppercase and lowercase letters, the filesystem is case-insensitive, i.e.,the filenames aBc and AbC are the same. If a file is found in a directory with the same HFS name, genisoimage willattempt to make a unique name by adding '_' characters to one of the filenames.
HFS file/directory names that share the first 31 characters have '_N' (a decimal number) substituted for the last fewcharacters to generate unique names.
Care must be taken when "grafting" Apple/Unix files or directories (see above for the method and syntax involved). Itis not possible to use a new name for an Apple/Unix encoded file/directory. e.g. If a Apple/Unix encoded file called oldname is to added to the CD, you cannot use the command line:
genisoimage -o output.raw -hfs -graft-points newname=oldname cd_dir
genisoimage will be unable to decode oldname. However, you can graft Apple/Unix encoded files or directories aslong as you do not attempt to give them new names as above.
When creating an HFS volume with the multisession options, -M and -C, only files in the last session will be in theHFS volume. i.e. genisoimage cannot add existing files from previous sessions to the HFS volume.
However, if each session is created with -part, each session will appear as separate volumes when mounted on aMac. In this case, it is worth using -V or -hfs-volid to give each session a unique volume name, otherwise each"volume" will appear on the Desktop with the same name.
Symbolic links (as with all other non-regular files) are not added to the HFS directory.
Hybrid volumes may be larger than pure ISO9660 volumes containing the same data. In some cases (e.g. DVD sizedvolumes) the difference can be significant. As an HFS volume gets bigger, so does the allocation block size (thesmallest amount of space a file can occupy). For a 650MB CD, the allocation block is 10kB, for a 4.7GB DVD itwill be about 70kB.
The maximum number of files in an HFS volume is about 65500 -- although the real limit will be somewhat less thanthis.
The resulting hybrid volume can be accessed on a Unix machine by using the hfsutils routines. However, no changescan be made to the volume as it is set as locked. The option -hfs-unlock will create an output image that is unlocked-- however no changes should be made to the contents of the volume (unless you really know what you are doing) asit's not a "real" HFS volume.
-mac-name will not currently work with -T -- the Unix name will be used in the TRANS.TBL file, not the Macintoshname.
Created with the Freeware Edition of HelpNDoc: Free PDF documentation generator

Although genisoimage does not alter the contents of a file, if a binary file has its TYPE set as TEXT, it may be readincorrectly on a Macintosh. Therefore a better choice for the default TYPE may be ????.
-mac-boot-file may not work at all...
May not work with PC Exchange v2.2 or higher files (available with MacOS 8.1). DOS media containing PCExchange files should be mounted as type msdos (not vfat) when using Linux.
The SFM format is only partially supported -- see HFS MACINTOSH FILE FORMATS section above.
It is not possible to use -sparc-boot or -generic-boot with -boot-hfs-file or -prep-boot.
genisoimage should be able to create HFS hybrid images over 4Gb, although this has not been fully tested.
See Alsogenisoimagerc(5), wodim(1), mkzftree(8), magic(5).
Authorsgenisoimage is derived from mkisofs from the cdrtools 2.01.01a08 package from May 2006 (with few updatesextracted from cdrtools 2.01.01a24 from March 2007) from .IR http://cdrecord.berlios.de/ , but is now part of thecdrkit suite, maintained by Joerg Jaspert, Eduard Bloch, Steve McIntyre, Peter Samuelson, Christian Fromme, BenHutchings, and other contributors. The maintainers can be contacted at [email protected], orsee the cdrkit project web site at http://www.cdrkit.org/.
Eric Youngdale wrote the first versions (1993en1998) of mkisofs. J:org Schilling wrote the SCSI transport libraryand its interface, and has maintained mkisofs since 1999. James Pearson wrote the HFS hybrid code, using libhfsby Robert Leslie. Pearson, Schilling, Jungshik Shin and Jaakko Heinonen contributed to the character set conversioncode. The cdrkit maintainers have maintained genisoimage since 2006.
Copyright 1993-1998 by Yggdrasil Computing, Inc.Copyright 1996-1997 by Robert LeslieCopyright 1997-2001 by James PearsonCopyright 1999-2006 by J:org SchillingCopyright 2007 by J:org Schilling (originating few updates)Copyright 2002-2003 by Jungshik ShinCopyright 2003 by Jaakko HeinonenCopyright 2006 by the Cdrkit maintainersIf you want to take part in the development of genisoimage, you may join the cdrkit developer mailing list byfollowing the instructions on http://alioth.debian.org/mail/?group_id=31006. The email address of the list [email protected]. This is also the address for user support questions. Note that cdrkit andcdrtools are not affiliated.
Created with the Freeware Edition of HelpNDoc: Free PDF documentation generator