panduan ringkas quick start - welcome.hp-ww.comwelcome.hp-ww.com/ctg/manual/c00457781.pdf · bahasa...
TRANSCRIPT
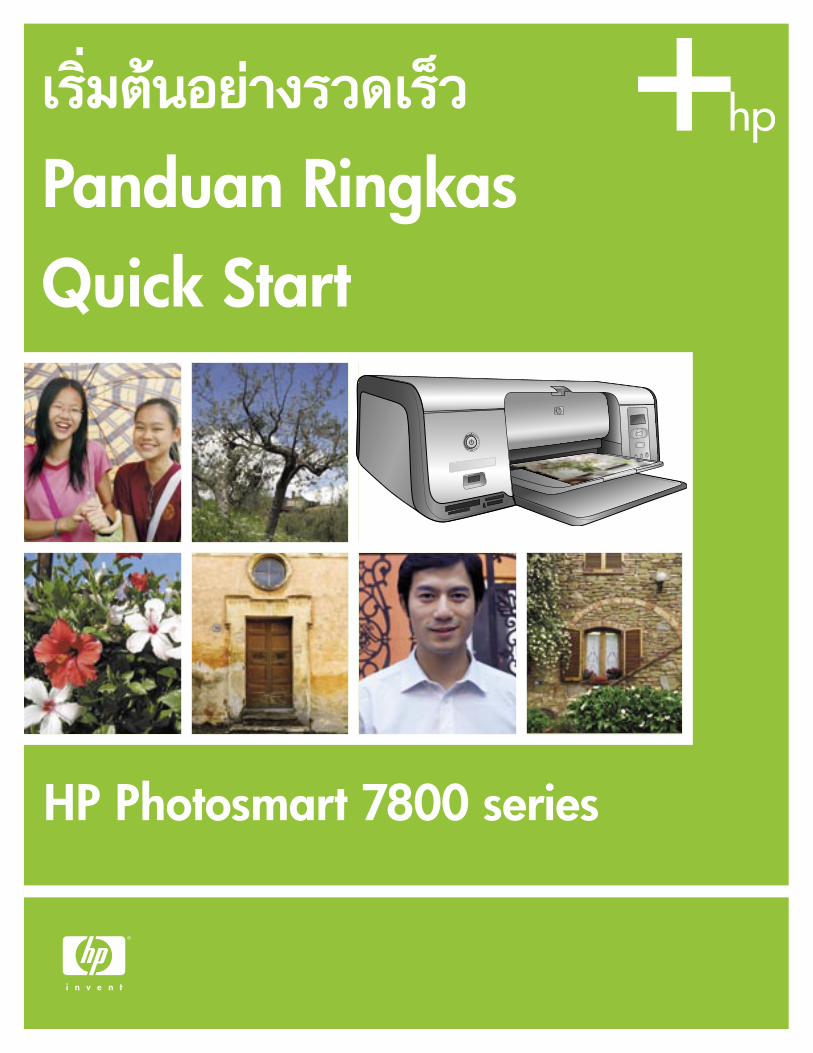
Panduan RingkasQuick Start
HP Photosmart 7800 series
2
a
b
c
d
e
fg
h
j
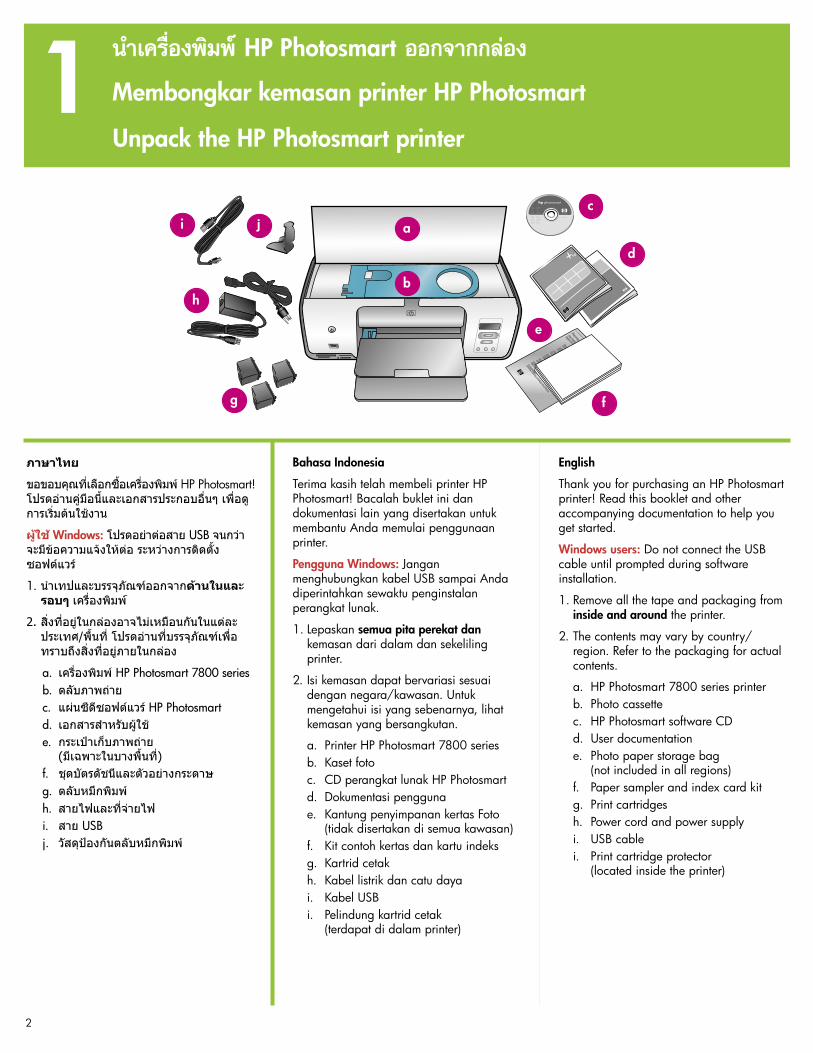
Membongkar kemasan printer HP Photosmart
Unpack the HP Photosmart printer1
Bahasa Indonesia
Terima kasih telah membeli printer HP Photosmart! Bacalah buklet ini dan dokumentasi lain yang disertakan untuk membantu Anda memulai penggunaan printer.
Pengguna Windows: Jangan menghubungkan kabel USB sampai Anda diperintahkan sewaktu penginstalan perangkat lunak.
1. Lepaskan semua pita perekat dan kemasan dari dalam dan sekeliling printer.
2. Isi kemasan dapat bervariasi sesuai dengan negara/kawasan. Untuk mengetahui isi yang sebenarnya, lihat kemasan yang bersangkutan.
a. Printer HP Photosmart 7800 series b. Kaset foto c. CD perangkat lunak HP Photosmart d. Dokumentasi pengguna e. Kantung penyimpanan kertas Foto
(tidak disertakan di semua kawasan) f. Kit contoh kertas dan kartu indeks g. Kartrid cetak h. Kabel listrik dan catu daya i. Kabel USB i. Pelindung kartrid cetak
(terdapat di dalam printer)
English
Thank you for purchasing an HP Photosmart printer! Read this booklet and other accompanying documentation to help you get started.
Windows users: Do not connect the USB cable until prompted during software installation.
1. Remove all the tape and packaging from inside and around the printer.
2. The contents may vary by country/region. Refer to the packaging for actual contents.
a. HP Photosmart 7800 series printer b. Photo cassette c. HP Photosmart software CD d. User documentation e. Photo paper storage bag
(not included in all regions) f. Paper sampler and index card kit g. Print cartridges h. Power cord and power supply i. USB cable i. Print cartridge protector
(located inside the printer)
i

3
Menghubungkan daya dan menghidupkan printer
Connect the power and turn on the printer2
Tombol daya
Power button
Printer tampak belakang
Back view of printer
Bahasa Indonesia
1. Sambungkan catu daya dengan kabel listrik. Colokkan kabel ke bagian belakang printer dan ke stopkontak di dinding.
Pengguna Windows: Jangan menghubungkan kabel USB sampai Anda diperintahkan sewaktu penginstalan perangkat lunak.
2. Lepaskan lapisan pelindung dari layar printer.
3. Tekan tombol Daya untuk menghidupkan printer.
4. Buka lipatan baki kertas.
English
1. Connect the power supply to the power cord. Plug the cord into the back of the printer and into a wall outlet.
Windows users: Do not connect the USB cable until prompted during software installation.
2. Remove the protective film from the printer screen.
3. Press the Power button to turn on the printer.
4. Unfold the paper trays.
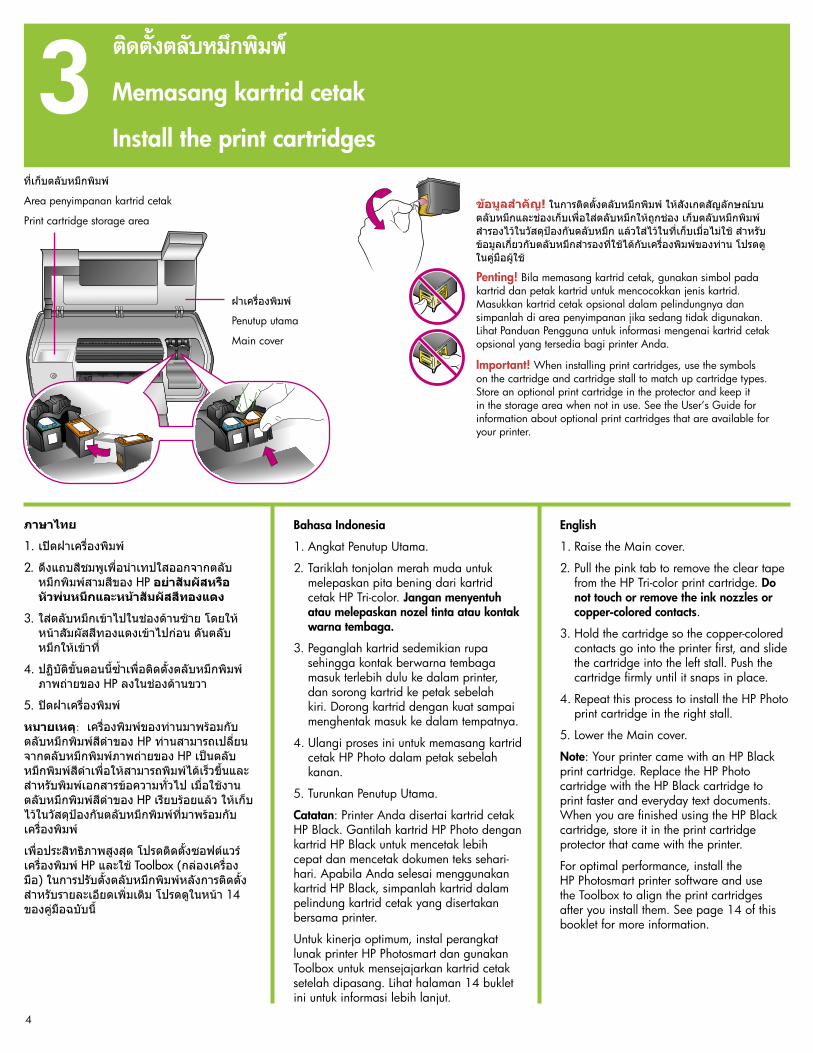
Penting! Bila memasang kartrid cetak, gunakan simbol pada kartrid dan petak kartrid untuk mencocokkan jenis kartrid. Masukkan kartrid cetak opsional dalam pelindungnya dan simpanlah di area penyimpanan jika sedang tidak digunakan. Lihat Panduan Pengguna untuk informasi mengenai kartrid cetak opsional yang tersedia bagi printer Anda.
Important! When installing print cartridges, use the symbols on the cartridge and cartridge stall to match up cartridge types. Store an optional print cartridge in the protector and keep it in the storage area when not in use. See the User’s Guide for information about optional print cartridges that are available for your printer.
Memasang kartrid cetak
Install the print cartridges3
Area penyimpanan kartrid cetak
Print cartridge storage area
4
Penutup utama
Main cover
Bahasa Indonesia
1. Angkat Penutup Utama.
2. Tariklah tonjolan merah muda untuk melepaskan pita bening dari kartrid cetak HP Tri-color. Jangan menyentuh atau melepaskan nozel tinta atau kontak warna tembaga.
3. Peganglah kartrid sedemikian rupa sehingga kontak berwarna tembaga masuk terlebih dulu ke dalam printer, dan sorong kartrid ke petak sebelah kiri. Dorong kartrid dengan kuat sampai menghentak masuk ke dalam tempatnya.
4. Ulangi proses ini untuk memasang kartrid cetak HP Photo dalam petak sebelah kanan.
5. Turunkan Penutup Utama.
Catatan: Printer Anda disertai kartrid cetak HP Black. Gantilah kartrid HP Photo dengan kartrid HP Black untuk mencetak lebih cepat dan mencetak dokumen teks sehari-hari. Apabila Anda selesai menggunakan kartrid HP Black, simpanlah kartrid dalam pelindung kartrid cetak yang disertakan bersama printer.
Untuk kinerja optimum, instal perangkat lunak printer HP Photosmart dan gunakan Toolbox untuk mensejajarkan kartrid cetak setelah dipasang. Lihat halaman 14 buklet ini untuk informasi lebih lanjut.
English
1. Raise the Main cover.
2. Pull the pink tab to remove the clear tape from the HP Tri-color print cartridge. Do not touch or remove the ink nozzles or copper-colored contacts.
3. Hold the cartridge so the copper-colored contacts go into the printer first, and slide the cartridge into the left stall. Push the cartridge firmly until it snaps in place.
4. Repeat this process to install the HP Photo print cartridge in the right stall.
5. Lower the Main cover.
Note: Your printer came with an HP Black print cartridge. Replace the HP Photo cartridge with the HP Black cartridge to print faster and everyday text documents. When you are finished using the HP Black cartridge, store it in the print cartridge protector that came with the printer.
For optimal performance, install the HP Photosmart printer software and use the Toolbox to align the print cartridges after you install them. See page 14 of this booklet for more information.

Baki Keluaran
Output tray
Memuatkan kertas biasa
Load plain paper4
Pemandu lebar kertas
Paper-width guide
Baki Utama
Main tray
5
Bahasa Indonesia
Muatkan kertas biasa sebagai persiapan untuk pensejajaran kartrid cetak.
1. Turunkan baki Utama dan baki Keluaran.
2. Jangkaulah baki Keluaran, kemudian dengan perlahan tekan pemandu lebar kertas dengan jari dan geser ke kiri hingga berhenti.
3. Tempatkan beberapa lembar kertas biasa ukuran letter dalam baki Utama.
4. Tekan pemandu lebar kertas dengan jari, kemudian dengan perlahan geserlah ke kanan sampai menyentuh tepi kertas tanpa menekuknya.
English
Load plain paper in preparation for print cartridge alignment.
1. Lower the Main and Output trays.
2. Reach over the Output tray and gently squeeze the paper-width guide and slide it to the left until it stops.
3. Place a few sheets of plain letter paper in the Main tray.
4. Squeeze the paper-width guide and gently slide it to the right so it touches the edges of the paper without bending it.
6
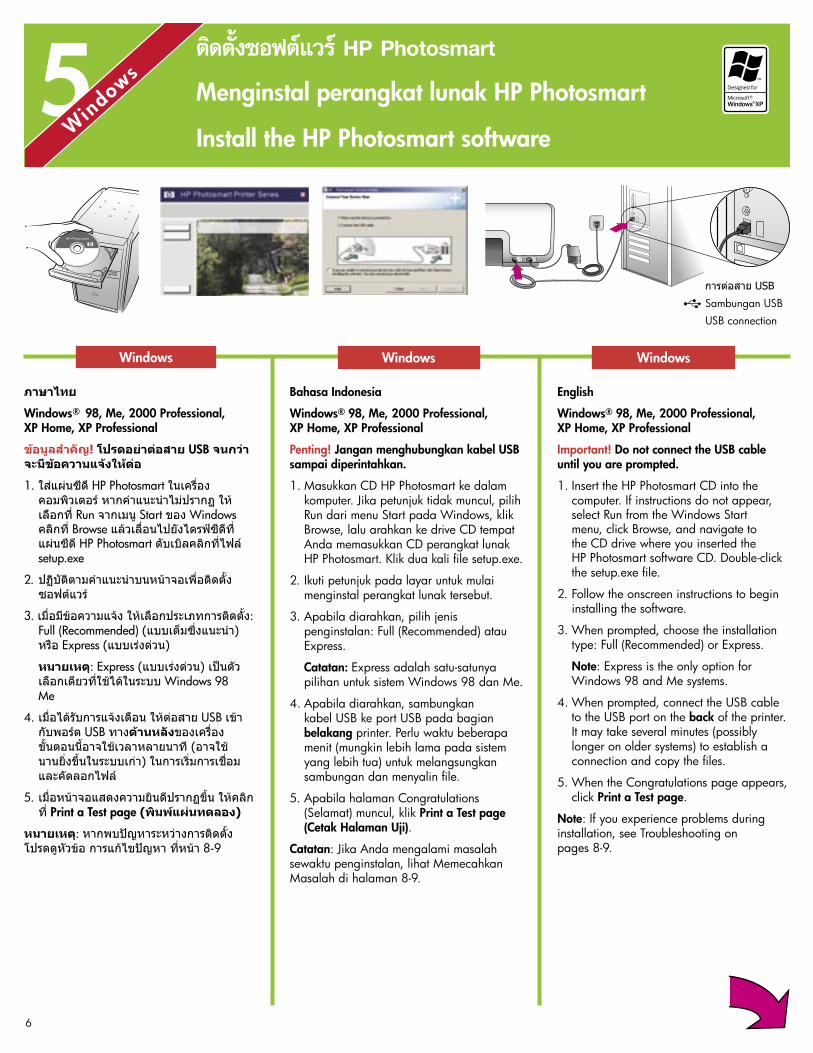
5 Menginstal perangkat lunak HP Photosmart
Install the HP Photosmart software5
Sambungan USBUSB connection
Windows Windows Windows
Bahasa Indonesia
Windows® 98, Me, 2000 Professional, XP Home, XP Professional
Penting! Jangan menghubungkan kabel USB sampai diperintahkan.
1. Masukkan CD HP Photosmart ke dalam komputer. Jika petunjuk tidak muncul, pilih Run dari menu Start pada Windows, klik Browse, lalu arahkan ke drive CD tempat Anda memasukkan CD perangkat lunak HP Photosmart. Klik dua kali file setup.exe.
2. Ikuti petunjuk pada layar untuk mulai menginstal perangkat lunak tersebut.
3. Apabila diarahkan, pilih jenis penginstalan: Full (Recommended) atau Express.
Catatan: Express adalah satu-satunya pilihan untuk sistem Windows 98 dan Me.
4. Apabila diarahkan, sambungkan kabel USB ke port USB pada bagian belakang printer. Perlu waktu beberapa menit (mungkin lebih lama pada sistem yang lebih tua) untuk melangsungkan sambungan dan menyalin file.
5. Apabila halaman Congratulations (Selamat) muncul, klik Print a Test page (Cetak Halaman Uji).
Catatan: Jika Anda mengalami masalah sewaktu penginstalan, lihat Memecahkan Masalah di halaman 8-9.
English
Windows® 98, Me, 2000 Professional, XP Home, XP Professional
Important! Do not connect the USB cable until you are prompted.
1. Insert the HP Photosmart CD into the computer. If instructions do not appear, select Run from the Windows Start menu, click Browse, and navigate to the CD drive where you inserted the HP Photosmart software CD. Double-click the setup.exe file.
2. Follow the onscreen instructions to begin installing the software.
3. When prompted, choose the installation type: Full (Recommended) or Express.
Note: Express is the only option for Windows 98 and Me systems.
4. When prompted, connect the USB cable to the USB port on the back of the printer. It may take several minutes (possibly longer on older systems) to establish a connection and copy the files.
5. When the Congratulations page appears, click Print a Test page.
Note: If you experience problems during installation, see Troubleshooting on pages 8-9.
7
5 Menginstal perangkat lunak HP Photosmart
Install the HP Photosmart software5
MacintoshMacintosh Macintosh
Sambungan USBUSB connection
Bahasa Indonesia
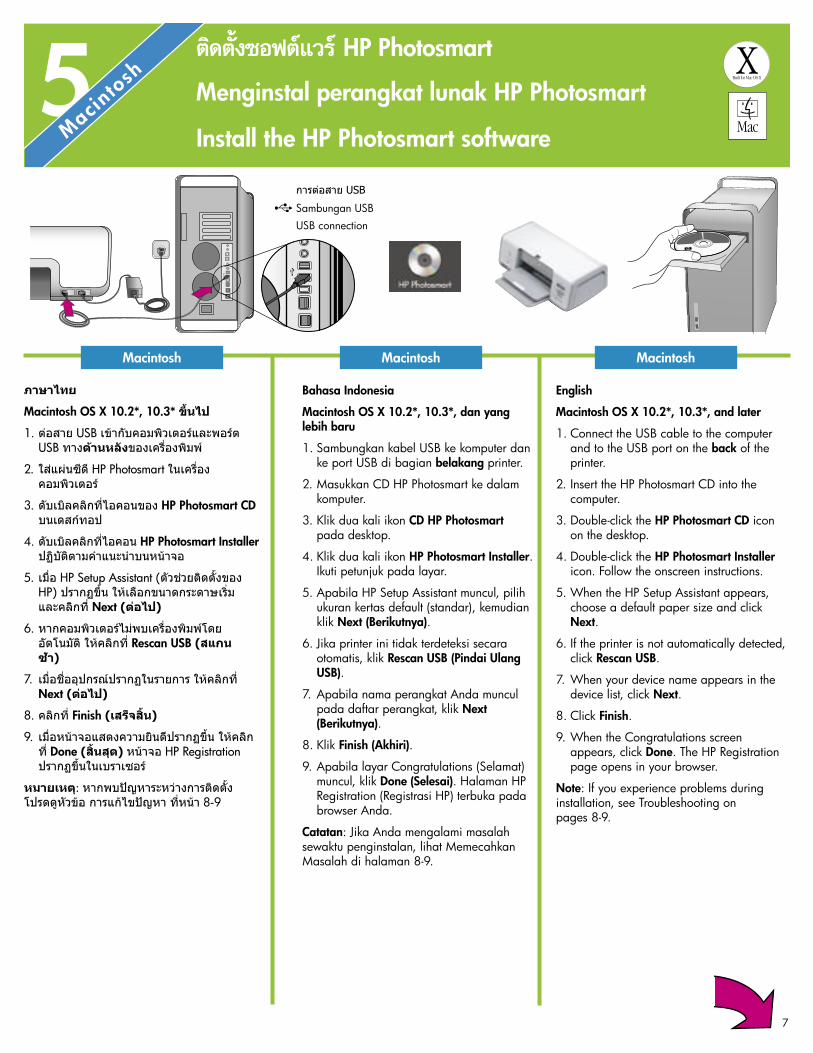
Macintosh OS X 10.2*, 10.3*, dan yang lebih baru
1. Sambungkan kabel USB ke komputer dan ke port USB di bagian belakang printer.
2. Masukkan CD HP Photosmart ke dalam komputer.
3. Klik dua kali ikon CD HP Photosmart pada desktop.
4. Klik dua kali ikon HP Photosmart Installer. Ikuti petunjuk pada layar.
5. Apabila HP Setup Assistant muncul, pilih ukuran kertas default (standar), kemudian klik Next (Berikutnya).
6. Jika printer ini tidak terdeteksi secara otomatis, klik Rescan USB (Pindai Ulang USB).
7. Apabila nama perangkat Anda muncul pada daftar perangkat, klik Next (Berikutnya).
8. Klik Finish (Akhiri).
9. Apabila layar Congratulations (Selamat) muncul, klik Done (Selesai). Halaman HP Registration (Registrasi HP) terbuka pada browser Anda.
Catatan: Jika Anda mengalami masalah sewaktu penginstalan, lihat Memecahkan Masalah di halaman 8-9.
English
Macintosh OS X 10.2*, 10.3*, and later
1. Connect the USB cable to the computer and to the USB port on the back of the printer.
2. Insert the HP Photosmart CD into the computer.
3. Double-click the HP Photosmart CD icon on the desktop.
4. Double-click the HP Photosmart Installer icon. Follow the onscreen instructions.
5. When the HP Setup Assistant appears, choose a default paper size and click Next.
6. If the printer is not automatically detected, click Rescan USB.
7. When your device name appears in the device list, click Next.
8. Click Finish.
9. When the Congratulations screen appears, click Done. The HP Registration page opens in your browser.
Note: If you experience problems during installation, see Troubleshooting on pages 8-9.

8
Memecahkan masalah penginstalan
Installation troubleshooting
(Bersambung ke halaman 9)
Bahasa Indonesia
Jika perangkat lunak printer tidak berhasil menginstal atau jika printer dan komputer tidak saling berkomunikasi dengan benar setelah perangkat lunak diinstal, periksa halaman ini untuk mendapatkan solusi yang memungkinkan.
Periksa semua sambungan kabel antara printer dan komputer, dan pastikan bahwa Anda menggunakan perangkat lunak printer versi terbaru. Anda dapat memperoleh pembaruan (update) perangkat lunak terbaru dengan mengunjungi situs web dukungan HP di www.hp.com/support. Jika Anda masih memerlukan bantuan, periksa dokumentasi printer atau hubungi layanan Peduli Pelanggan HP.
Hanya Windows
Masalah: Penginstalan perangkat lunak tidak mulai secara otomatis ketika CD dimasukkan.
Solusi: Dari menu Start Windows, pilih Run. Klik Browse, lalu arahkan ke drive CD tempat Anda memasukkan CD perangkat lunak HP Photosmart. Klik dua kali file setup.exe.
Masalah: Found New Hardware Wizard (Wizard tentang Ditemukan Perangkat Keras Baru) terbuka, tetapi tidak mengenali printer.
Solusi: Anda mungkin menyambungkan kabel USB sebelum menyelesaikan penginstalan perangkat lunak. Lepaskan kabel USB. Masukkan CD perangkat lunak ke drive CD, kemudian ikuti petunjuk pada layar. Jika petunjuk tidak muncul, cari dan klik dua kali file setup.exe pada CD untuk memulai-ulang penginstalan. Jika muncul pesan yang mengatakan bahwa perangkat lunak sudah berhasil diinstal, pilih Uninstal (Copot-instal), kemudian ikuti petunjuk untuk menginstal ulang perangkat lunak tersebut. Hubungkan lagi kabel USB hanya apabila diperintahkan sewaktu penginstalan perangkat lunak.
Masalah: Pemeriksaan persyaratan sistem menunjukkan bahwa komputer menjalankan versi Internet Explorer yang sudah tidak berlaku lagi.
Solusi: Batalkan penginstalan, perbarui versi Internet Explorer, kemudian instal ulang perangkat lunak HP Photosmart.
Masalah: Komputer berhenti bereaksi ketika penginstalan perangkat lunak sedang berjalan.
Solusi: Mungkin ada perangkat lunak antivirus atau program perangkat lunak lain yang dijalankan, sehingga memperlambat proses penginstalan.
Memecahkan masalah penginstalan
Installation troubleshooting
9
Tunggu sebentar sampai perangkat lunak selesai menyalin file; ini bisa berlangsung beberapa menit. Jika komputer masih tidak bereaksi setelah beberapa menit, hidupkan ulang komputer, hentikan sementara (pause) atau lumpuhkan (disable) perangkat lunak antivirus yang sedang aktif (lihat petunjuk perangkat lunak antivirus tersebut untuk mengetahui cara melumpuhkannya), tutup semua program perangkat lunak lainnya, kemudian instal ulang perangkat lunak printer. Catatan: Perangkat lunak antivirus Anda akan dihidupkan secara otomatis ketika Anda menghidupkan ulang komputer.
Masalah: Kotak dialog System Requirements (Persyaratan Sistem) muncul ketika penginstalan berlangsung.
Solusi: Ada komponen sistem komputer yang tidak memenuhi persyaratan sistem minimum. Upgrade (tingkatkan) komponen ke persyaratan sistem minimum, kemudian instal ulang perangkat lunak printer.
Hanya Macintosh
Masalah: Semua printer pada Print Center (Pusat Cetak) menghilang setelah perangkat lunak printer diinstal.
Solusi: Copot-instal perangkat lunak printer, kemudian instal ulang. Untuk mencopot-instal, buka HP Image Zone. Klik tab Devices (Perangkat), kemudian pilih Settings > Uninstall HP Photosmart Software. Hidupkan ulang komputer sebelum menambahkan printer pada Print Center (Pusat Cetak).
Windows dan Macintosh
Masalah: Komputer tidak dapat membaca CD HP Photosmart.
Solusi: Pastikan CD tidak kotor atau tergores. Jika CD lain dapat dibaca tetapi CD HP Photosmart tidak, mungkin CD Anda rusak. Anda dapat men-download perangkat lunak ini dari situs web dukungan HP atau meminta CD baru dari layanan Peduli Pelanggan HP. Jika CD lain tidak dapat dibaca, drive CD Anda mungkin harus diservis.
English
If the printer software did not install successfully, or if the printer and computer are not communicating properly after software installation, check this page for possible solutions.
Check all cable connections between the printer and computer, and be sure you are using the most recent version of the printer software. You can acquire the latest software updates by visiting the HP support website at www.hp.com/support. If you still need help, check the printer documentation or contact HP Customer Care.
Windows only
Problem: The installation software does not start automatically when the CD is inserted.
Solution: From the Windows Start menu, select Run. Click Browse, and navigate to the CD drive where you inserted the HP Photosmart software CD. Double-click the setup.exe file.
Problem: The Found New Hardware Wizard opens but does not recognize the printer.
Solution: You may have connected the USB cable before completing the software installation. Disconnect the USB cable. Insert the software CD into your CD drive, and follow the onscreen instructions. If instructions do not appear, locate and double-click the setup.exe file on the CD to restart the installation. If a message appears saying the software has already been successfully installed, then select Uninstall, and follow the instructions to reinstall the software. Reconnect the USB cable only when prompted during software installation.
Problem: The system requirements check indicates that the computer is running an outdated version of Internet Explorer.
Solution: Cancel the installation, update your version of Internet Explorer, and then reinstall the HP Photosmart software.
Problem: The computer stops responding during software installation.
Solution: Virus protection software or another software program may be running in the background, slowing down the installation process. Wait while the software finishes copying files; this may take several minutes. If the computer is still not responding after several minutes, restart the computer, pause or disable any active virus protection software (refer to your virus protection
software manual for information on how to disable it), quit all other software programs, and then reinstall the printer software. Note: Your virus protection software will turn back on automatically when you restart the computer.
Problem: The System Requirements dialog box appears during installation.
Solution: A component of the computer system does not meet the minimum system requirements. Upgrade the component to the minimum system requirement and then reinstall the printer software.
Macintosh only
Problem: All of the printers in Print Center disappear after printer software installation.
Solution: Uninstall and then reinstall the printer software. To uninstall, open HP Image Zone. Click the Devices tab, and then choose Settings > Uninstall HP Photosmart Software. Restart the computer before adding the printer in Print Center.
Windows and Macintosh
Problem: The computer could not read the HP Photosmart CD.
Solution: Make sure the CD is not dirty or scratched. If other CDs work but the HP Photosmart CD does not, your CD may be damaged. You can download the software from the HP support website or request a new CD from HP Customer Care. If other CDs do not work, you may need to service your CD drive.
10
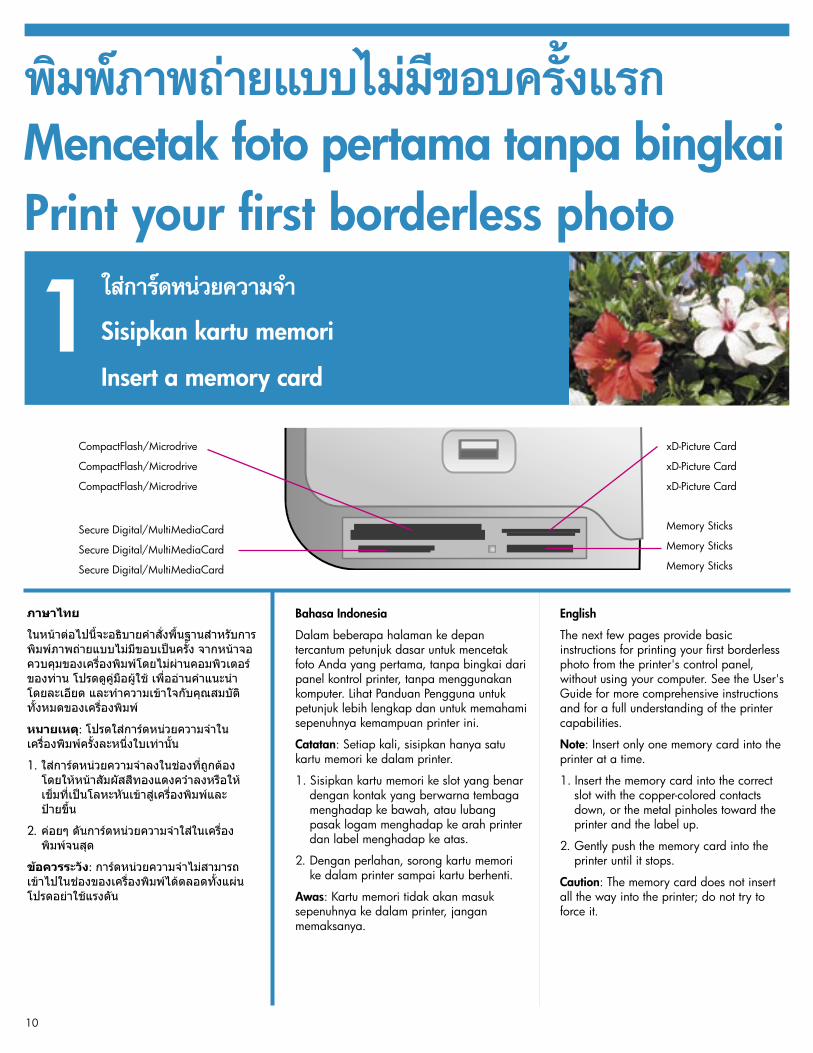
CompactFlash/Microdrive
CompactFlash/Microdrive
CompactFlash/Microdrive
Memory Sticks
Memory Sticks
Memory Sticks
Secure Digital/MultiMediaCard
Secure Digital/MultiMediaCard
Secure Digital/MultiMediaCard
xD-Picture Card
xD-Picture Card
xD-Picture Card
Sisipkan kartu memori
Insert a memory card
Mencetak foto pertama tanpa bingkaiPrint your first borderless photo
1
Bahasa Indonesia
Dalam beberapa halaman ke depan tercantum petunjuk dasar untuk mencetak foto Anda yang pertama, tanpa bingkai dari panel kontrol printer, tanpa menggunakan komputer. Lihat Panduan Pengguna untuk petunjuk lebih lengkap dan untuk memahami sepenuhnya kemampuan printer ini.
Catatan: Setiap kali, sisipkan hanya satu kartu memori ke dalam printer.
1. Sisipkan kartu memori ke slot yang benar dengan kontak yang berwarna tembaga menghadap ke bawah, atau lubang pasak logam menghadap ke arah printer dan label menghadap ke atas.
2. Dengan perlahan, sorong kartu memori ke dalam printer sampai kartu berhenti.
Awas: Kartu memori tidak akan masuk sepenuhnya ke dalam printer, jangan memaksanya.
English
The next few pages provide basic instructions for printing your first borderless photo from the printer's control panel, without using your computer. See the User's Guide for more comprehensive instructions and for a full understanding of the printer capabilities.
Note: Insert only one memory card into the printer at a time.
1. Insert the memory card into the correct slot with the copper-colored contacts down, or the metal pinholes toward the printer and the label up.
2. Gently push the memory card into the printer until it stops.
Caution: The memory card does not insert all the way into the printer; do not try to force it.
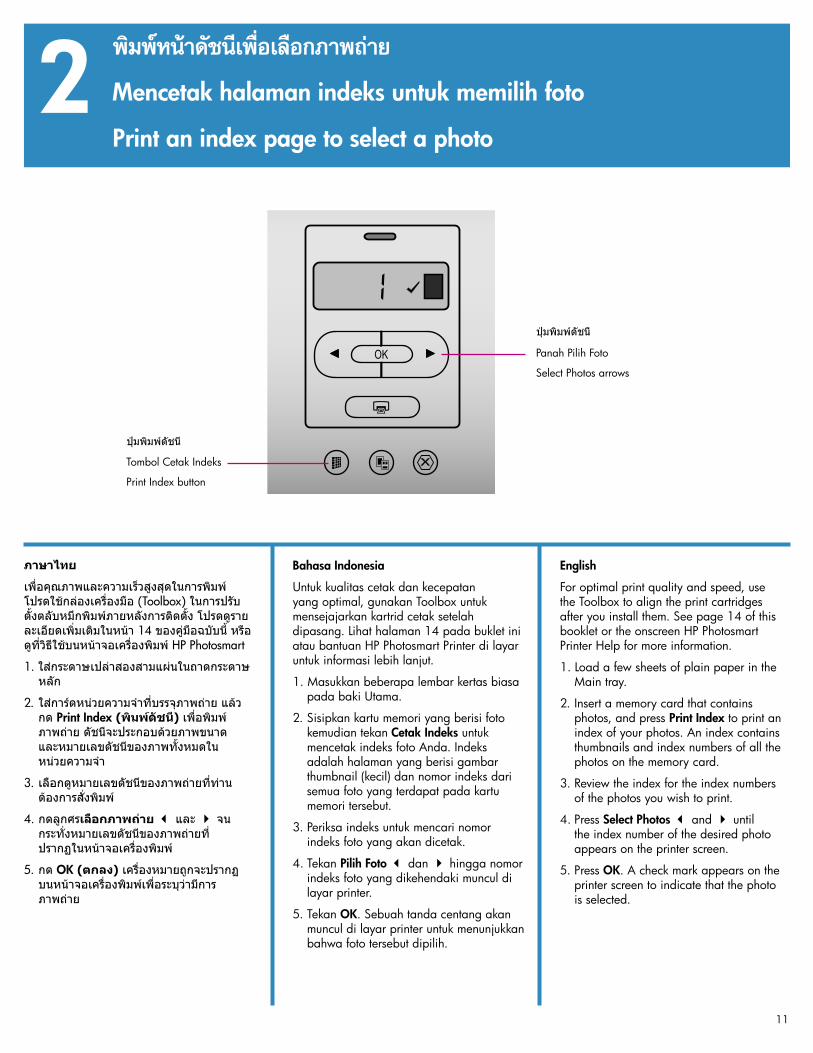
Mencetak halaman indeks untuk memilih foto
Print an index page to select a photo2
X
Panah Pilih Foto
Select Photos arrows
Tombol Cetak Indeks
Print Index button
11
Bahasa Indonesia
Untuk kualitas cetak dan kecepatan yang optimal, gunakan Toolbox untuk mensejajarkan kartrid cetak setelah dipasang. Lihat halaman 14 pada buklet ini atau bantuan HP Photosmart Printer di layar untuk informasi lebih lanjut.
1. Masukkan beberapa lembar kertas biasa pada baki Utama.
2. Sisipkan kartu memori yang berisi foto kemudian tekan Cetak Indeks untuk mencetak indeks foto Anda. Indeks adalah halaman yang berisi gambar thumbnail (kecil) dan nomor indeks dari semua foto yang terdapat pada kartu memori tersebut.
3. Periksa indeks untuk mencari nomor indeks foto yang akan dicetak.
4. Tekan Pilih Foto dan hingga nomor indeks foto yang dikehendaki muncul di layar printer.
5. Tekan OK. Sebuah tanda centang akan muncul di layar printer untuk menunjukkan bahwa foto tersebut dipilih.
English
For optimal print quality and speed, use the Toolbox to align the print cartridges after you install them. See page 14 of this booklet or the onscreen HP Photosmart Printer Help for more information.
1. Load a few sheets of plain paper in the Main tray.
2. Insert a memory card that contains photos, and press Print Index to print an index of your photos. An index contains thumbnails and index numbers of all the photos on the memory card.
3. Review the index for the index numbers of the photos you wish to print.
4. Press Select Photos and until the index number of the desired photo appears on the printer screen.
5. Press OK. A check mark appears on the printer screen to indicate that the photo is selected.

12
Memuatkan kertas foto 10 x 15 cm (4 x 6 inci)
Load 10 x 15 cm (4 x 6 inch) photo paper3
Baki Keluaran
Output tray
Area penyimpanan kaset foto
Photo cassette storage area
Baki Utama
Main tray
Bahasa Indonesia
1. Keluarkan semua kertas dari baki Utama.
2. Keluarkan kaset foto dari area penyimpanannya, kemudian masukkan beberapa lembar kertas foto 10 x 15 cm (4 x 6 inci) ke dalam kaset dengan sisi yang akan dicetak menghadap ke bawah. Jika Anda menggunakan kertas dengan tonjolan (tab), masukkan kertas sedemikian rupa sehingga ujung yang bertonjolan mengumpan terlebih dulu.
3. Geser kaset Foto ke sebelah kanan baki Utama hingga terhentak masuk ke tempatnya.
Tip: Gunakan HP Advanced Photo Paper untuk mencetak foto mengkilap yang tahan sidik jari.
English
1. Remove any paper from the Main tray.
2. Remove the Photo cassette from its storage area and place a few sheets of 10 x 15 cm (4 x 6 inch) photo paper in the cassette with the side to be printed on facing down. If you are using tabbed paper, insert the paper so the tabbed end feeds in first.
3. Slide the Photo cassette along the right side of the Main tray until it snaps into place.
Tip: Use HP Advanced Photo Paper to print fingerprint-resistant glossy photos.
1313
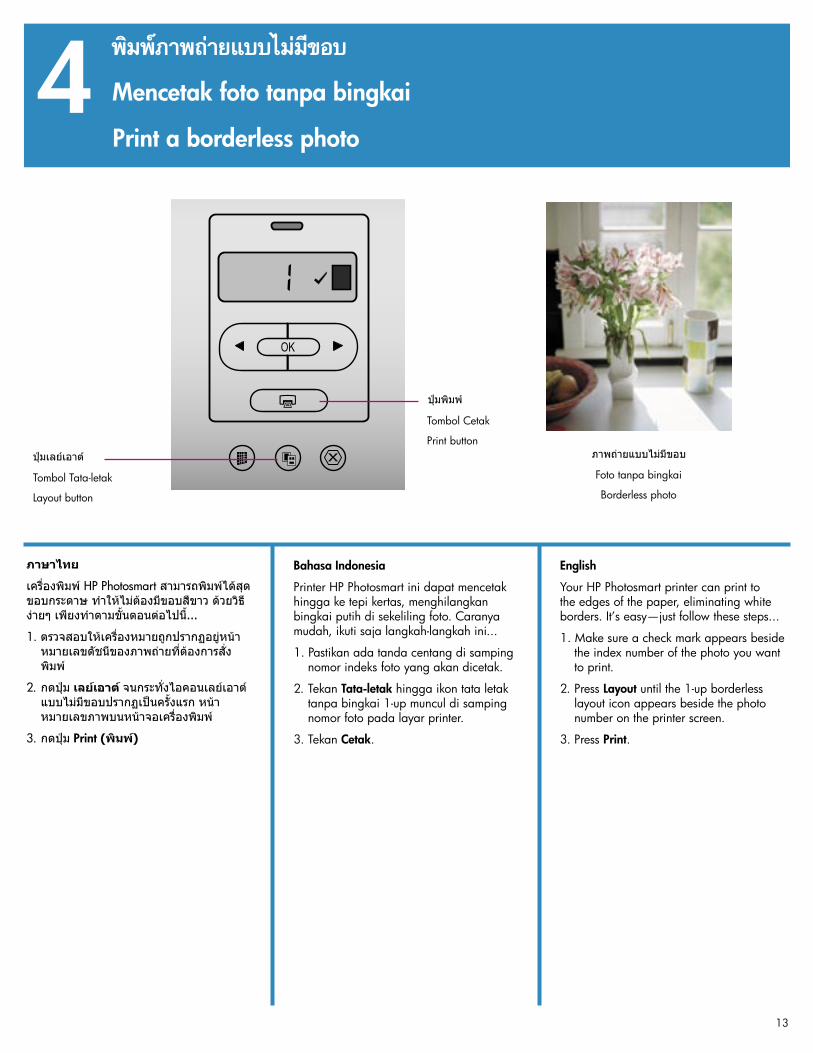
Tombol Tata-letak
Layout button
Foto tanpa bingkai
Borderless photo
Mencetak foto tanpa bingkai
Print a borderless photo4
X
Tombol Cetak
Print button
Bahasa Indonesia
Printer HP Photosmart ini dapat mencetak hingga ke tepi kertas, menghilangkan bingkai putih di sekeliling foto. Caranya mudah, ikuti saja langkah-langkah ini...
1. Pastikan ada tanda centang di samping nomor indeks foto yang akan dicetak.
2. Tekan Tata-letak hingga ikon tata letak tanpa bingkai 1-up muncul di samping nomor foto pada layar printer.
3. Tekan Cetak.
English
Your HP Photosmart printer can print to the edges of the paper, eliminating white borders. It’s easy—just follow these steps...
1. Make sure a check mark appears beside the index number of the photo you want to print.
2. Press Layout until the 1-up borderless layout icon appears beside the photo number on the printer screen.
3. Press Print.
14
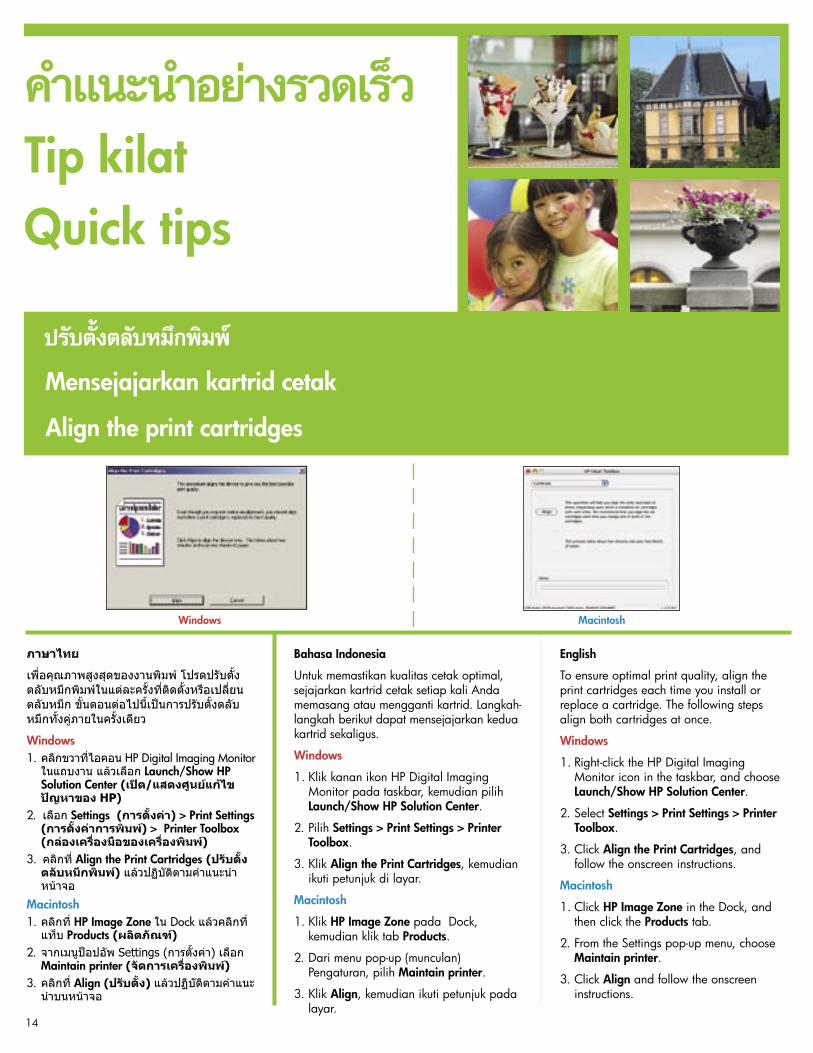
Mensejajarkan kartrid cetak
Align the print cartridges
Tip kilatQuick tips
MacintoshWindows
Bahasa Indonesia
Untuk memastikan kualitas cetak optimal, sejajarkan kartrid cetak setiap kali Anda memasang atau mengganti kartrid. Langkah-langkah berikut dapat mensejajarkan kedua kartrid sekaligus.
Windows
1. Klik kanan ikon HP Digital Imaging Monitor pada taskbar, kemudian pilih Launch/Show HP Solution Center.
2. Pilih Settings > Print Settings > Printer Toolbox.
3. Klik Align the Print Cartridges, kemudian ikuti petunjuk di layar.
Macintosh
1. Klik HP Image Zone pada Dock, kemudian klik tab Products.
2. Dari menu pop-up (munculan) Pengaturan, pilih Maintain printer.
3. Klik Align, kemudian ikuti petunjuk pada layar.
English
To ensure optimal print quality, align the print cartridges each time you install or replace a cartridge. The following steps align both cartridges at once.
Windows
1. Right-click the HP Digital Imaging Monitor icon in the taskbar, and choose Launch/Show HP Solution Center.
2. Select Settings > Print Settings > Printer Toolbox.
3. Click Align the Print Cartridges, and follow the onscreen instructions.
Macintosh
1. Click HP Image Zone in the Dock, and then click the Products tab.
2. From the Settings pop-up menu, choose Maintain printer.
3. Click Align and follow the onscreen instructions.
15
Mencetak dengan komputer dan HP Image Zone
Print with a computer and HP Image Zone
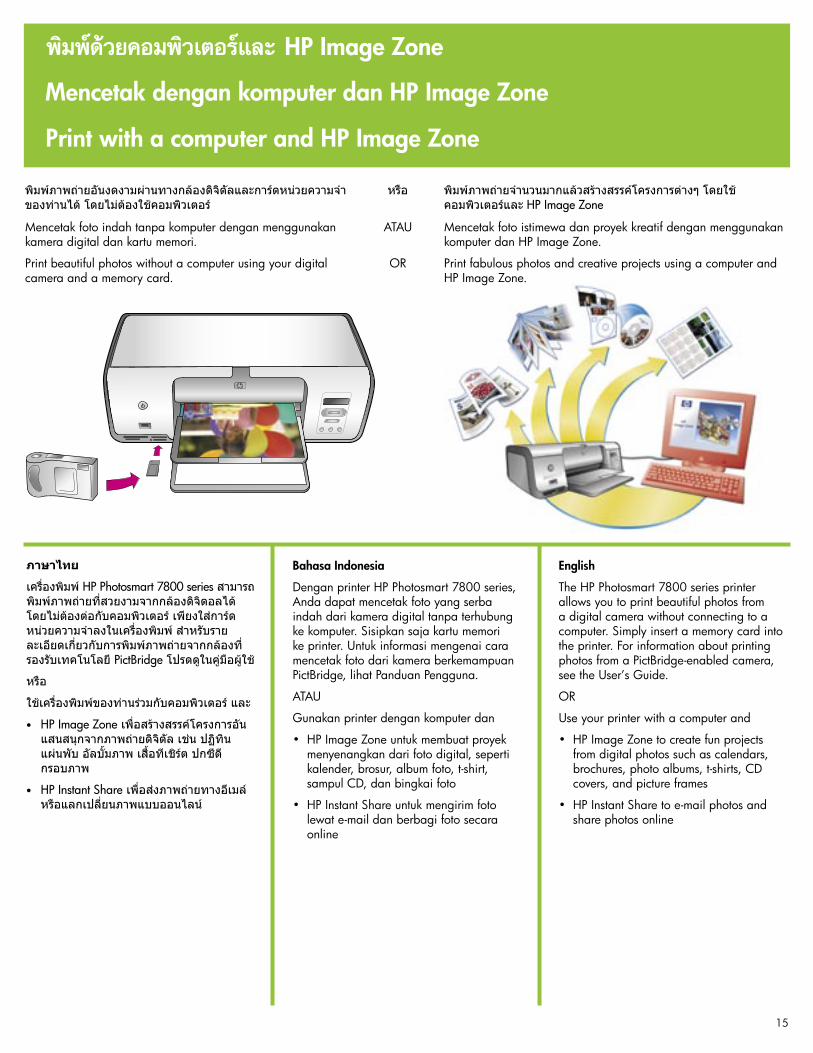
Mencetak foto indah tanpa komputer dengan menggunakan kamera digital dan kartu memori.
Print beautiful photos without a computer using your digital camera and a memory card.
ATAU
OR
Bahasa Indonesia
Dengan printer HP Photosmart 7800 series, Anda dapat mencetak foto yang serba indah dari kamera digital tanpa terhubung ke komputer. Sisipkan saja kartu memori ke printer. Untuk informasi mengenai cara mencetak foto dari kamera berkemampuan PictBridge, lihat Panduan Pengguna.
ATAU
Gunakan printer dengan komputer dan
• HP Image Zone untuk membuat proyek menyenangkan dari foto digital, seperti kalender, brosur, album foto, t-shirt, sampul CD, dan bingkai foto
• HP Instant Share untuk mengirim foto lewat e-mail dan berbagi foto secara online
English
The HP Photosmart 7800 series printer allows you to print beautiful photos from a digital camera without connecting to a computer. Simply insert a memory card into the printer. For information about printing photos from a PictBridge-enabled camera, see the User’s Guide.
OR
Use your printer with a computer and
• HP Image Zone to create fun projects from digital photos such as calendars, brochures, photo albums, t-shirts, CD covers, and picture frames
• HP Instant Share to e-mail photos and share photos online
Mencetak foto istimewa dan proyek kreatif dengan menggunakan komputer dan HP Image Zone.
Print fabulous photos and creative projects using a computer and HP Image Zone.
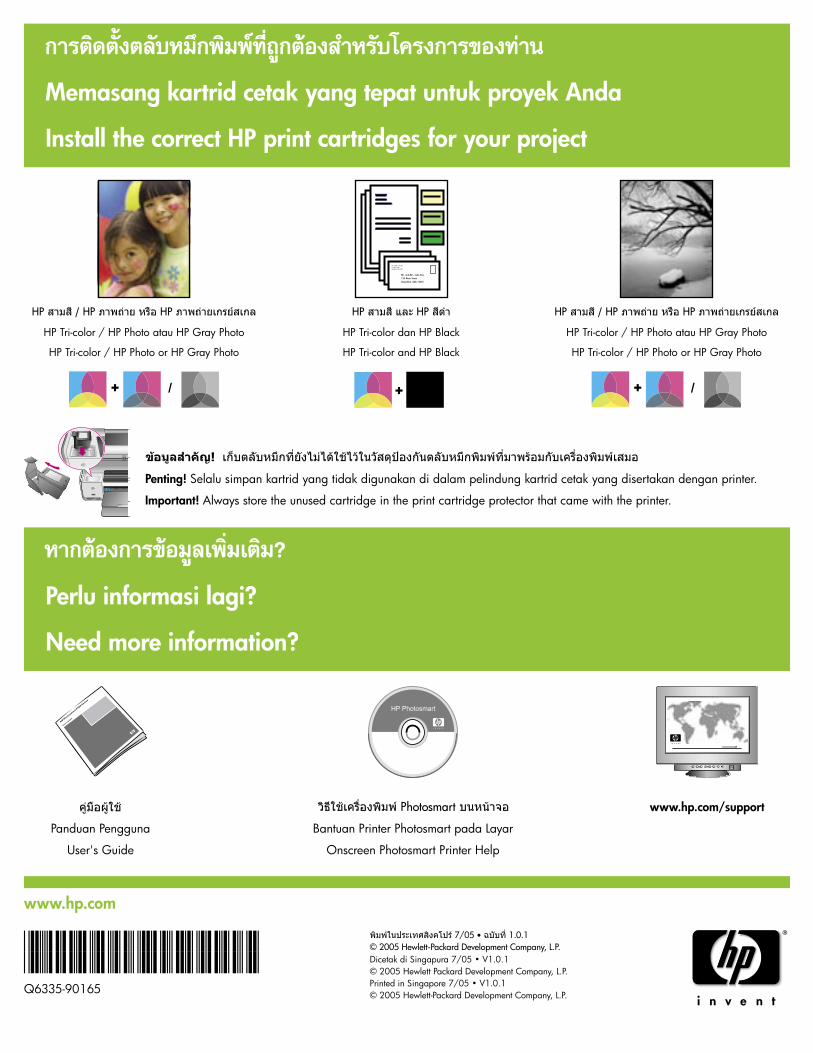
Memasang kartrid cetak yang tepat untuk proyek Anda
Install the correct HP print cartridges for your project
www.hp.com
*Q6335-90165**Q6335-90165*Q6335-90165
Dicetak di Singapura 7/05 • V1.0.1© 2005 Hewlett Packard Development Company, L.P. Printed in Singapore 7/05 • V1.0.1© 2005 Hewlett-Packard Development Company, L.P.
Perlu informasi lagi?
Need more information?
Panduan Pengguna
User's Guide
Bantuan Printer Photosmart pada Layar
Onscreen Photosmart Printer Help
www.hp.com/support
HP Tri-color / HP Photo atau HP Gray Photo
HP Tri-color / HP Photo or HP Gray Photo
HP Tri-color dan HP Black
HP Tri-color and HP Black
+ /
+
+ /
+
+ /
+
Penting! Selalu simpan kartrid yang tidak digunakan di dalam pelindung kartrid cetak yang disertakan dengan printer.
Important! Always store the unused cartridge in the print cartridge protector that came with the printer.
HP Tri-color / HP Photo atau HP Gray Photo
HP Tri-color / HP Photo or HP Gray Photo