topcon network rtk (ntrip)topcon wireless hardware configuration 1. topcon hiper+ or any topcon gnss...
TRANSCRIPT
TOPCON Network RTK
(NTRIP)(NTRIP)
Recommended Hardware Configuration for rovers
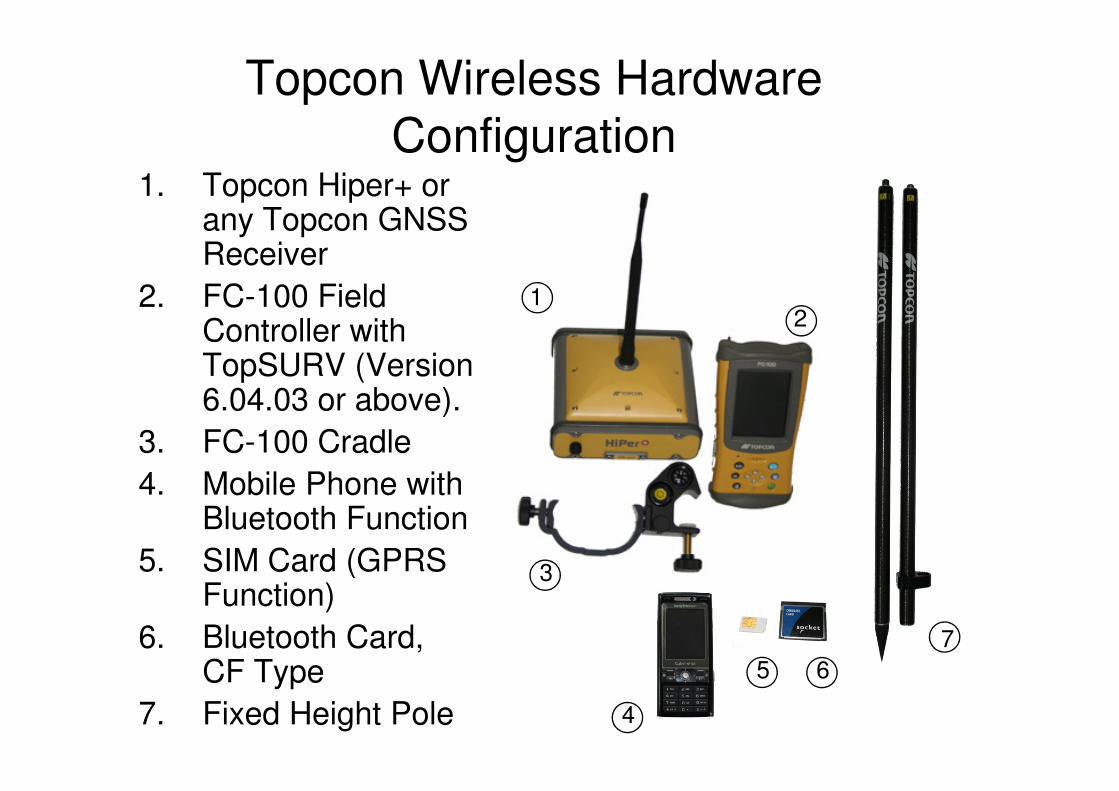
Topcon Wireless Hardware
Configuration1. Topcon Hiper+ or
any Topcon GNSS Receiver
2. FC-100 Field Controller with TopSURV (Version 6.04.03 or above).
12
6.04.03 or above).
3. FC-100 Cradle
4. Mobile Phone with Bluetooth Function
5. SIM Card (GPRS Function)
6. Bluetooth Card, CF Type
7. Fixed Height Pole
3
5
4
6
7

Configuration for using Network RTK services
provided by the SMO of the Lands Department of the HKSAR- One-time initial rover setting using NTRIP communication
1. Press button for 2 seconds to switch on the to switch on the Field Controller.
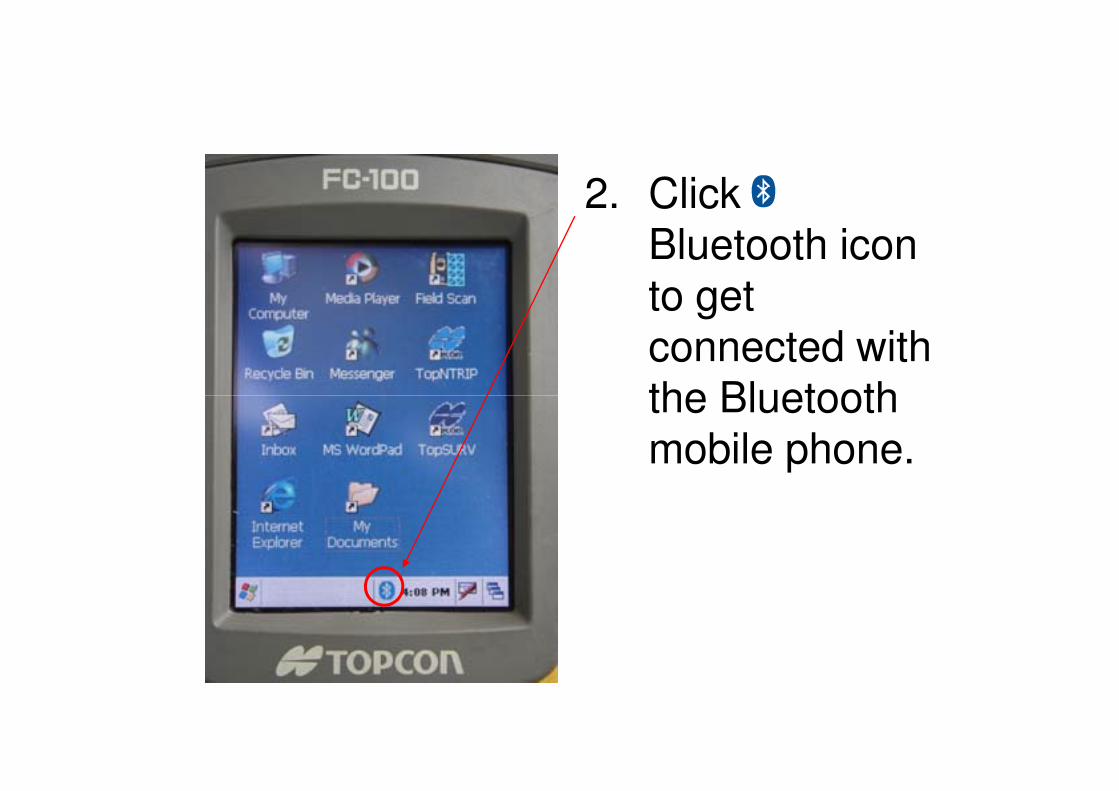
2. Click Bluetooth icon to get connected with the Bluetooth the Bluetooth mobile phone.
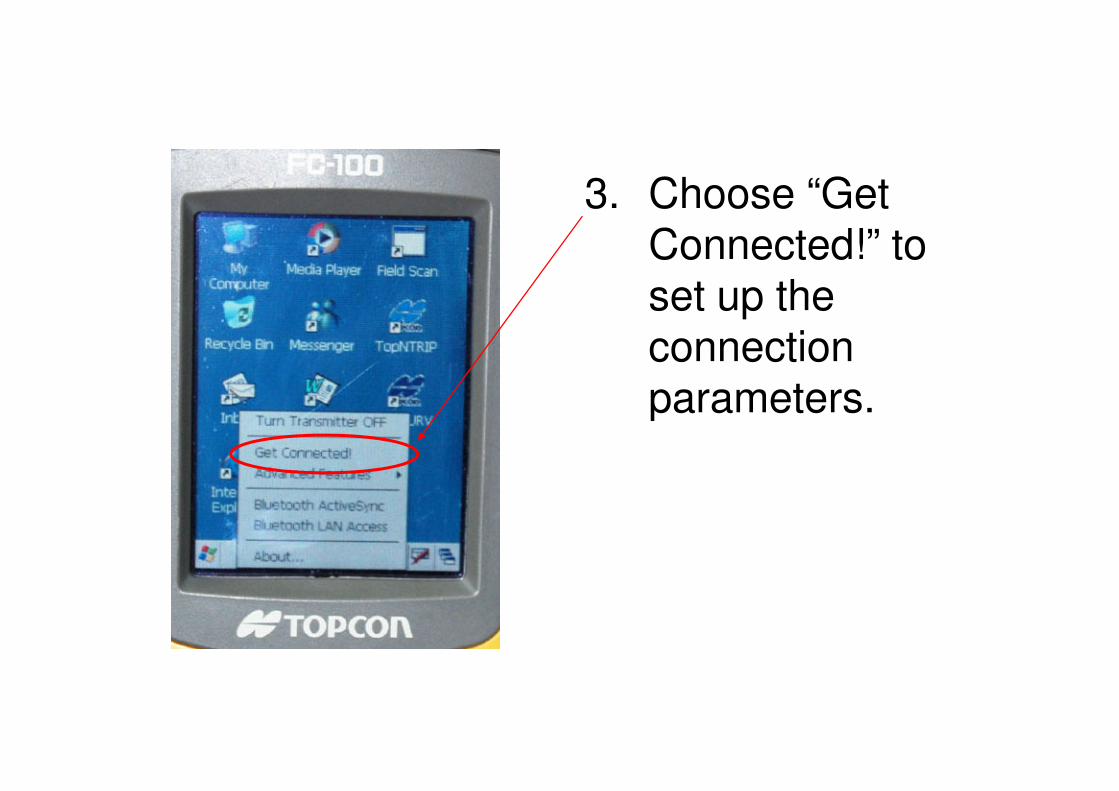
3. Choose “Get Connected!” to set up the connection parameters.parameters.
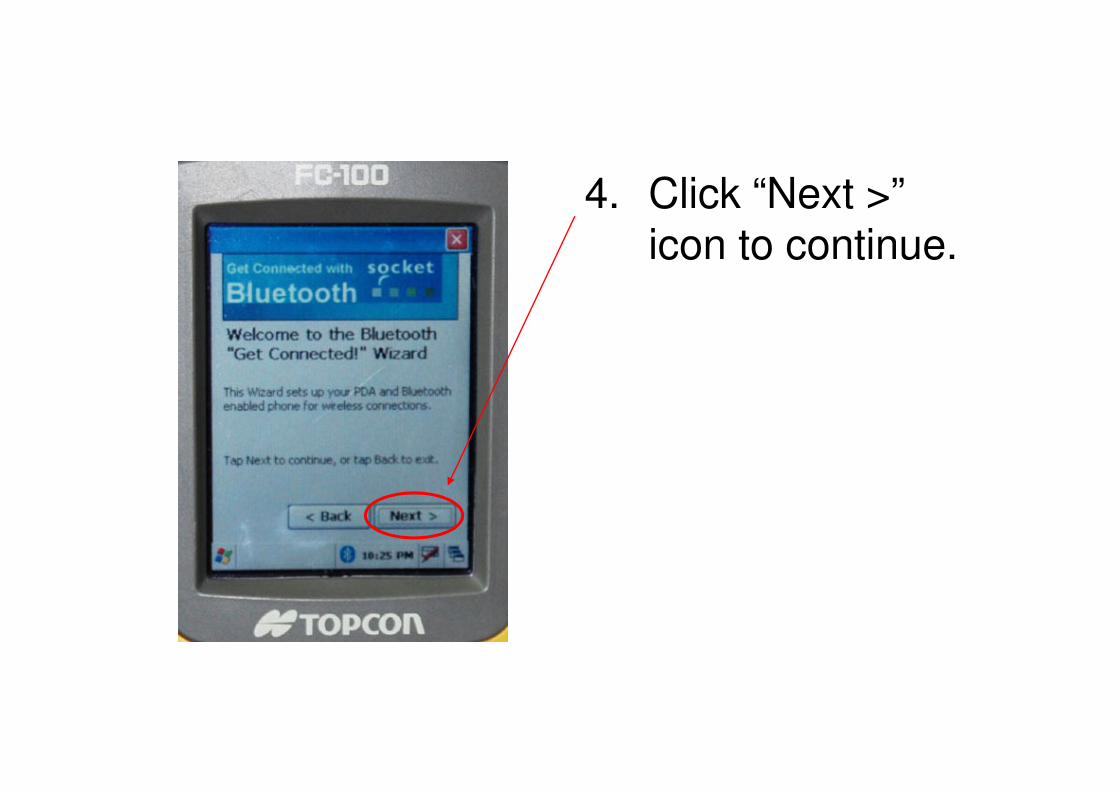
4. Click “Next >” icon to continue.
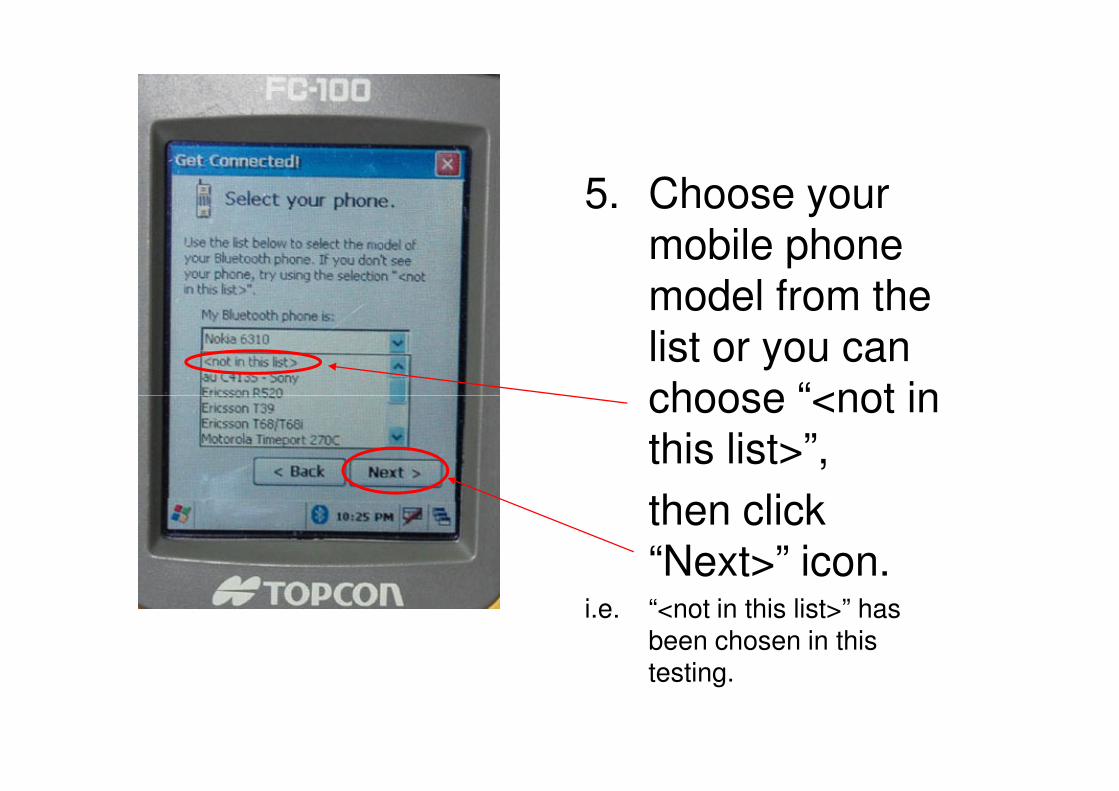
5. Choose your mobile phone model from the list or you can choose “<not in choose “<not in this list>”,
then click “Next>” icon.
i.e. “<not in this list>” has been chosen in this testing.
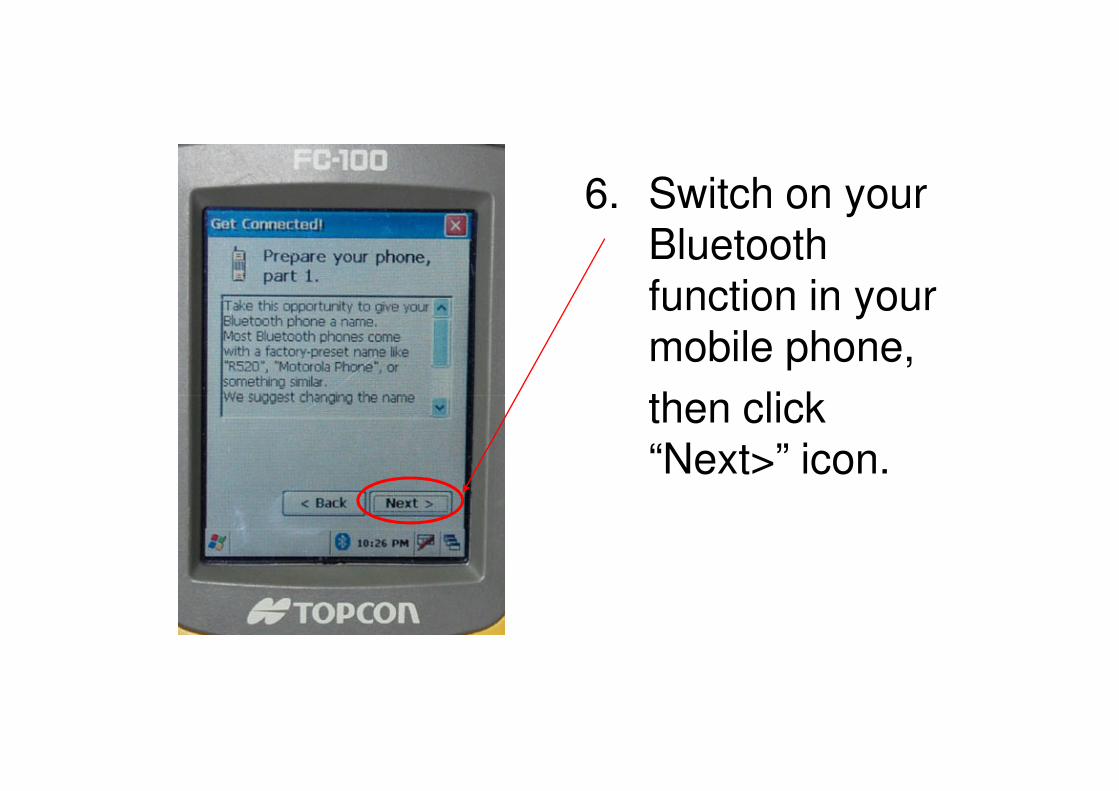
6. Switch on your Bluetooth function in your mobile phone,
then click then click “Next>” icon.
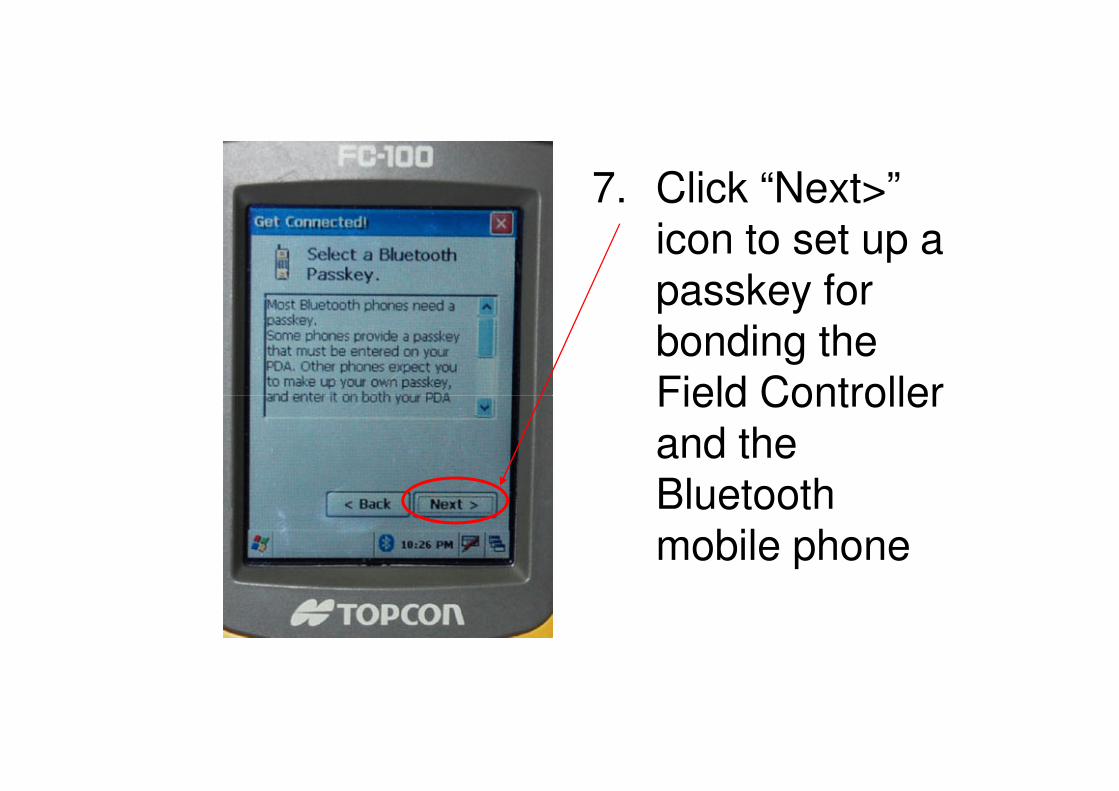
7. Click “Next>” icon to set up a passkey for bonding the Field Controller Field Controller and the Bluetooth mobile phone

8. Please follow the notes to prepare the Bluetooth mobile phone, mobile phone, then click “Next>”
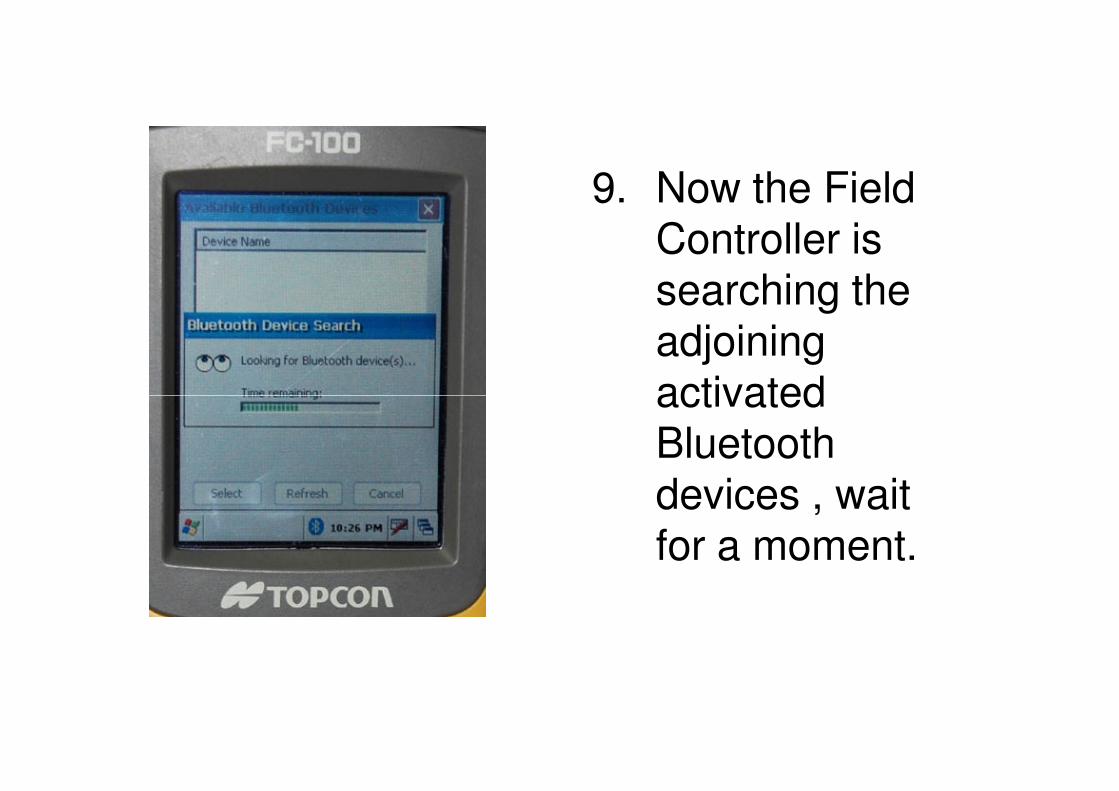
9. Now the Field Controller is searching the adjoining activated activated Bluetooth devices , wait for a moment.
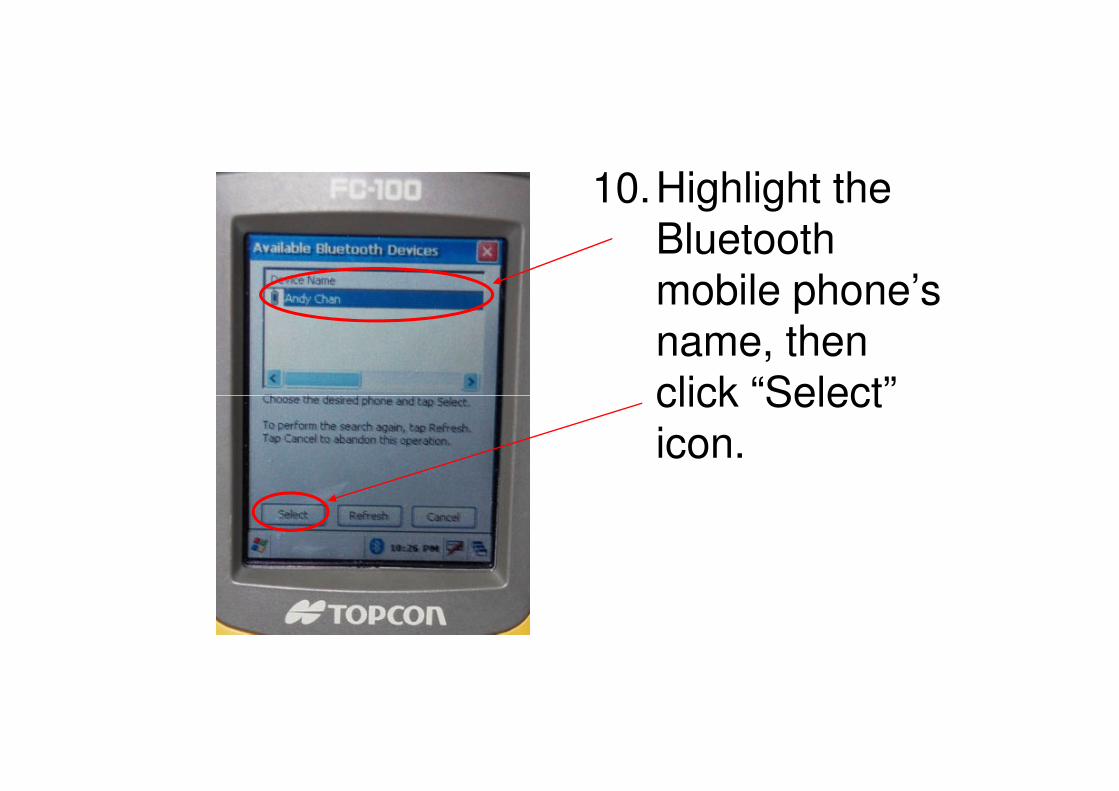
10.Highlight the Bluetooth mobile phone’s name, then click “Select” click “Select” icon.
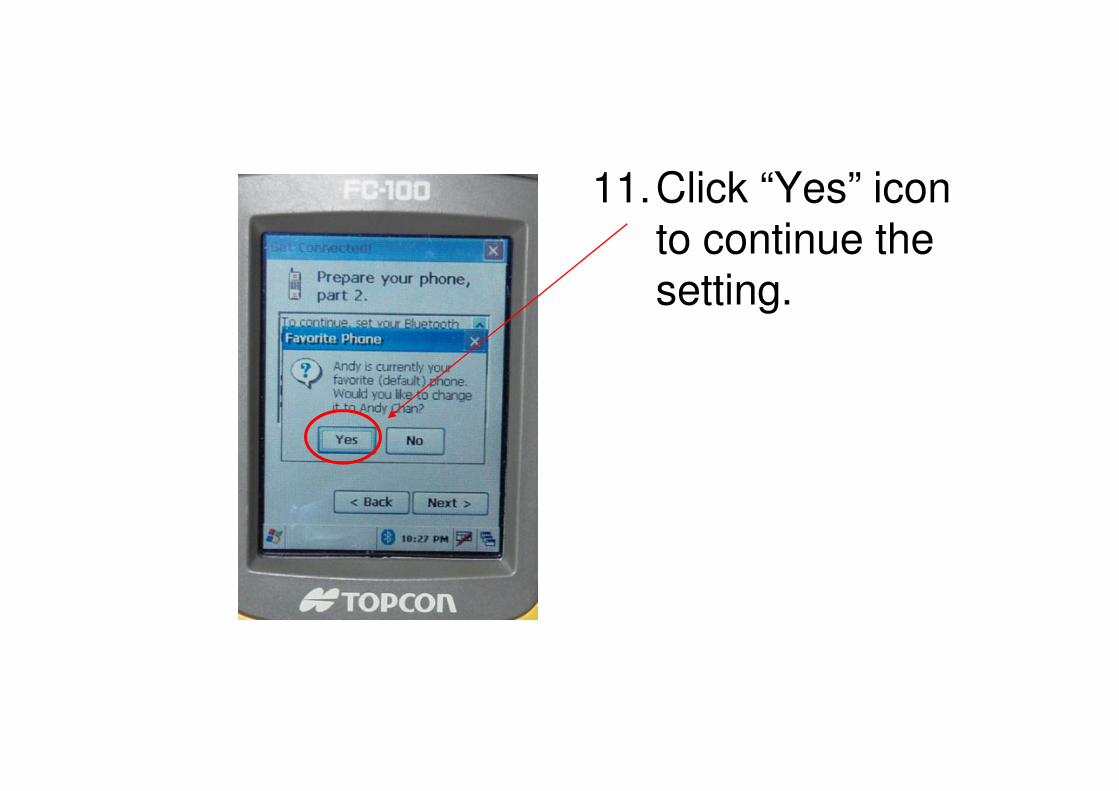
11.Click “Yes” icon to continue the setting.
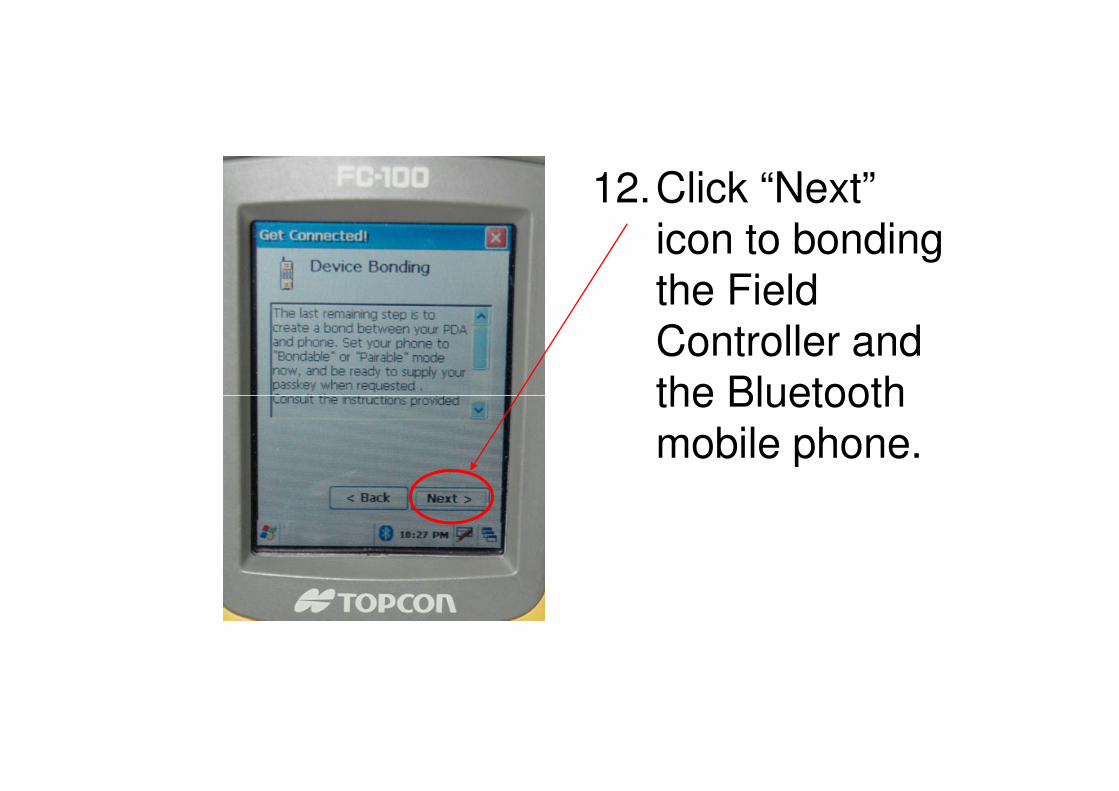
12.Click “Next” icon to bonding the Field Controller and the Bluetooth the Bluetooth mobile phone.
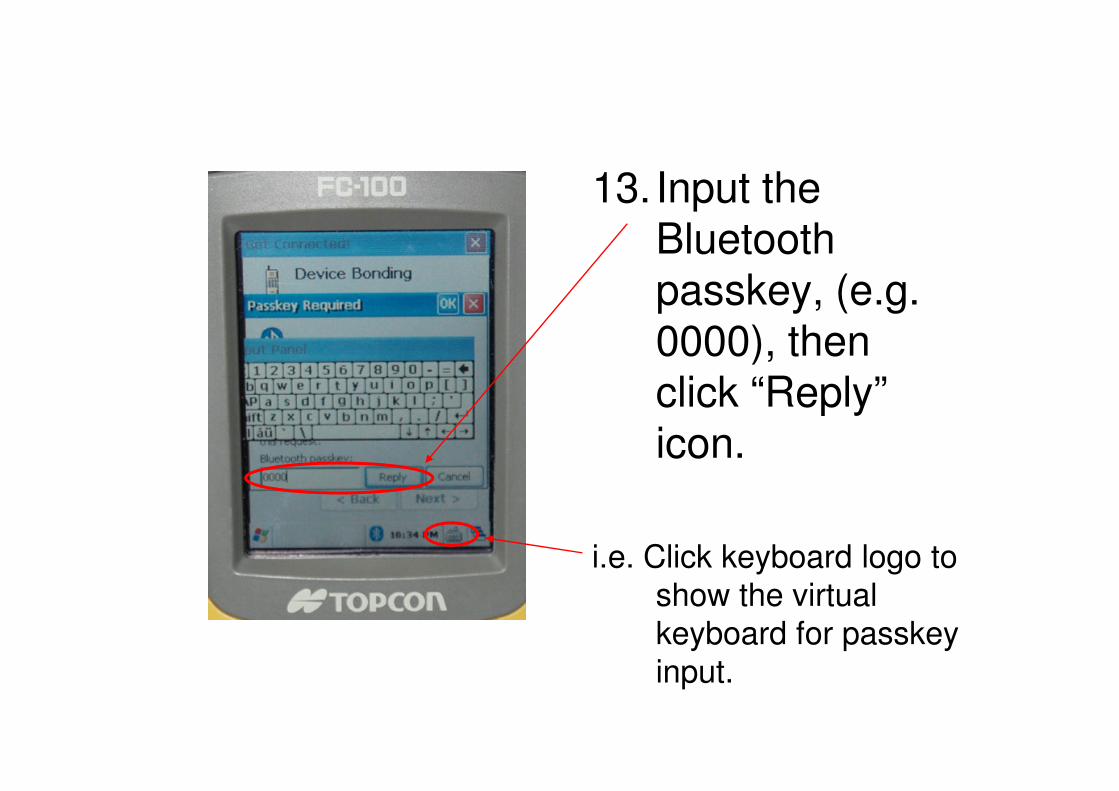
13. Input the Bluetooth passkey, (e.g. 0000), then click “Reply” click “Reply” icon.
i.e. Click keyboard logo to
show the virtual
keyboard for passkey
input.
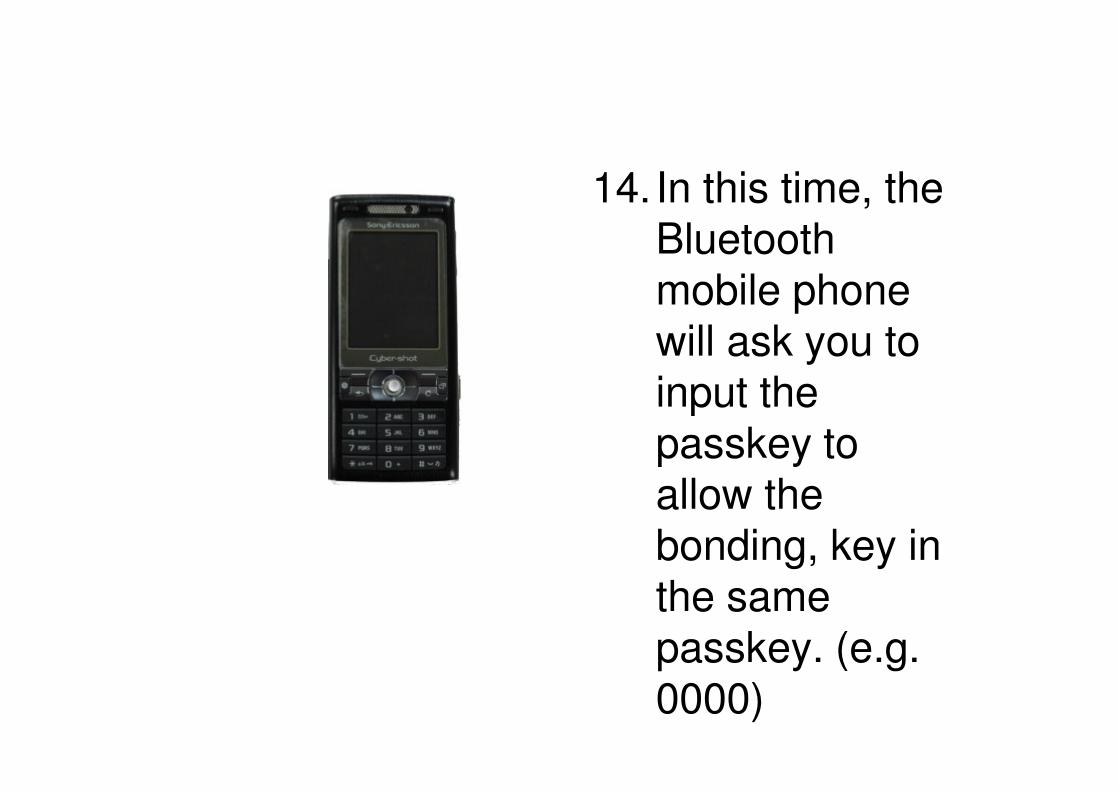
14. In this time, the Bluetooth mobile phone will ask you to input the input the passkey to allow the bonding, key in the same passkey. (e.g. 0000)
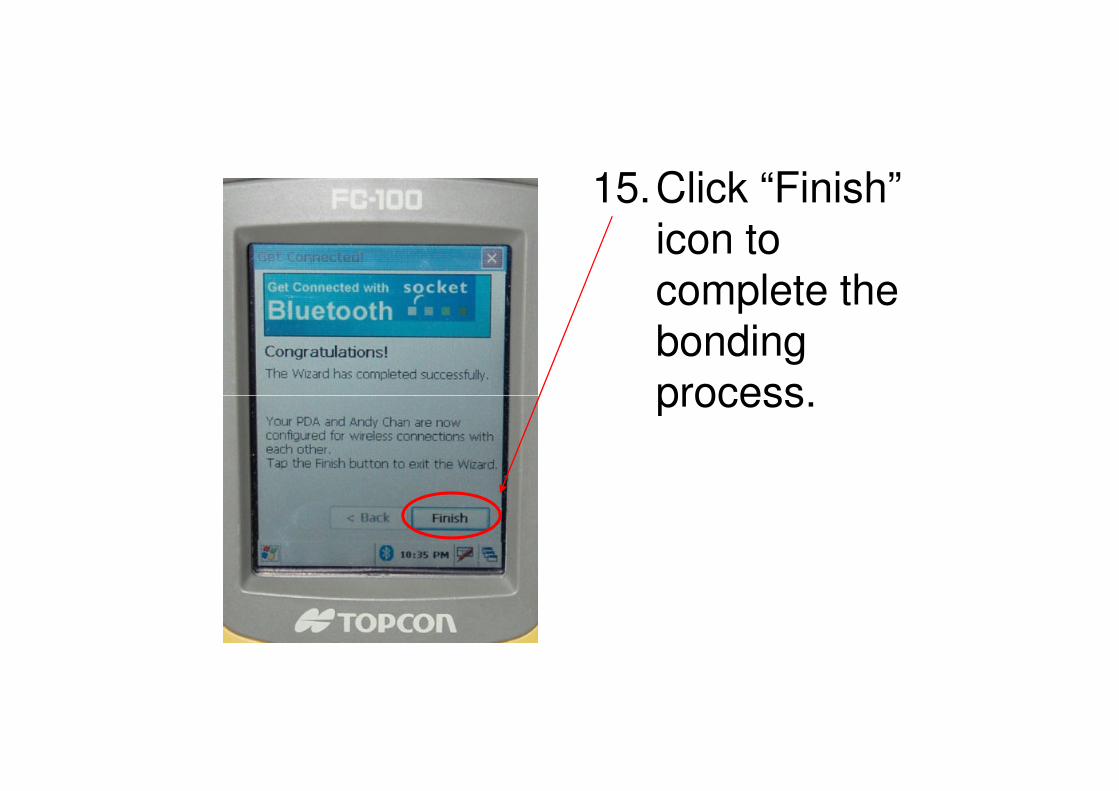
15.Click “Finish” icon to complete the bonding process.process.
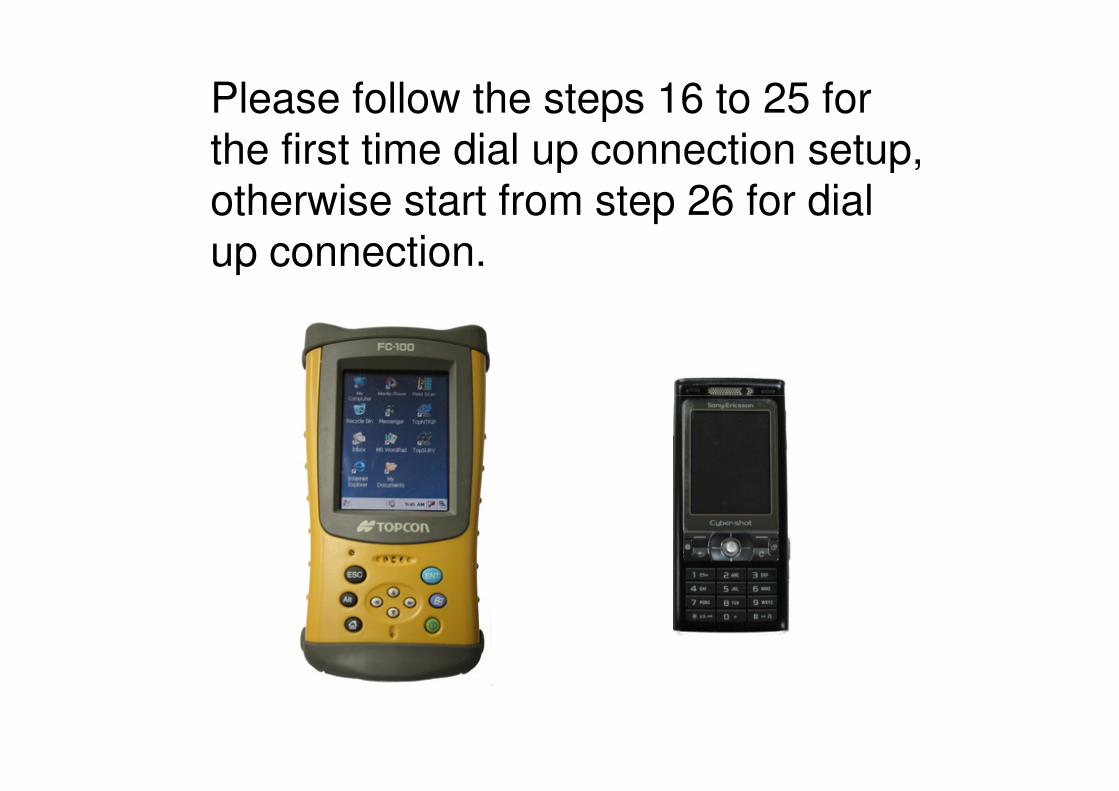
Please follow the steps 16 to 25 for the first time dial up connection setup, otherwise start from step 26 for dial up connection.
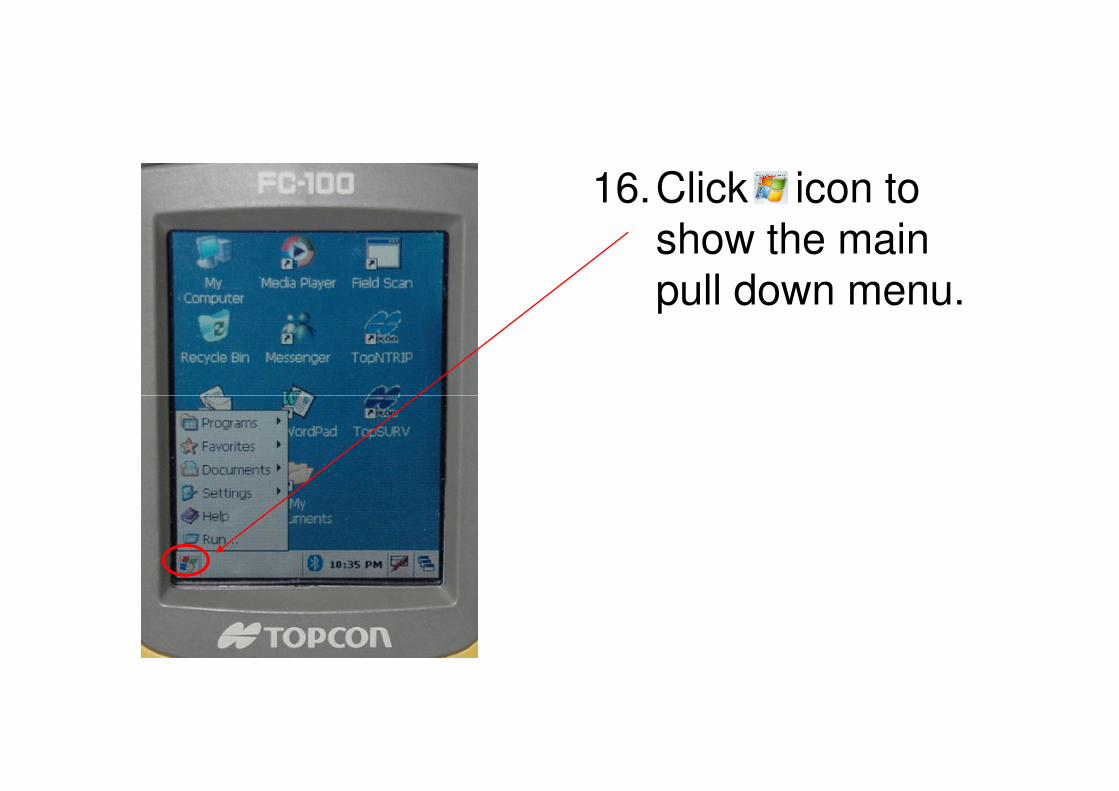
16.Click icon to show the main pull down menu.

17.Choose “Network&Dial-up” under “Settings”.
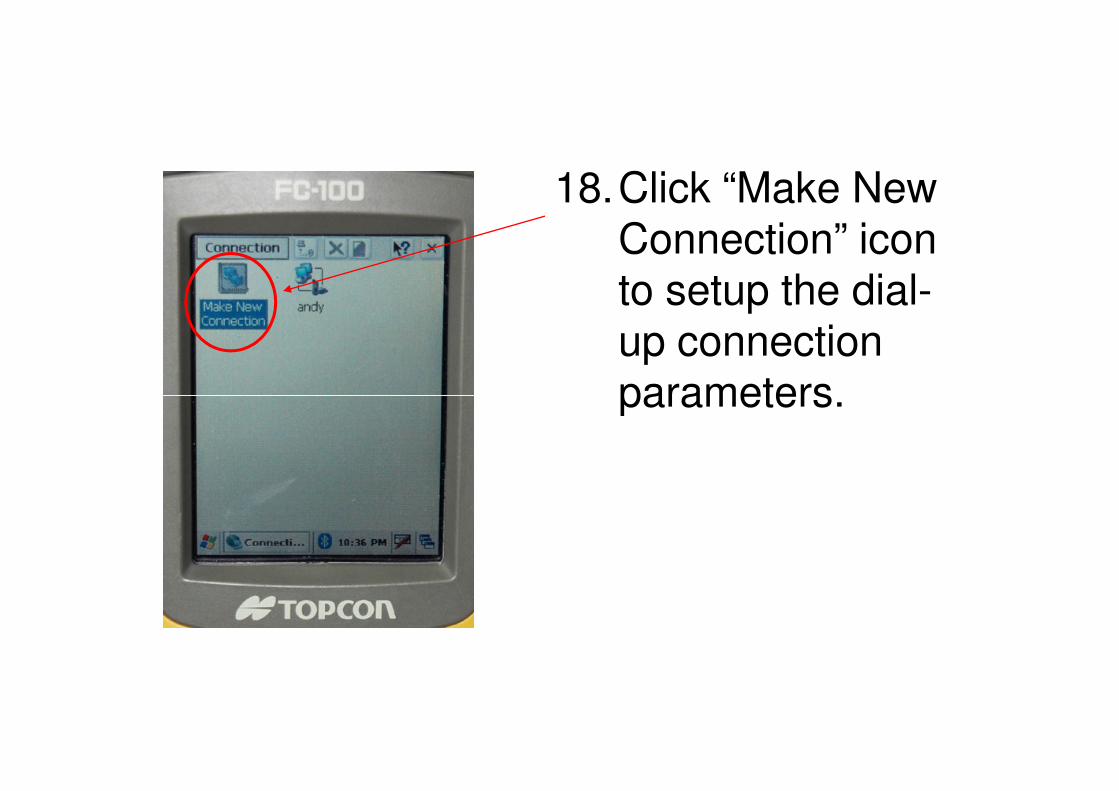
18.Click “Make New Connection” icon to setup the dial-up connection parameters. parameters.

19. Input a name for this connection file (e.g. Ntrip).
Check “Dial-Up Connection” box, Connection” box, then click “Next >” icon.
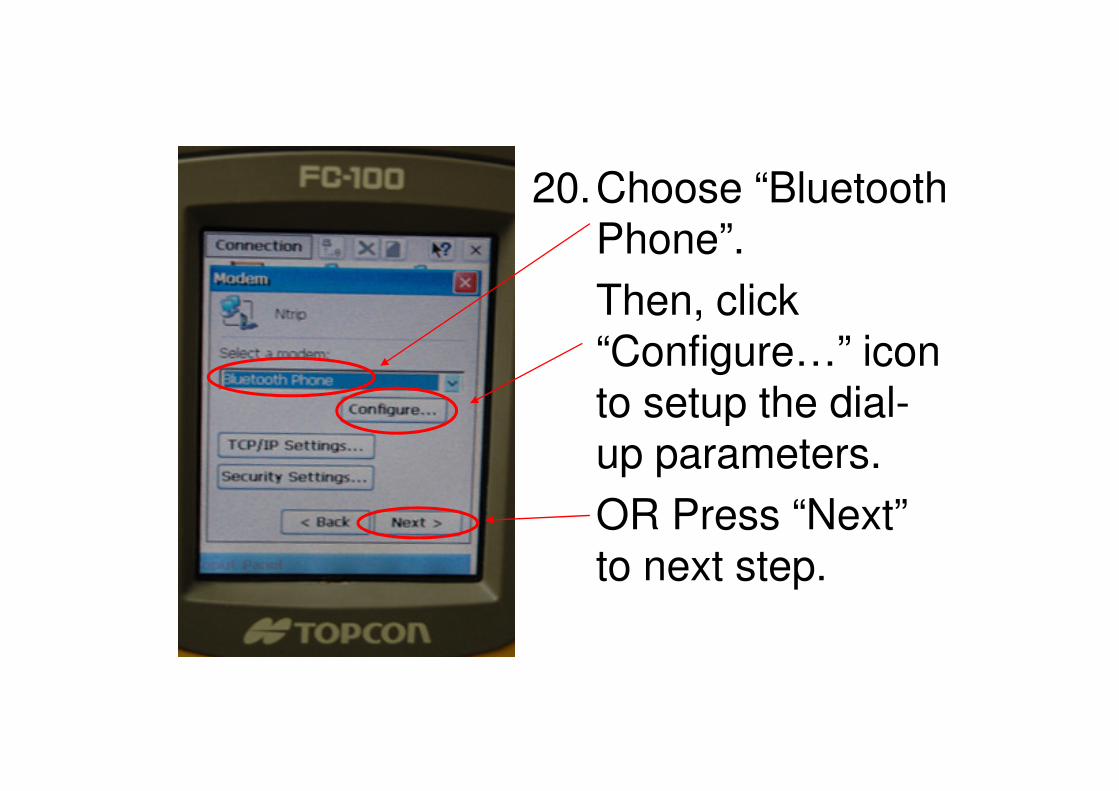
20.Choose “Bluetooth Phone”.
Then, click “Configure…” icon to setup the dial-to setup the dial-up parameters.
OR Press “Next” to next step.
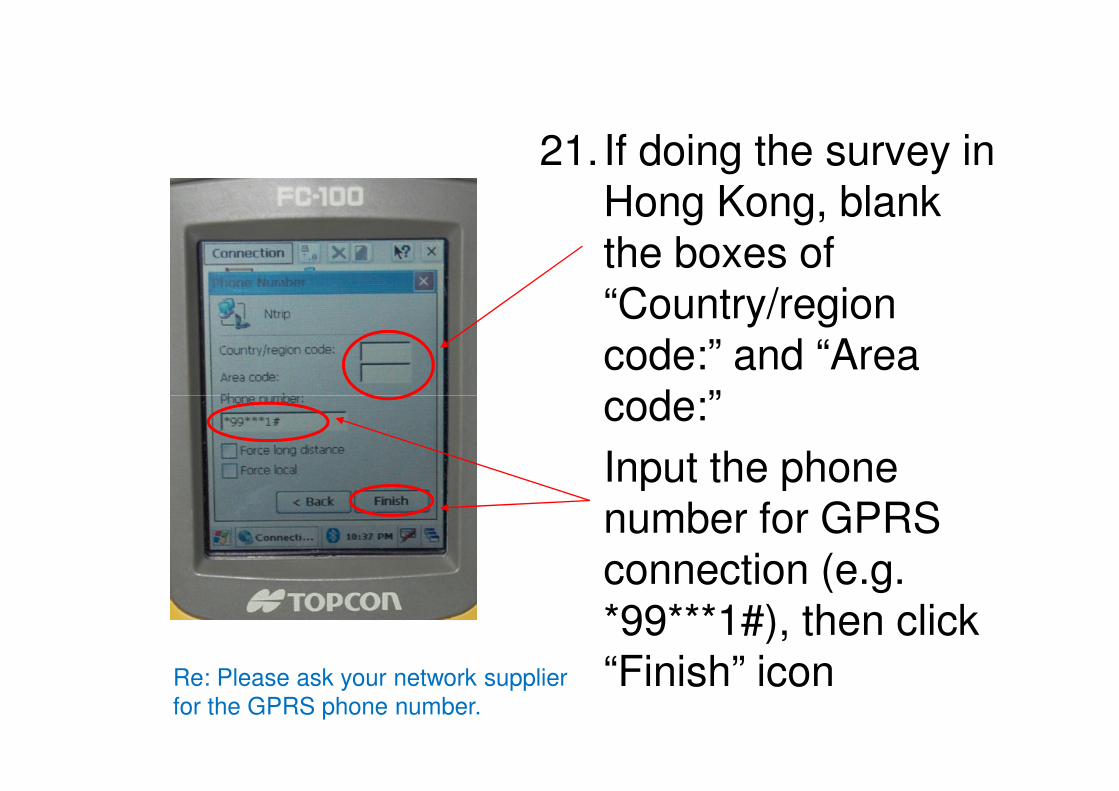
21. If doing the survey in Hong Kong, blank the boxes of “Country/region code:” and “Area code:”code:”
Input the phone number for GPRS connection (e.g. *99***1#), then click “Finish” iconRe: Please ask your network supplier
for the GPRS phone number.
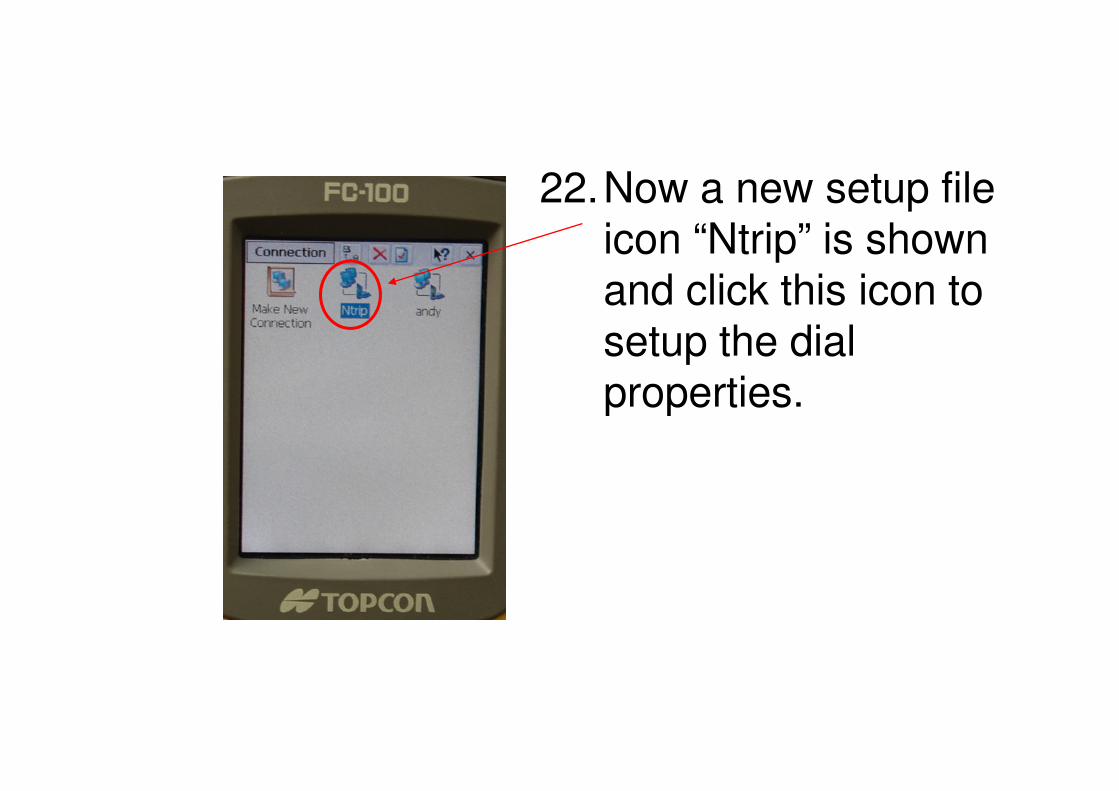
22.Now a new setup file icon “Ntrip” is shown and click this icon to setup the dial properties.properties.

23.Click “Dial Properties…” icon to set up the dial properties.
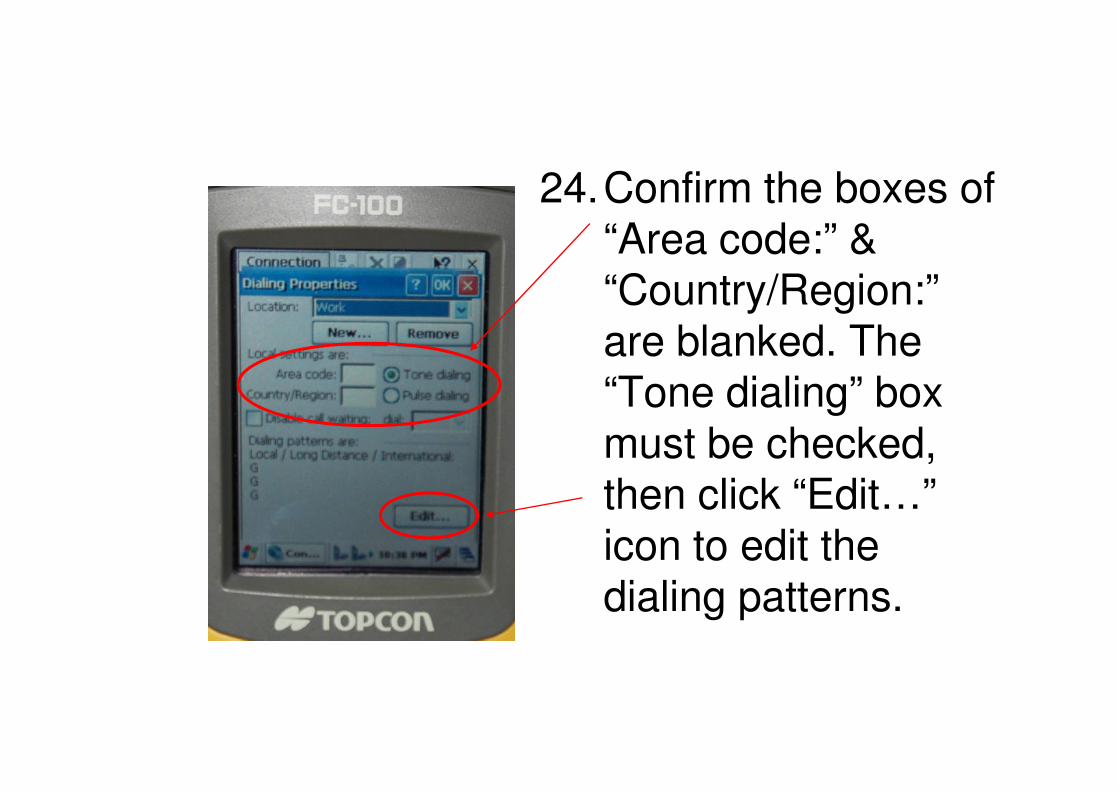
24.Confirm the boxes of “Area code:” & “Country/Region:” are blanked. The “Tone dialing” box “Tone dialing” box must be checked, then click “Edit…” icon to edit the dialing patterns.
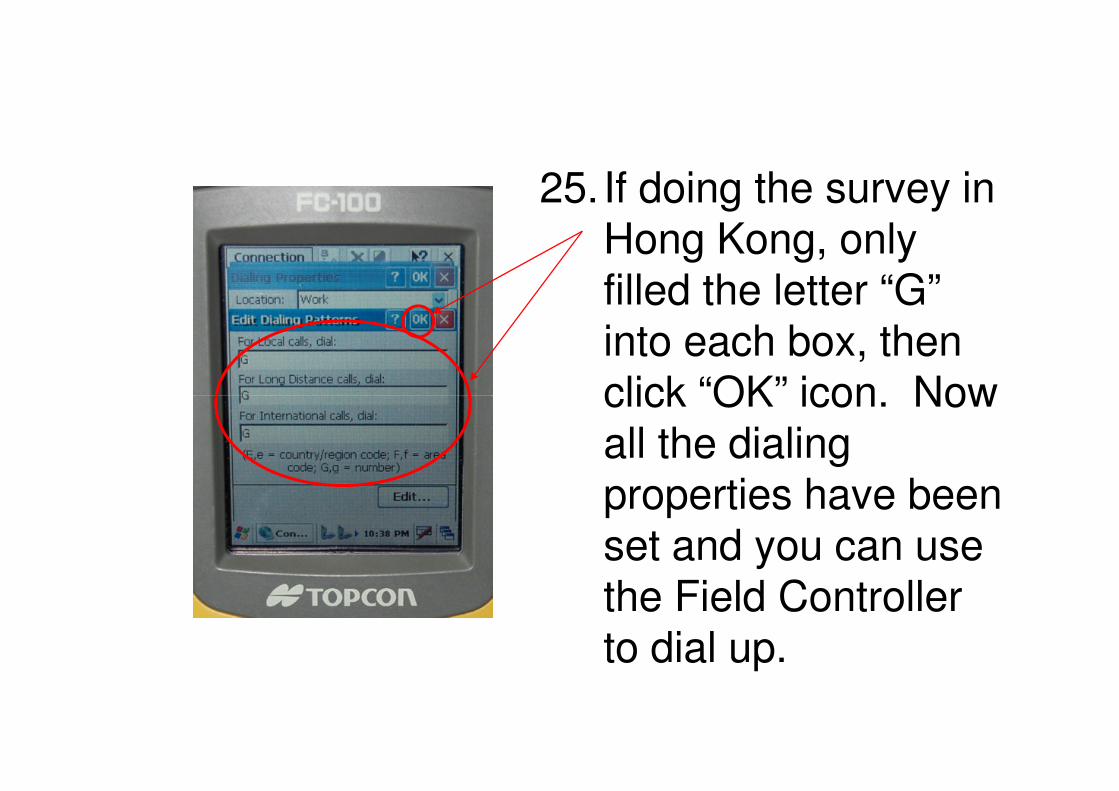
25. If doing the survey in Hong Kong, only filled the letter “G” into each box, then click “OK” icon. Now click “OK” icon. Now all the dialing properties have been set and you can use the Field Controller to dial up.
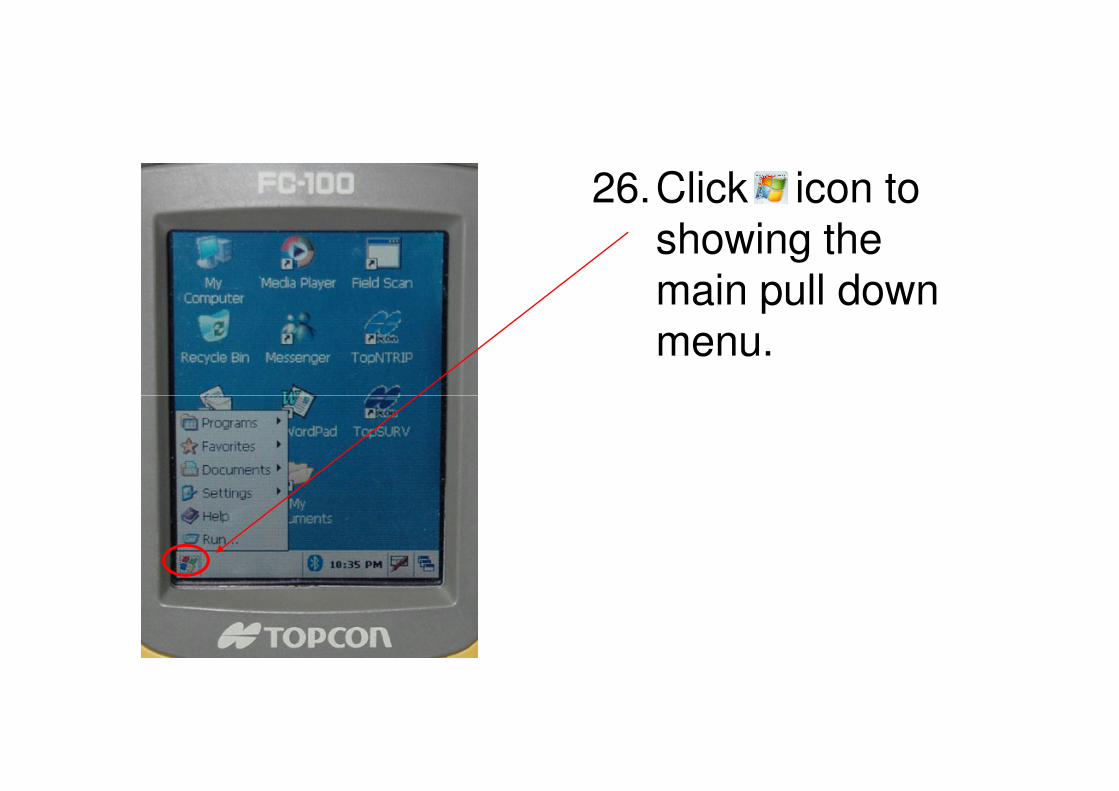
26.Click icon to showing the main pull down menu.
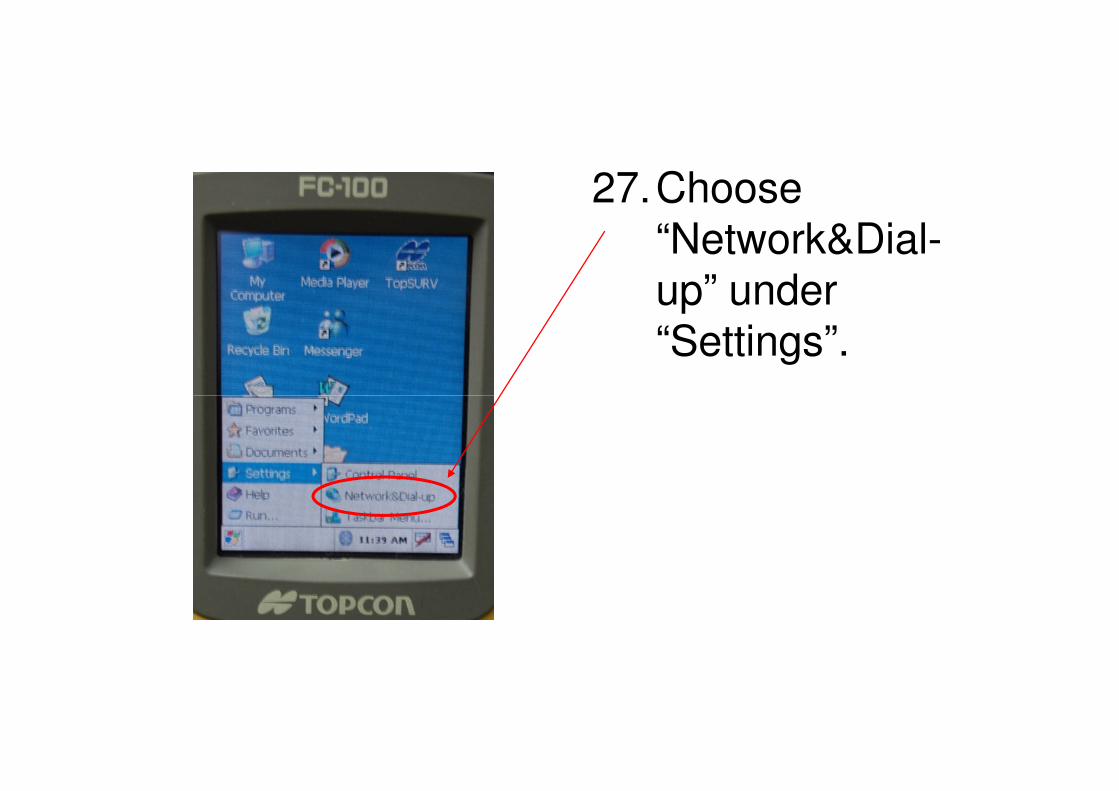
27.Choose “Network&Dial-up” under “Settings”.
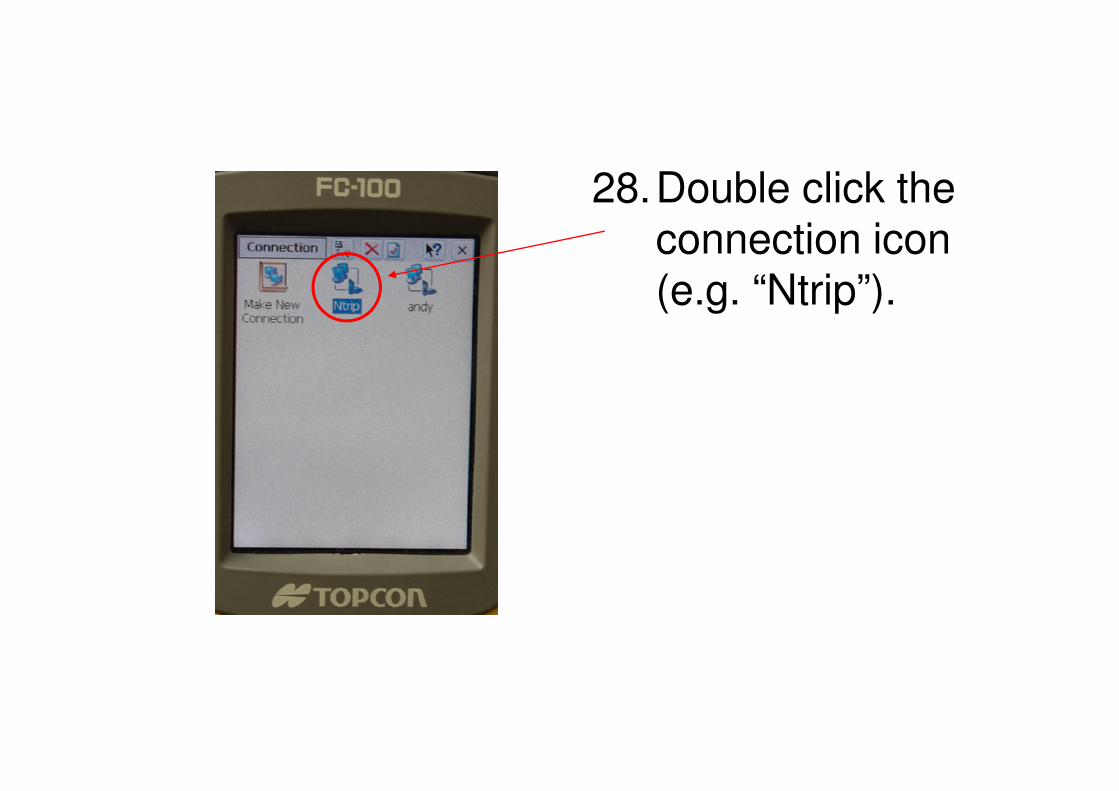
28.Double click the connection icon (e.g. “Ntrip”).
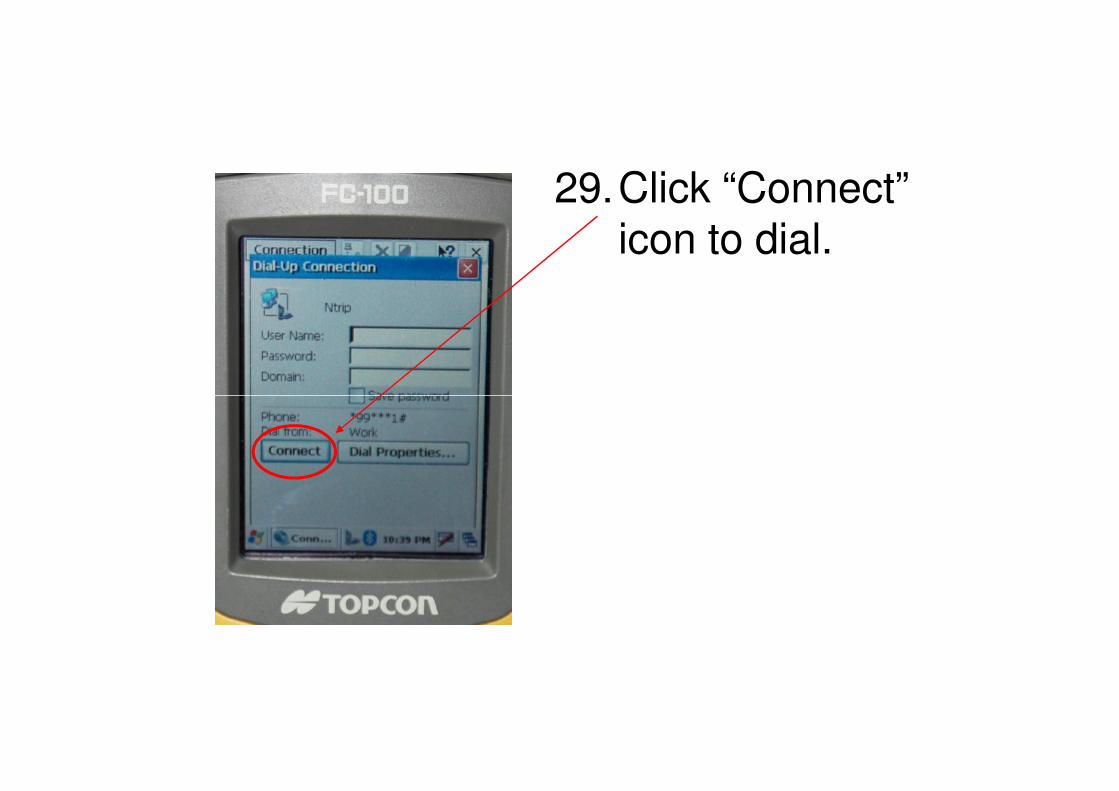
29.Click “Connect” icon to dial.
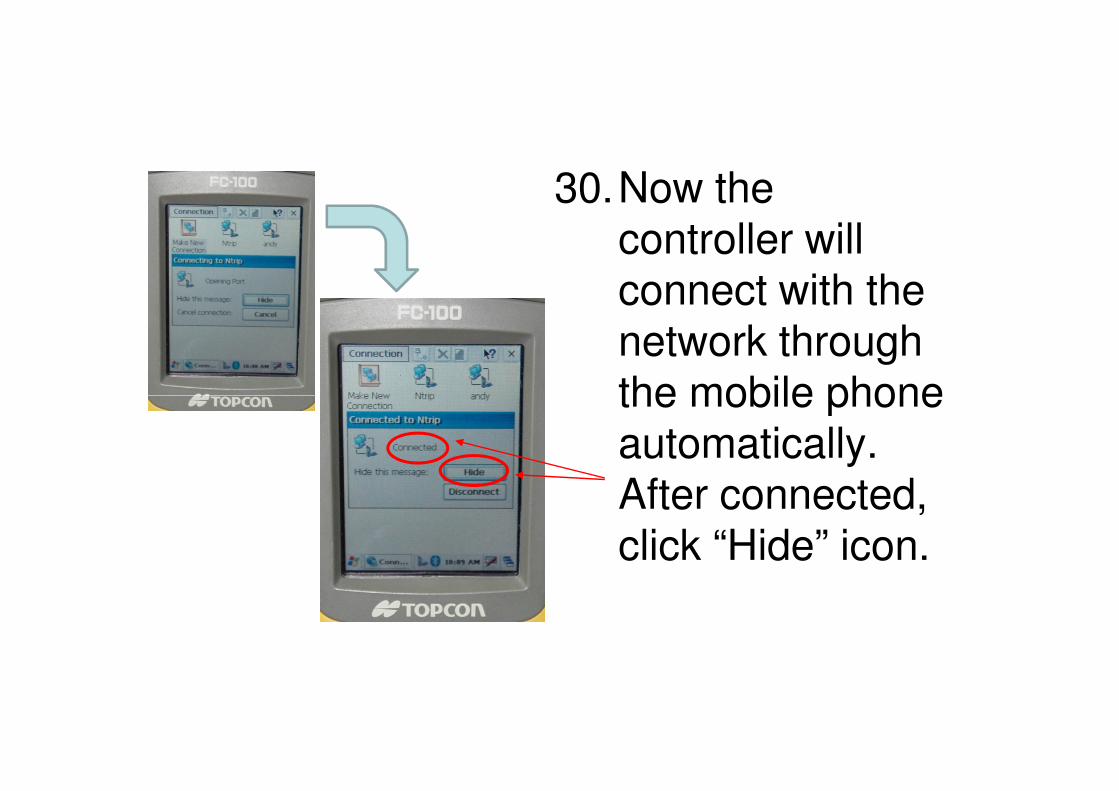
30.Now the controller will connect with the network through the mobile phone the mobile phone automatically. After connected, click “Hide” icon.
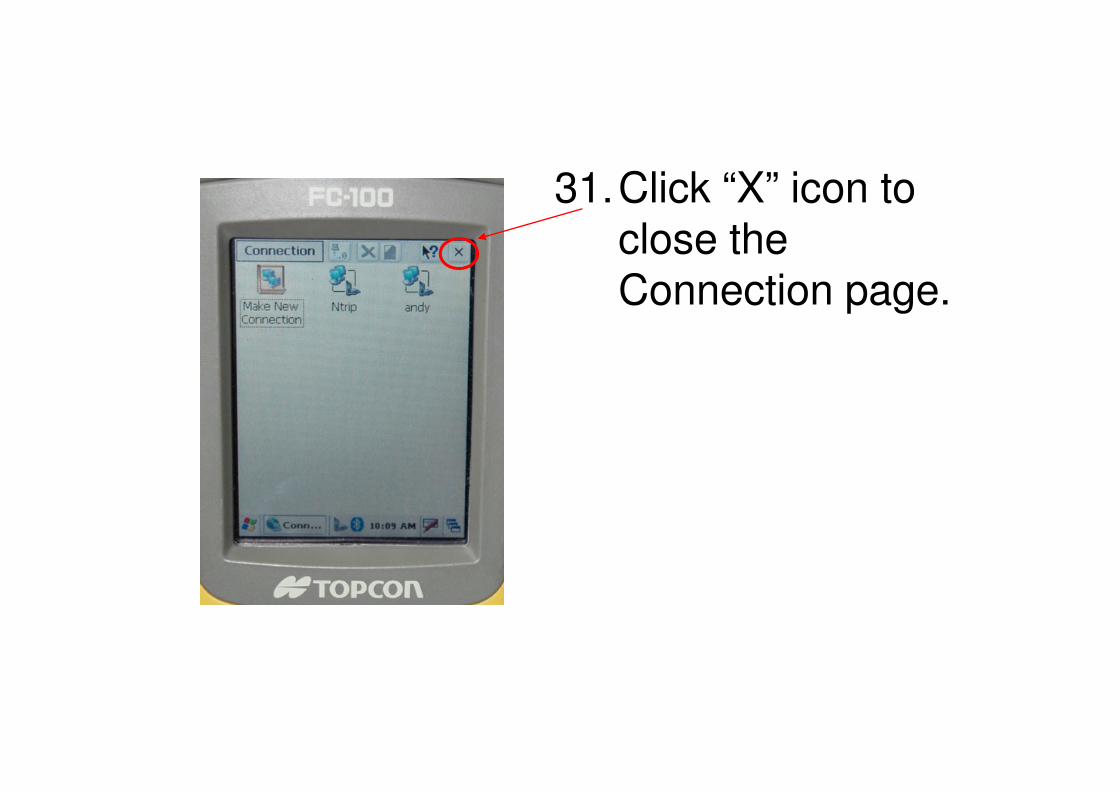
31.Click “X” icon to close the Connection page.
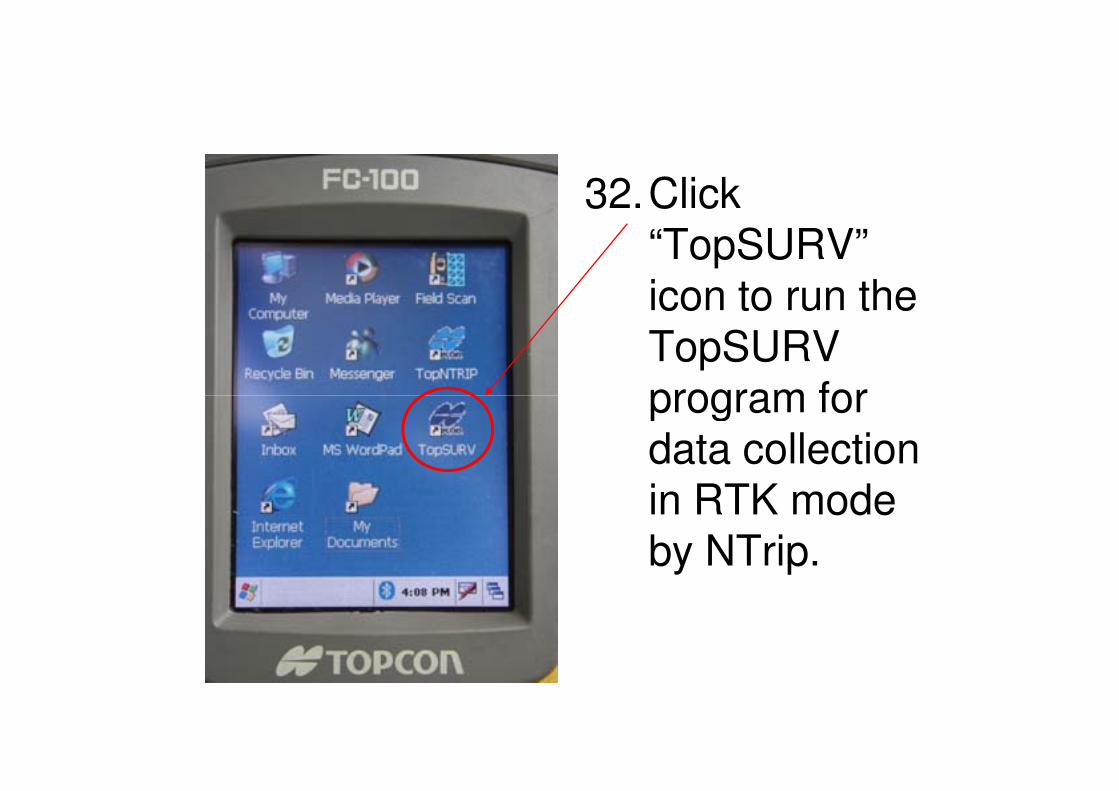
32.Click “TopSURV” icon to run the TopSURV program for program for data collection in RTK mode by NTrip.
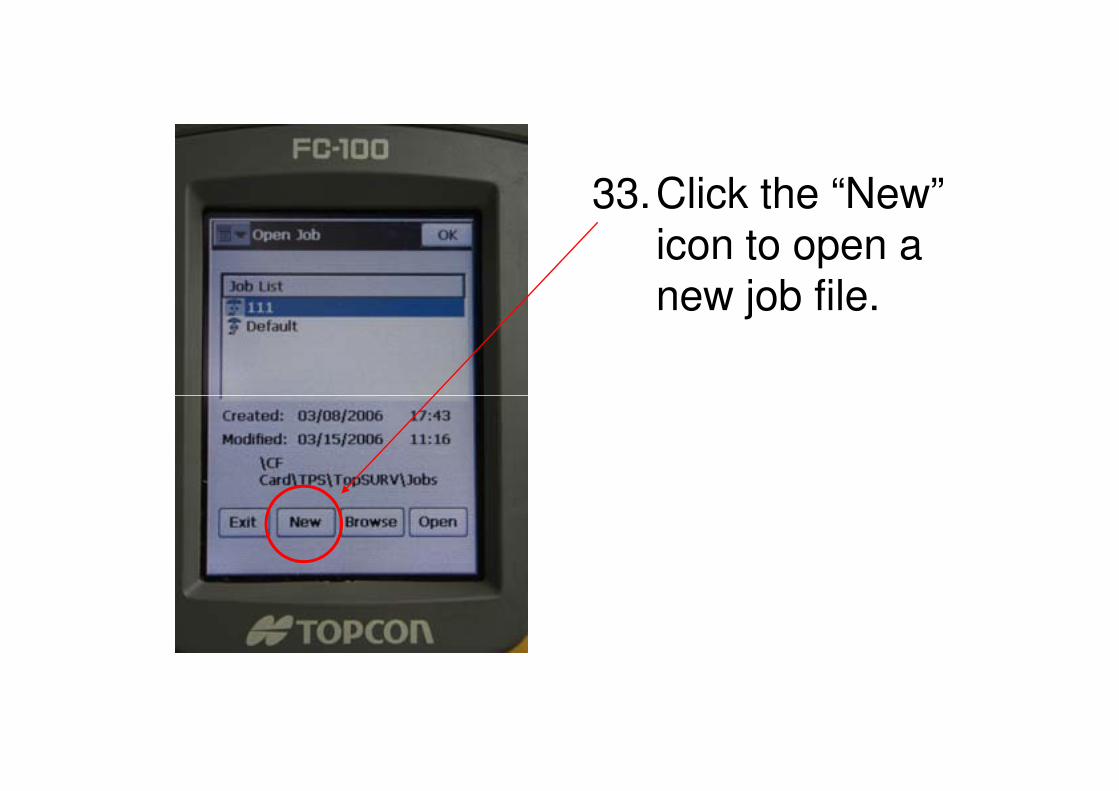
33.Click the “New” icon to open a new job file.
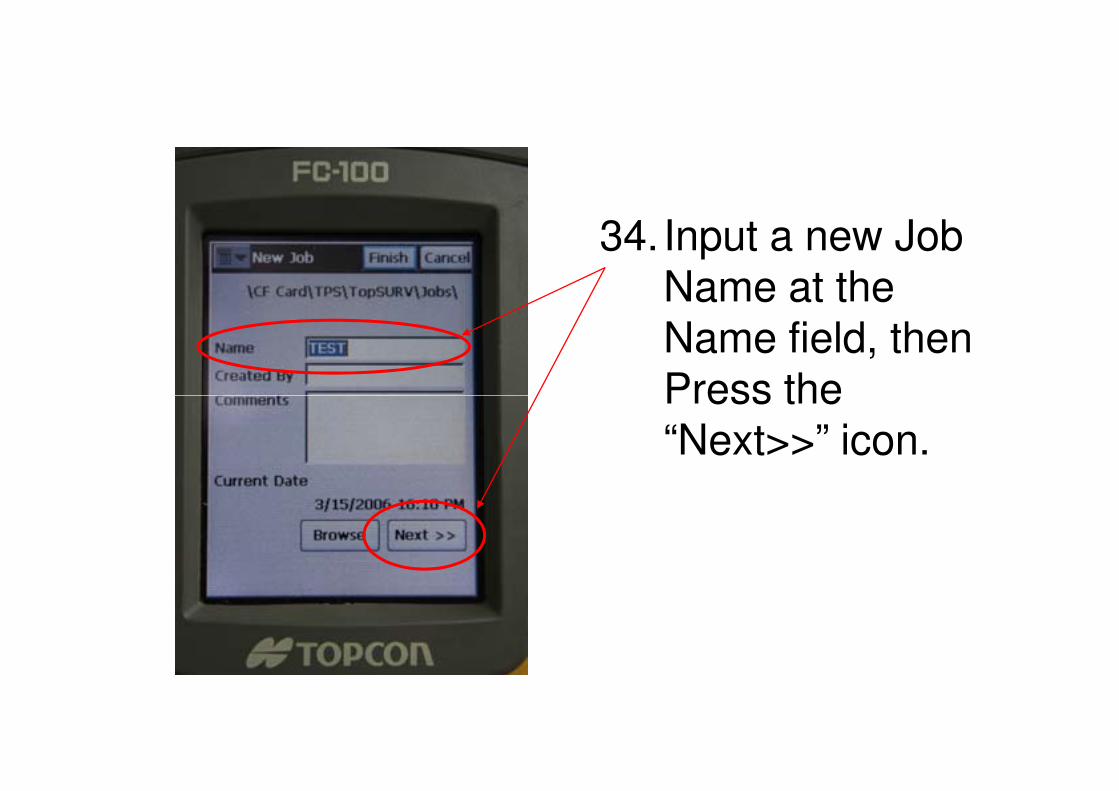
34. Input a new Job Name at the Name field, then Press the Press the “Next>>” icon.
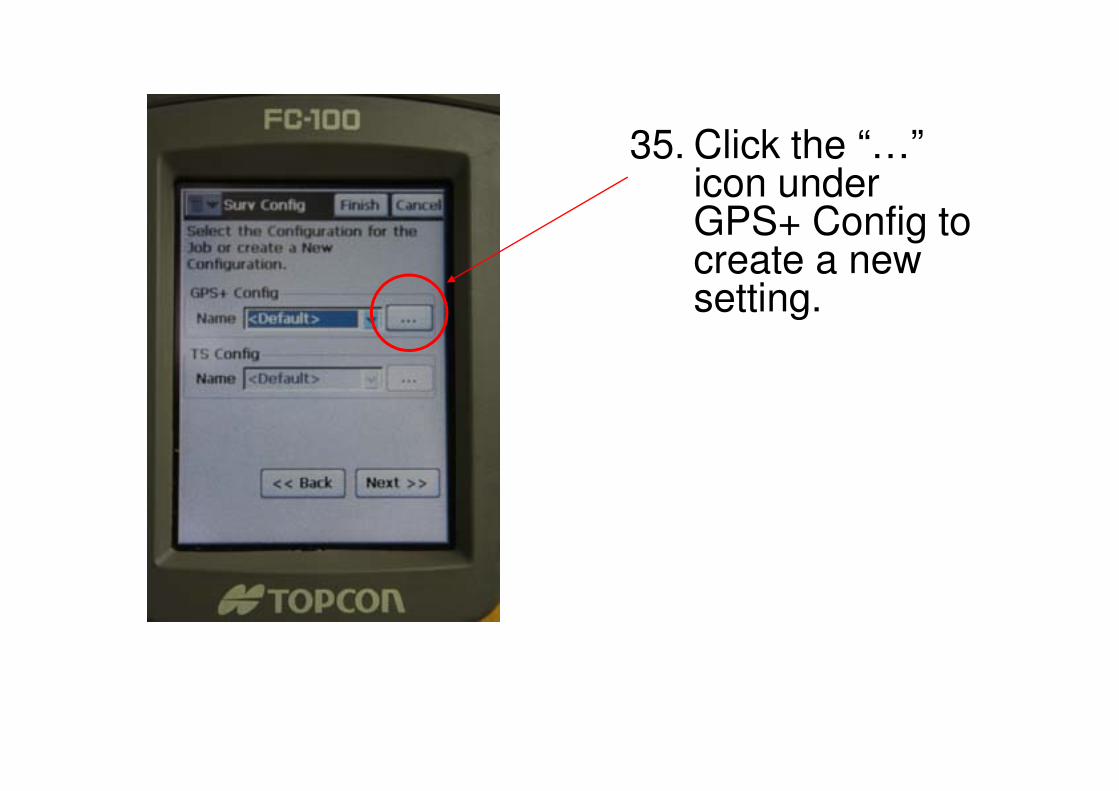
35. Click the “…” icon under GPS+ Config to create a new setting.
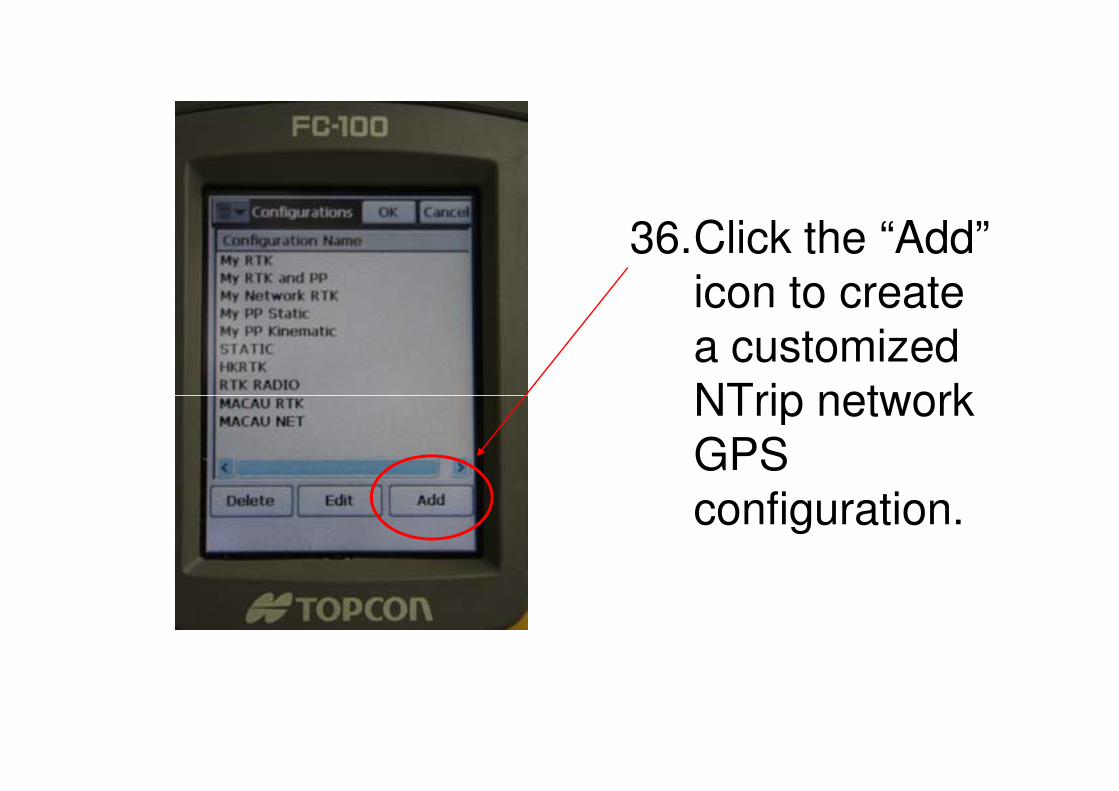
36.Click the “Add”
icon to create
a customized
NTrip network NTrip network
GPS
configuration.
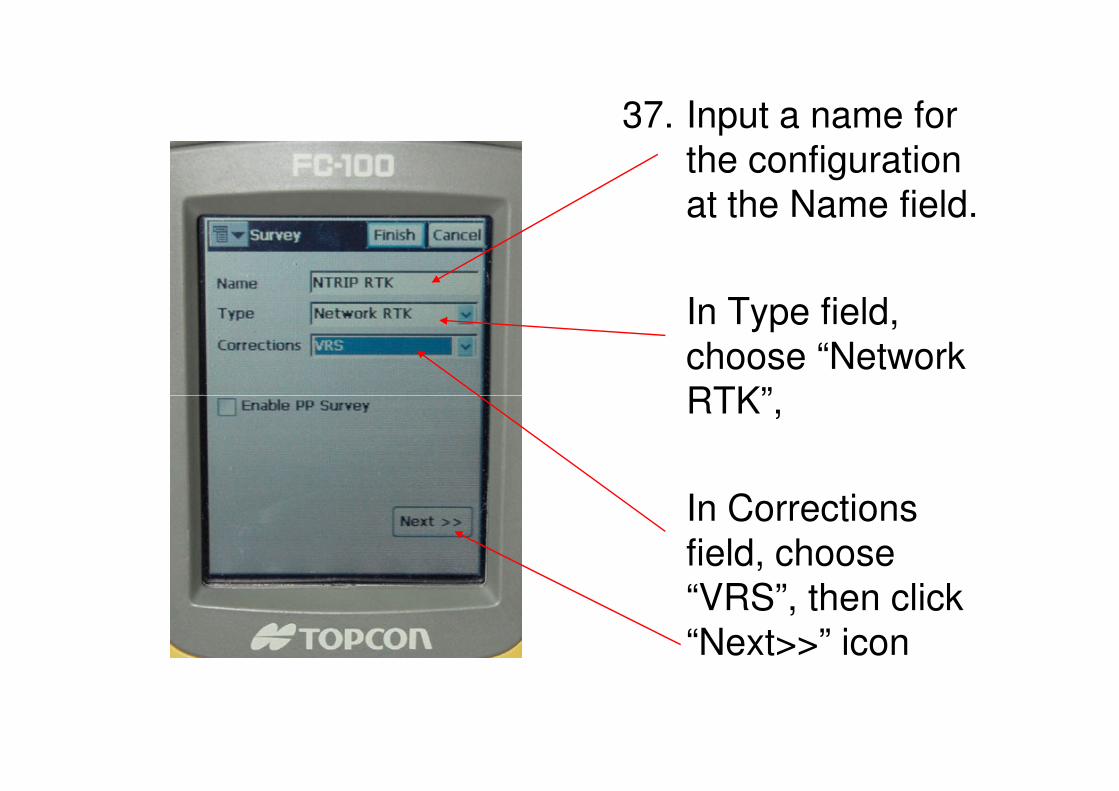
37. Input a name for
the configuration
at the Name field.
In Type field,
choose “Network
RTK”,RTK”,
In Corrections
field, choose
“VRS”, then click
“Next>>” icon
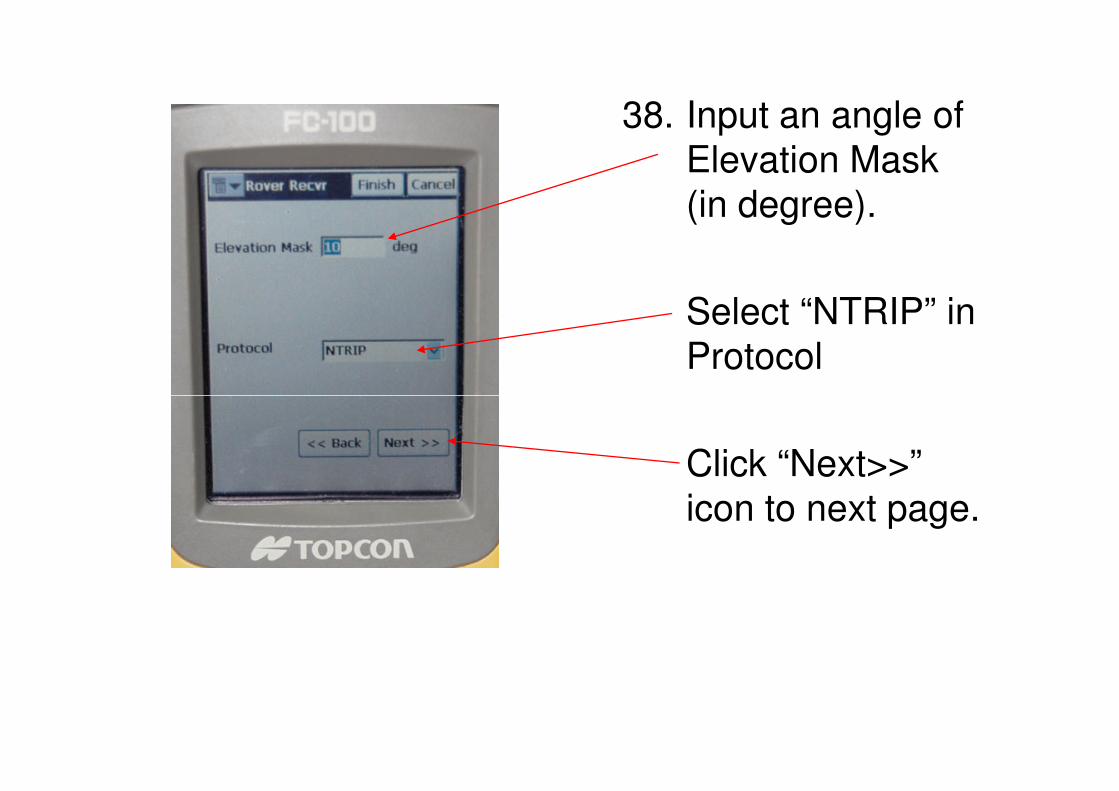
38. Input an angle of
Elevation Mask
(in degree).
Select “NTRIP” in
Protocol
Click “Next>>”
icon to next page.
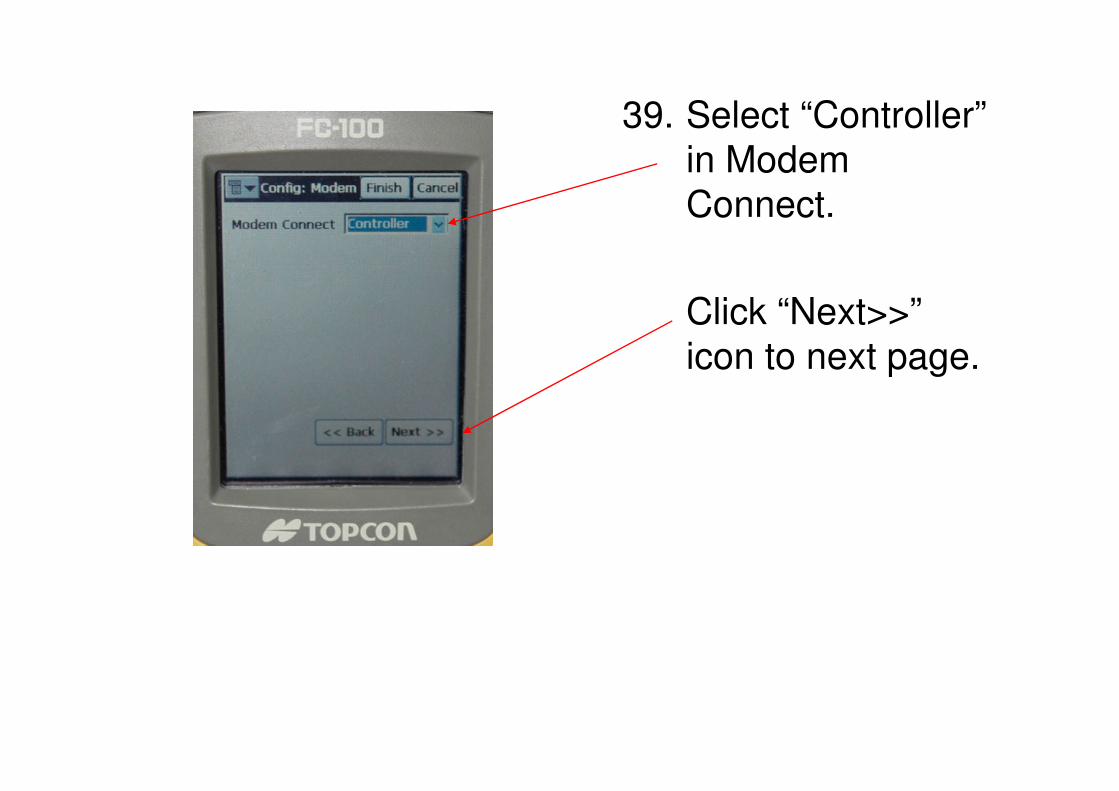
39. Select “Controller”
in Modem
Connect.
Click “Next>>”
icon to next page.
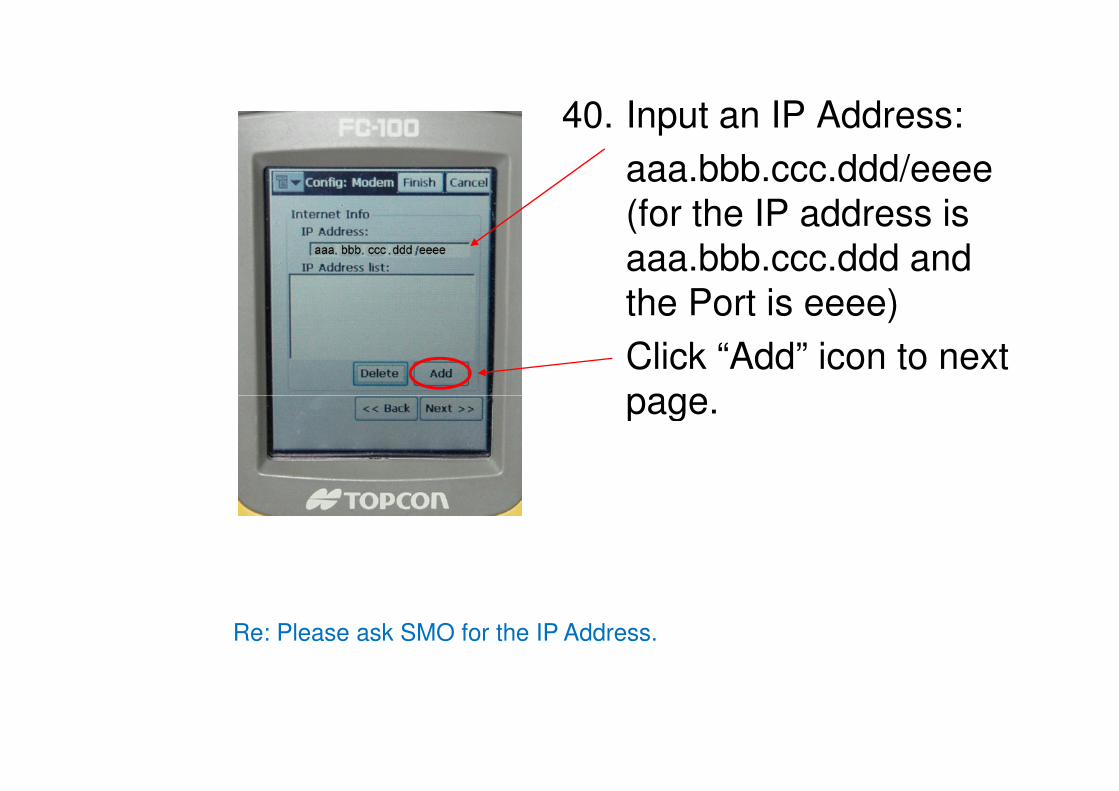
40. Input an IP Address:
aaa.bbb.ccc.ddd/eeee
(for the IP address is
aaa.bbb.ccc.ddd and
the Port is eeee)
Click “Add” icon to next
page.page.
Re: Please ask SMO for the IP Address.
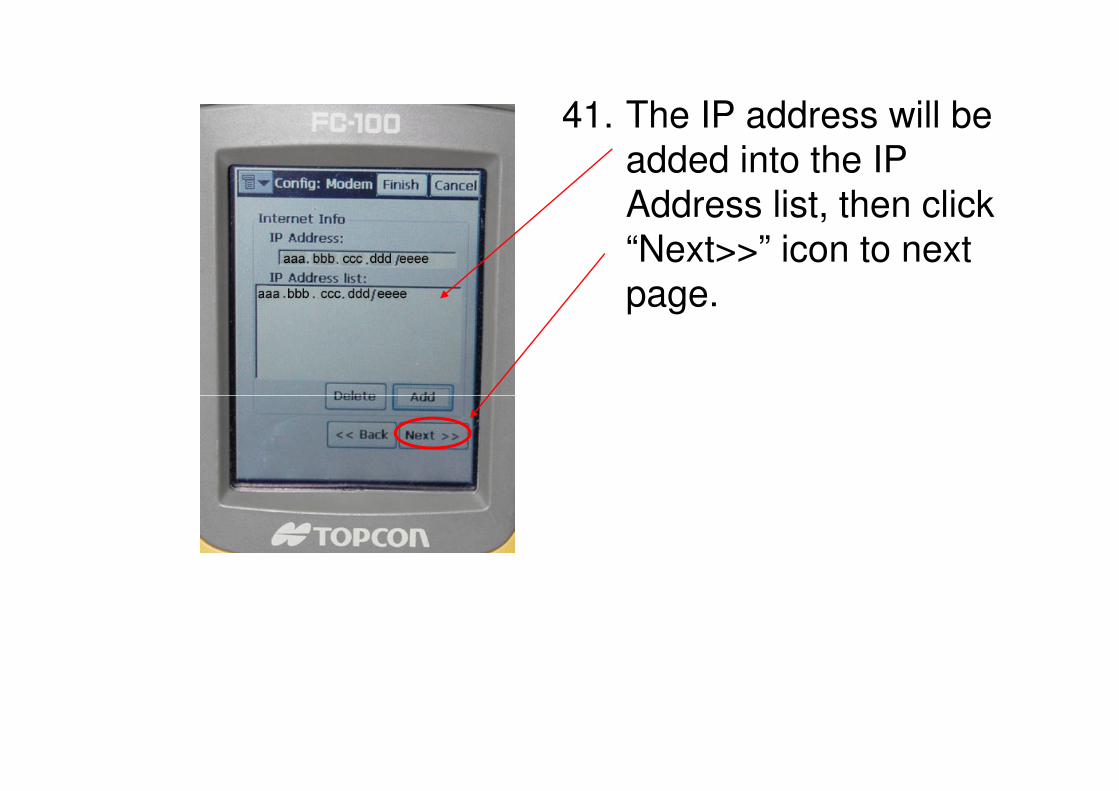
41. The IP address will be
added into the IP
Address list, then click
“Next>>” icon to next
page.
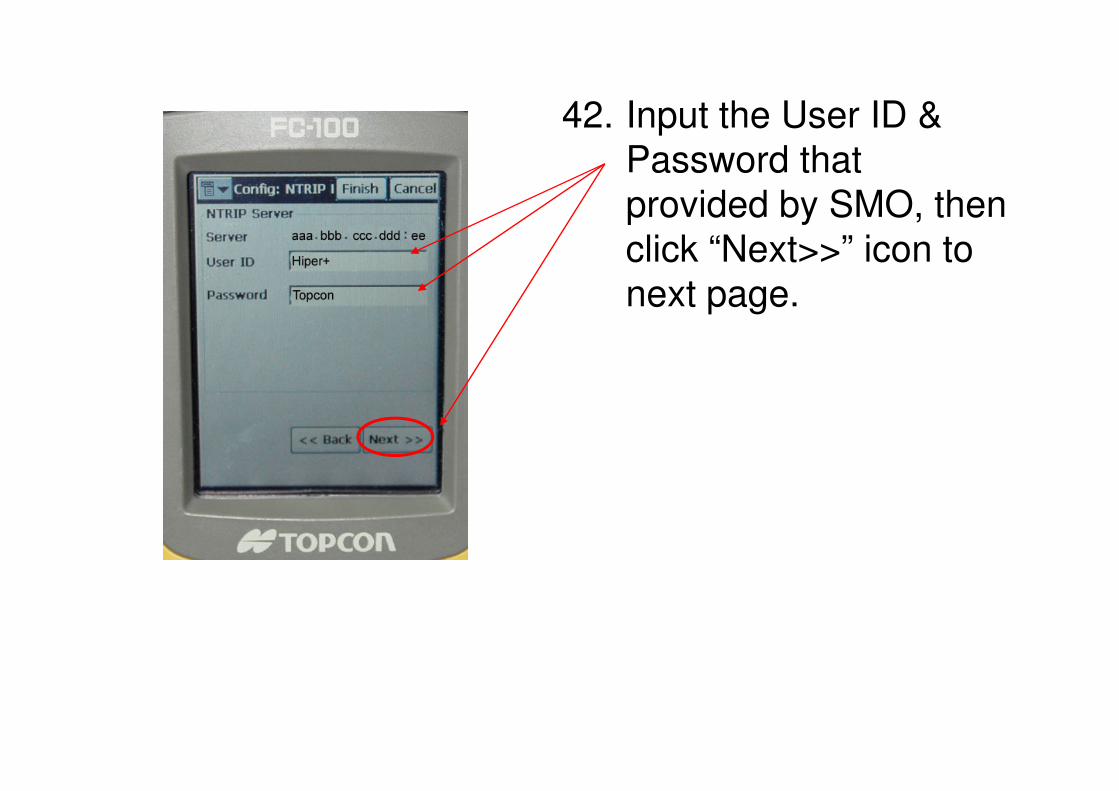
42. Input the User ID &
Password that
provided by SMO, then
click “Next>>” icon to
next page.
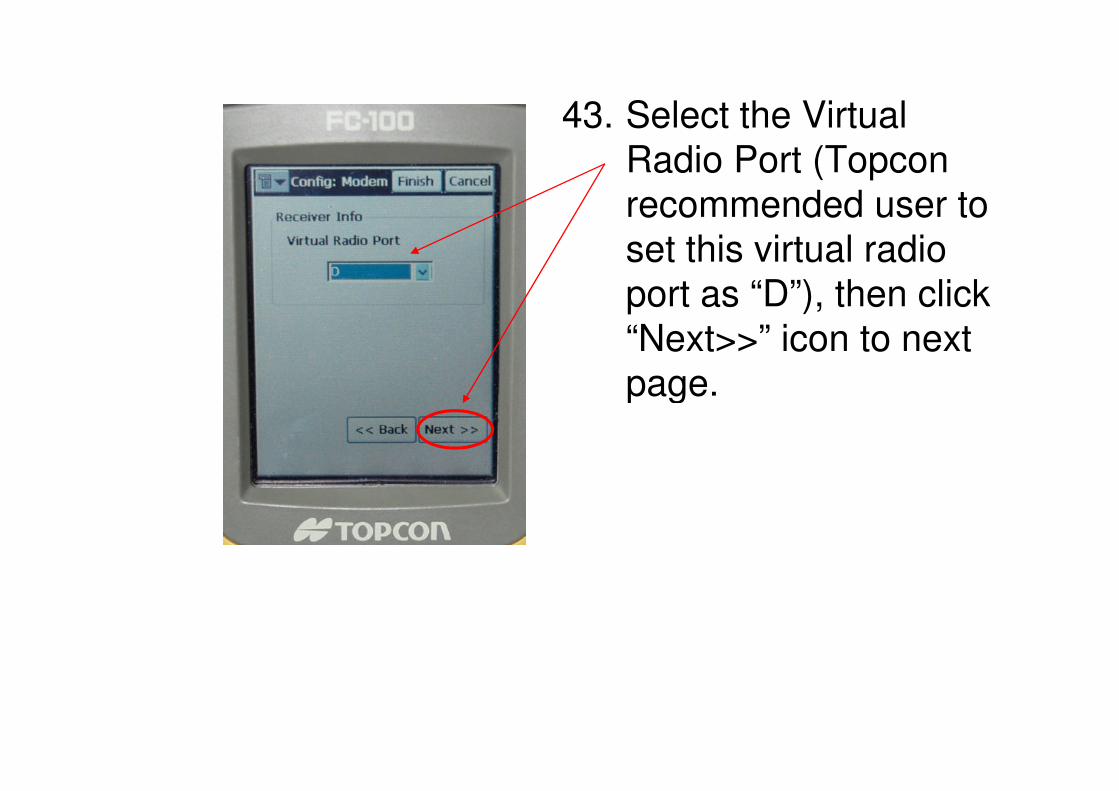
43. Select the Virtual
Radio Port (Topcon
recommended user to
set this virtual radio
port as “D”), then click
“Next>>” icon to next
page.page.
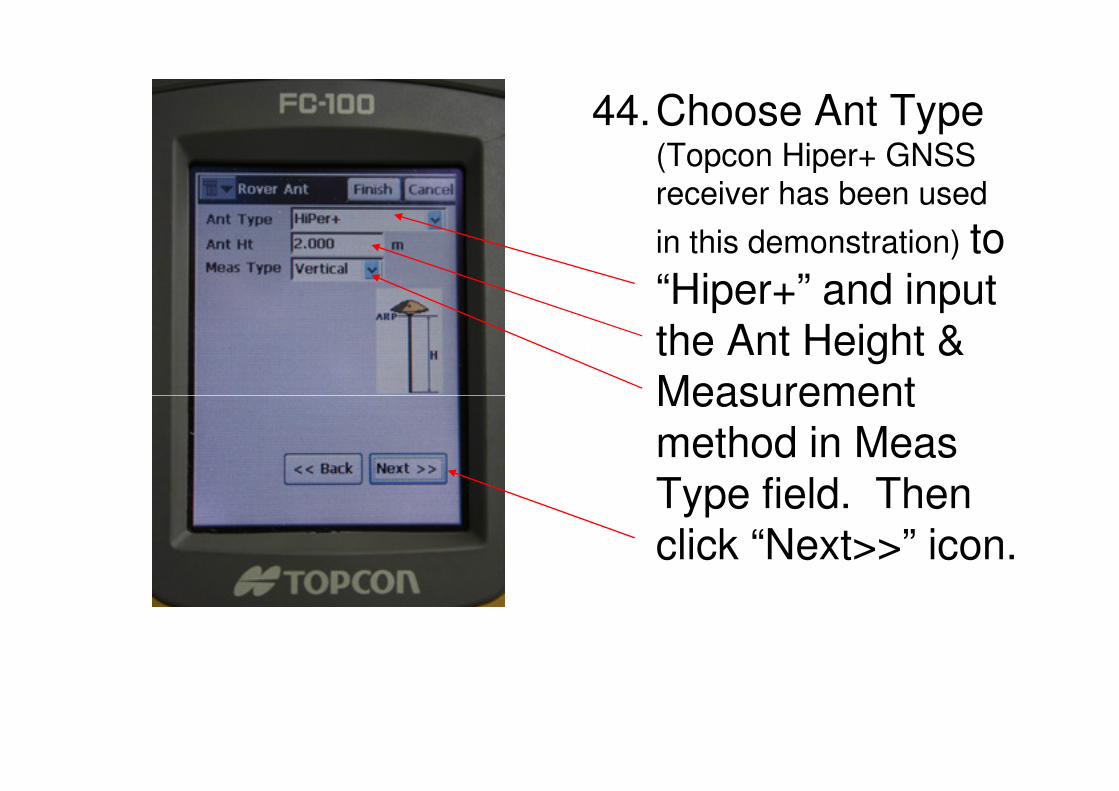
44.Choose Ant Type (Topcon Hiper+ GNSS
receiver has been used
in this demonstration) to “Hiper+” and input the Ant Height & Measurement Measurement method in Meas Type field. Then click “Next>>” icon.
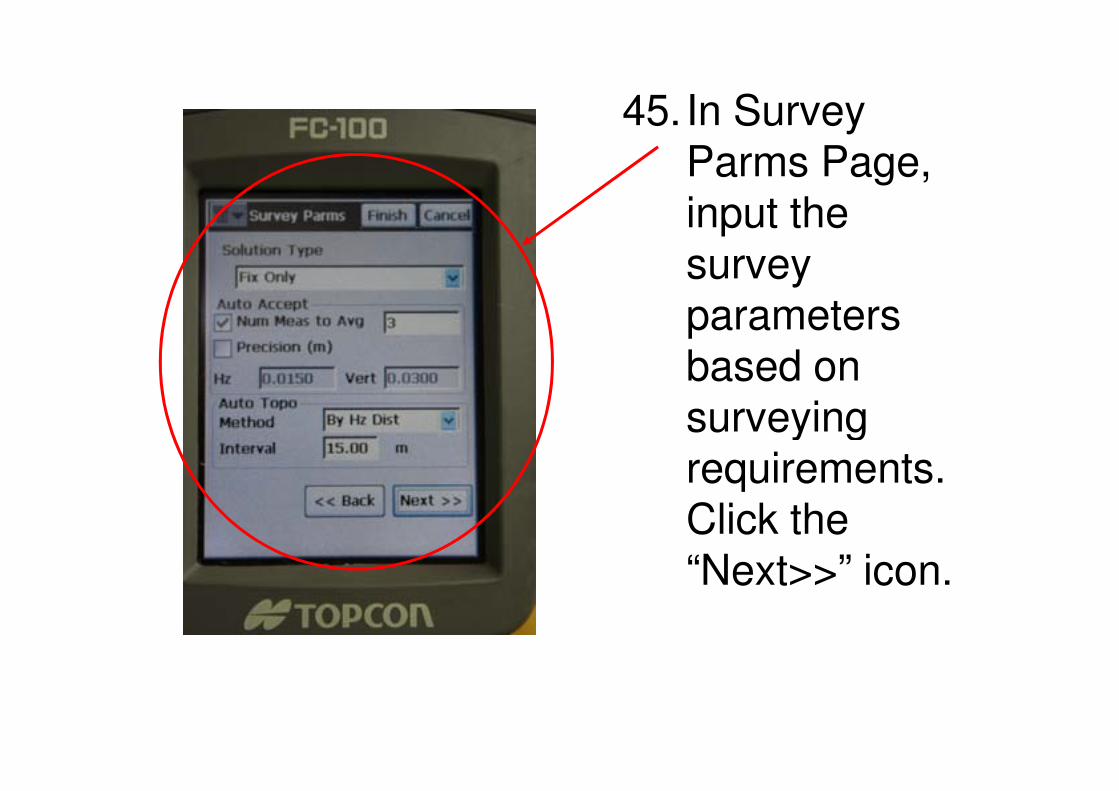
45. In Survey Parms Page, input the survey parameters based on surveying surveying requirements. Click the “Next>>” icon.
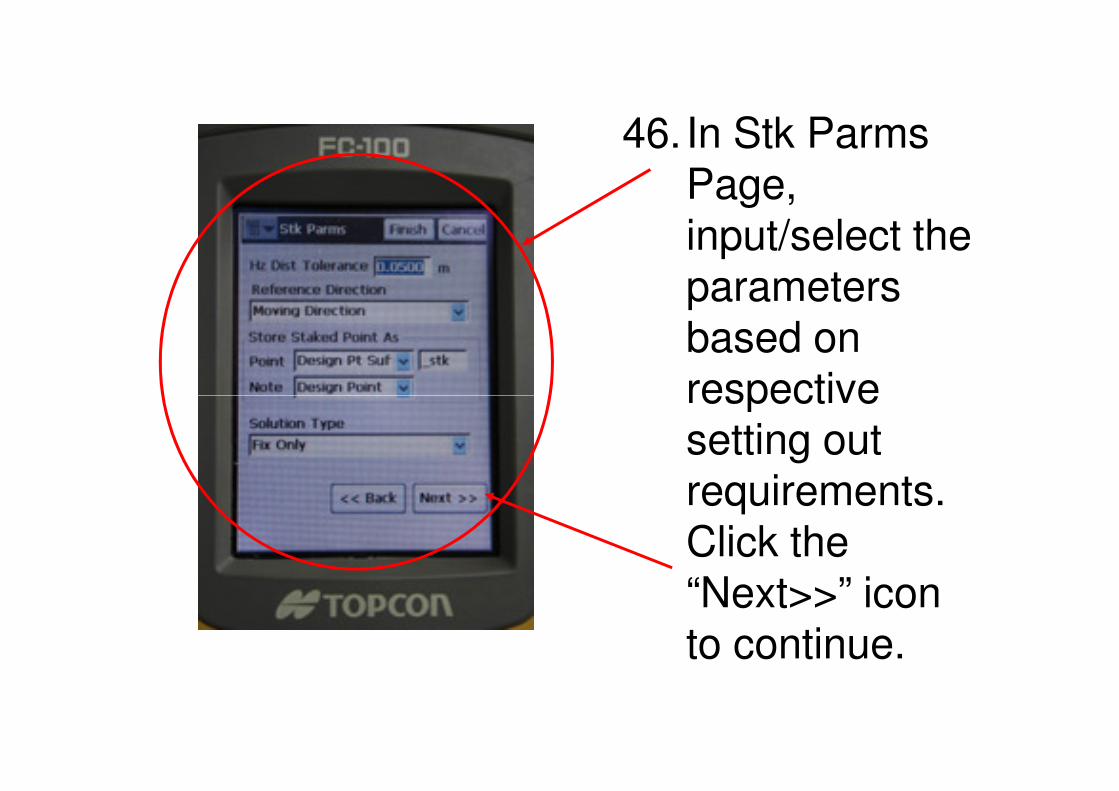
46. In Stk Parms Page, input/select the parameters based on respective respective setting out requirements. Click the “Next>>” icon to continue.
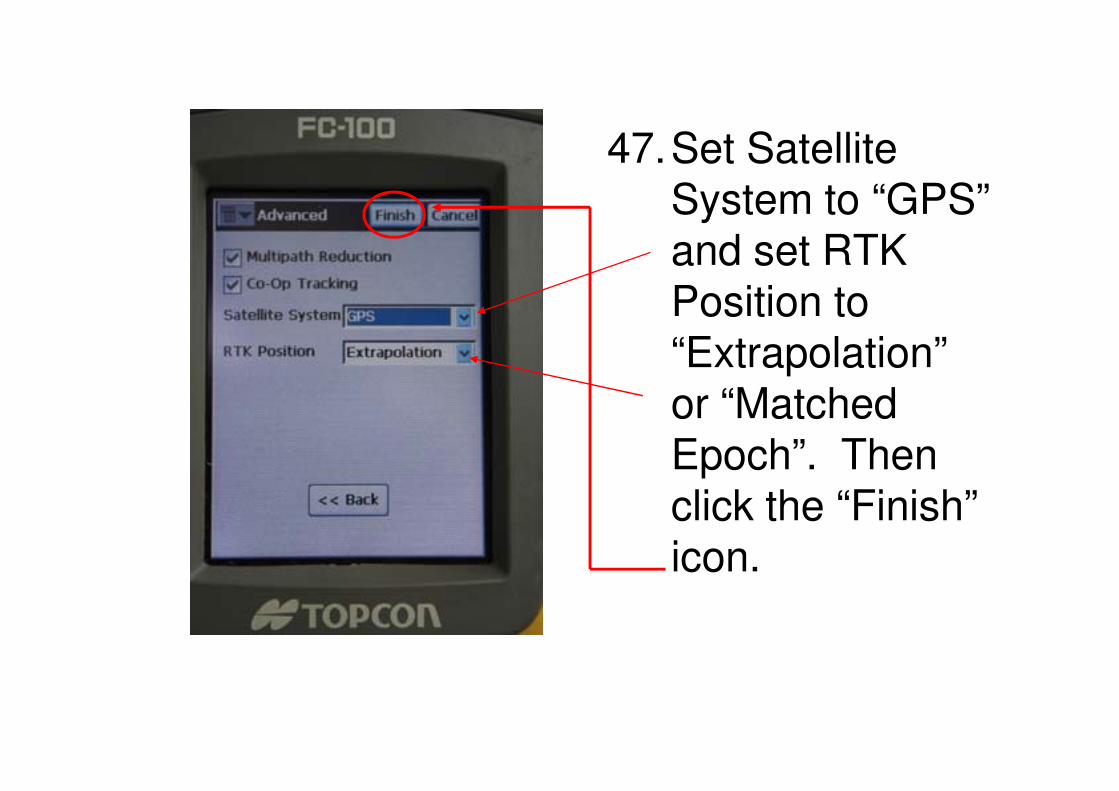
47.Set Satellite System to “GPS” and set RTK Position to “Extrapolation” or “Matched or “Matched Epoch”. Then click the “Finish” icon.
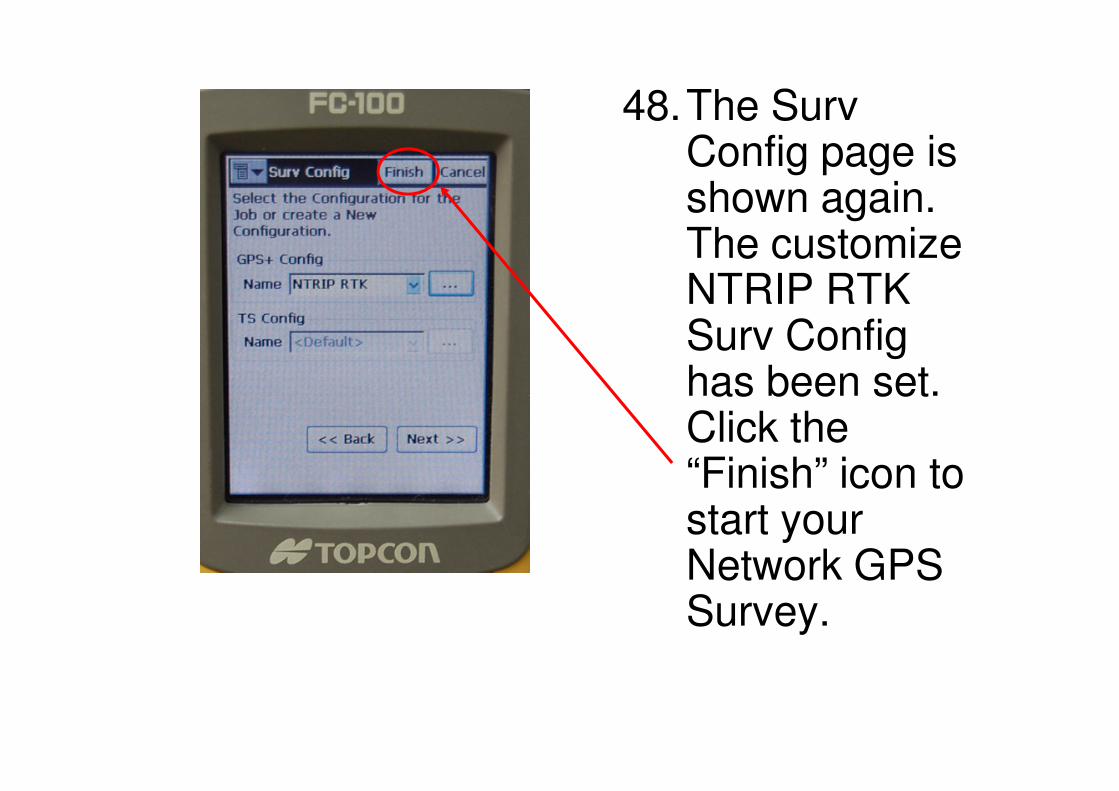
48.The Surv Config page is shown again. The customize NTRIP RTK Surv Config has been set. has been set. Click the “Finish” icon to start your Network GPS Survey.
Procedure for using Topcon GNSS
receiver for NTrip Network RTK
Survey(Topcon Hiper+ GNSS Receiver has been
used in this demonstration)used in this demonstration)
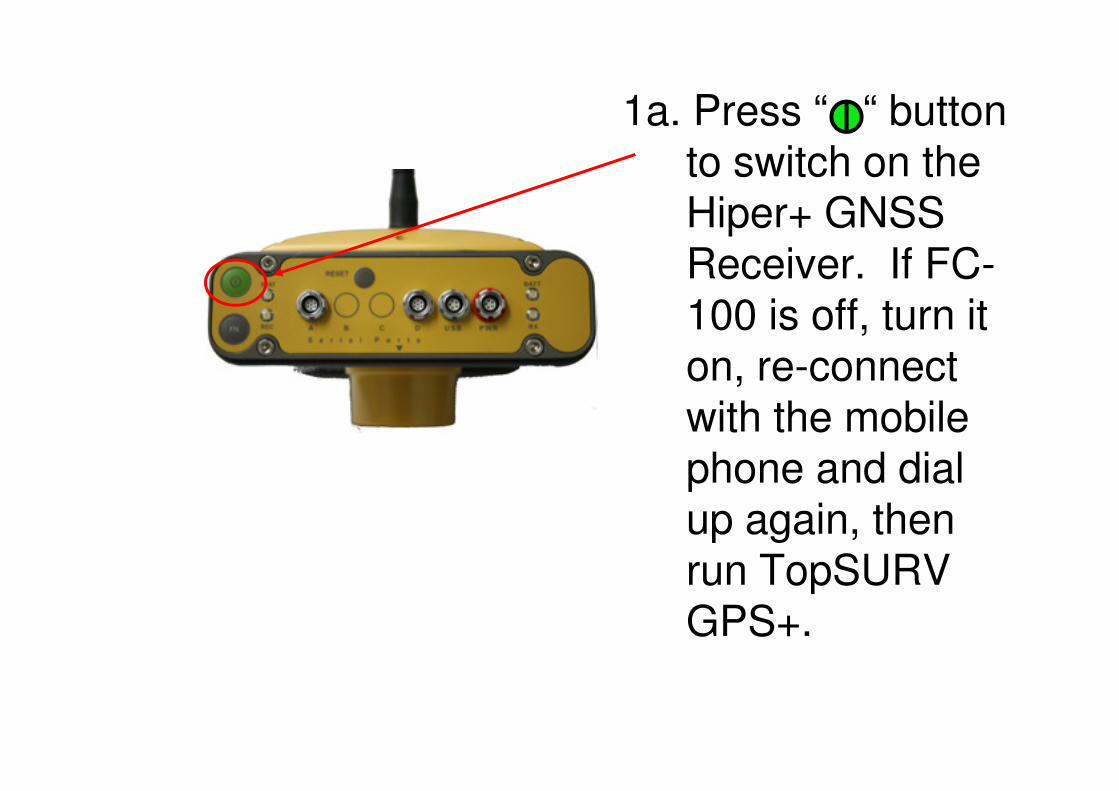
1a. Press “ “ button to switch on the Hiper+ GNSS Receiver. If FC-100 is off, turn it on, re-connect with the mobile with the mobile phone and dial up again, then run TopSURV GPS+.
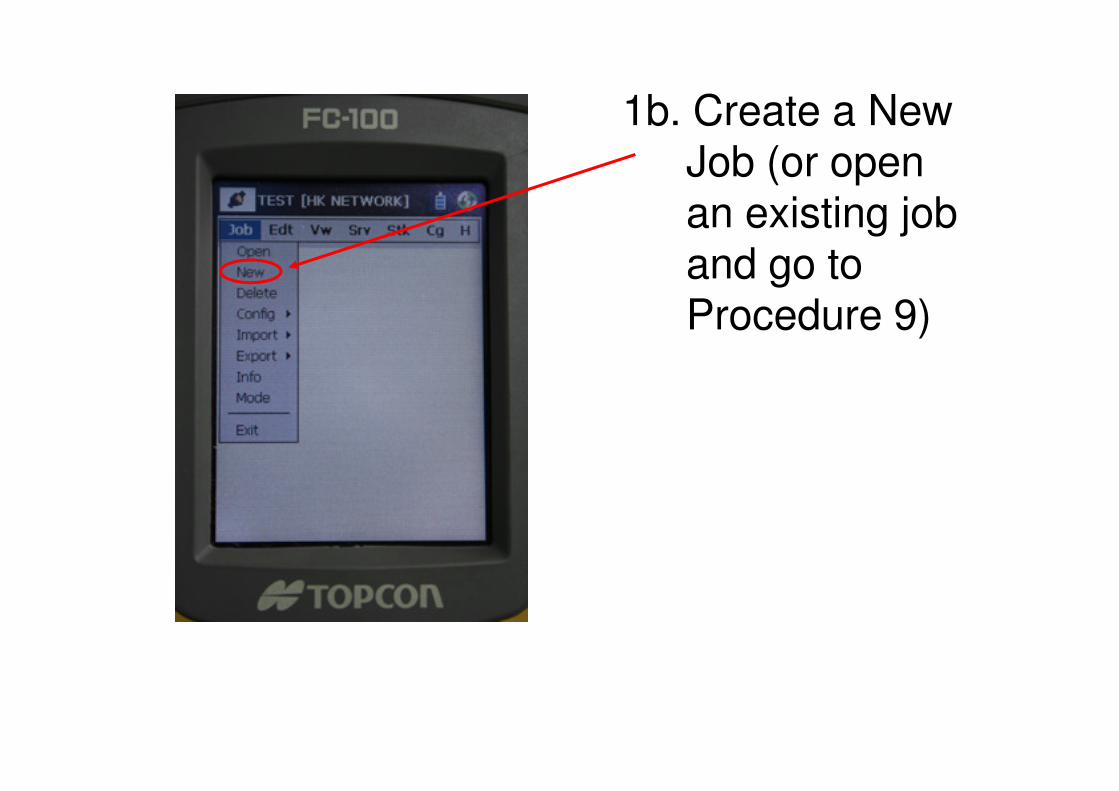
1b. Create a New Job (or open an existing job and go to Procedure 9)
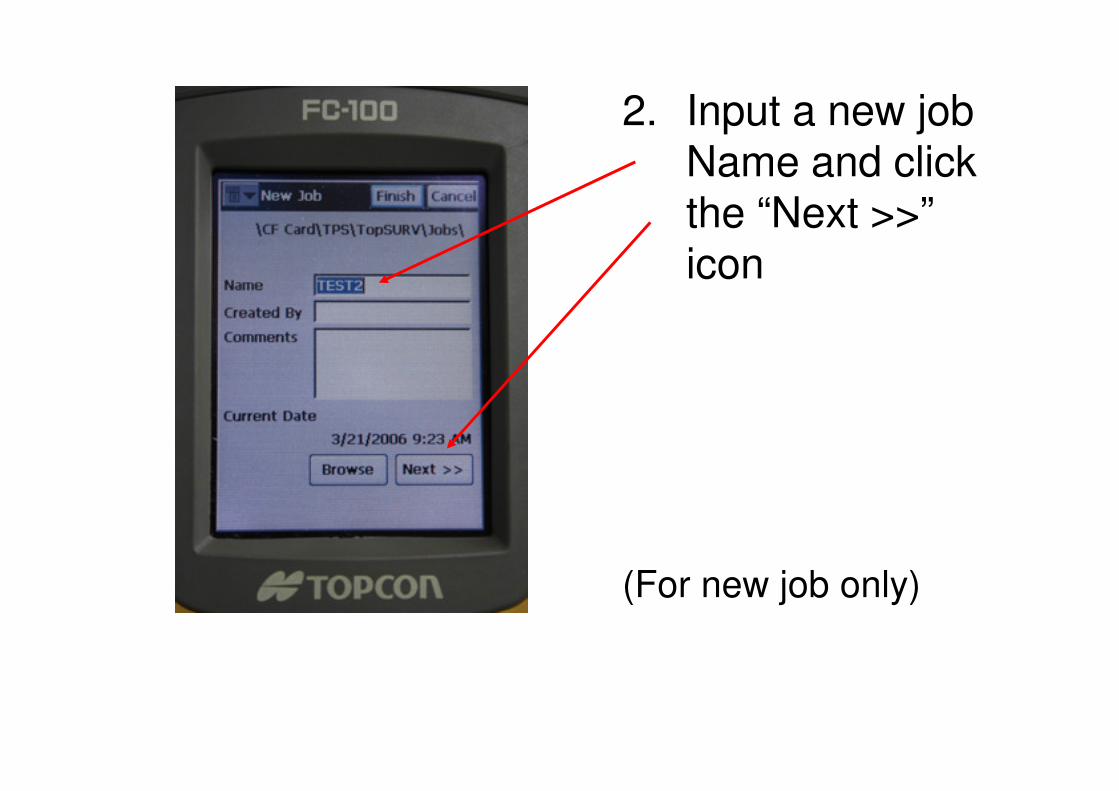
2. Input a new job Name and click the “Next >>” icon
(For new job only)
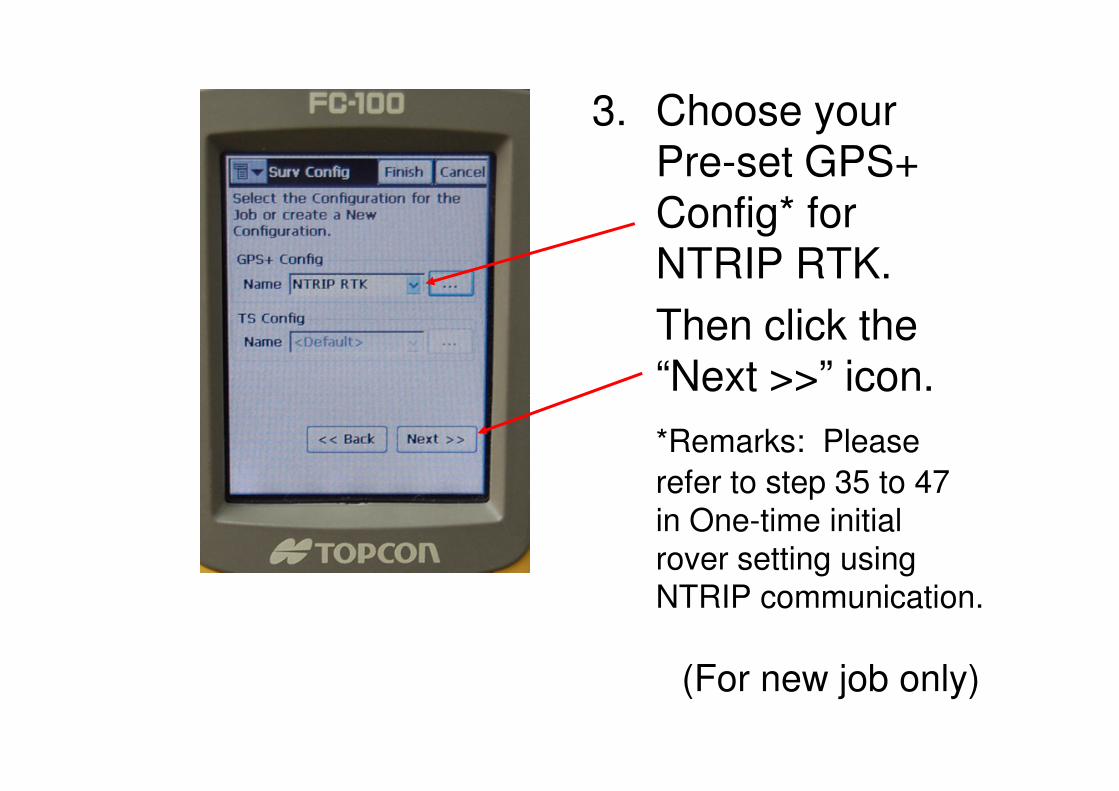
3. Choose your Pre-set GPS+ Config* for NTRIP RTK.
Then click the “Next >>” icon.“Next >>” icon.
*Remarks: Please
refer to step 35 to 47
in One-time initial
rover setting using
NTRIP communication.
(For new job only)
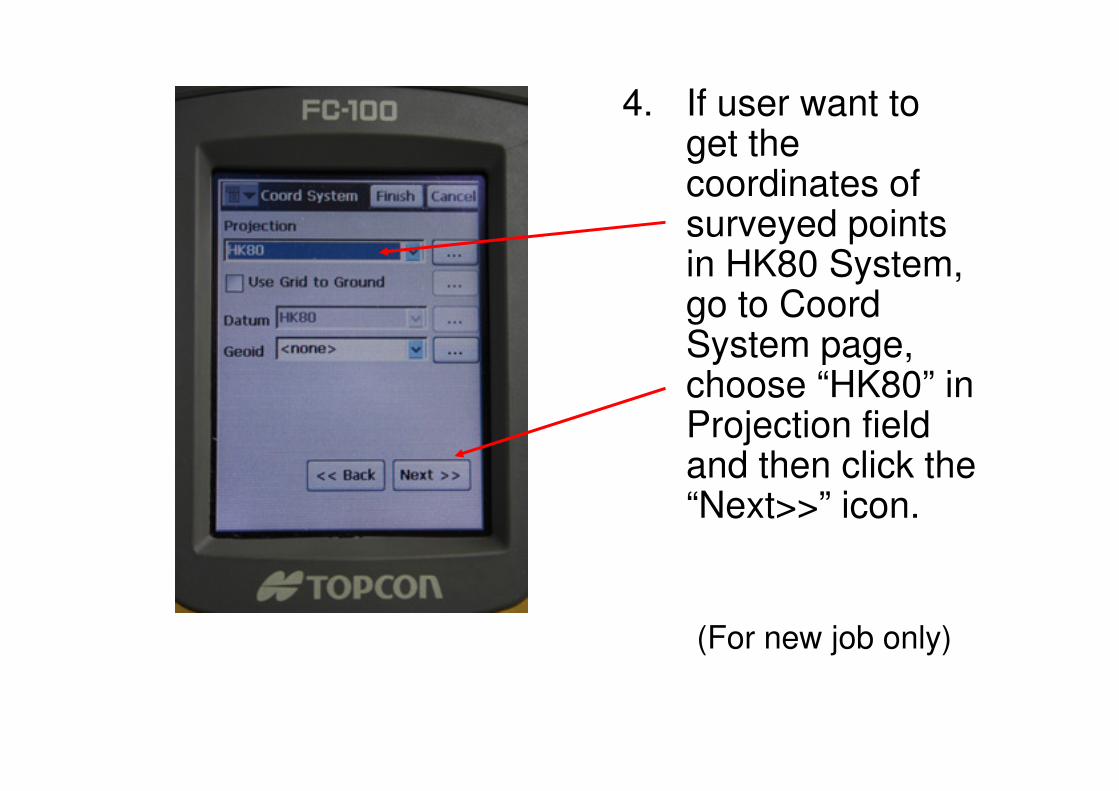
4. If user want to get the coordinates of surveyed points in HK80 System, go to Coord System page, choose “HK80” in choose “HK80” in Projection field and then click the “Next>>” icon.
(For new job only)
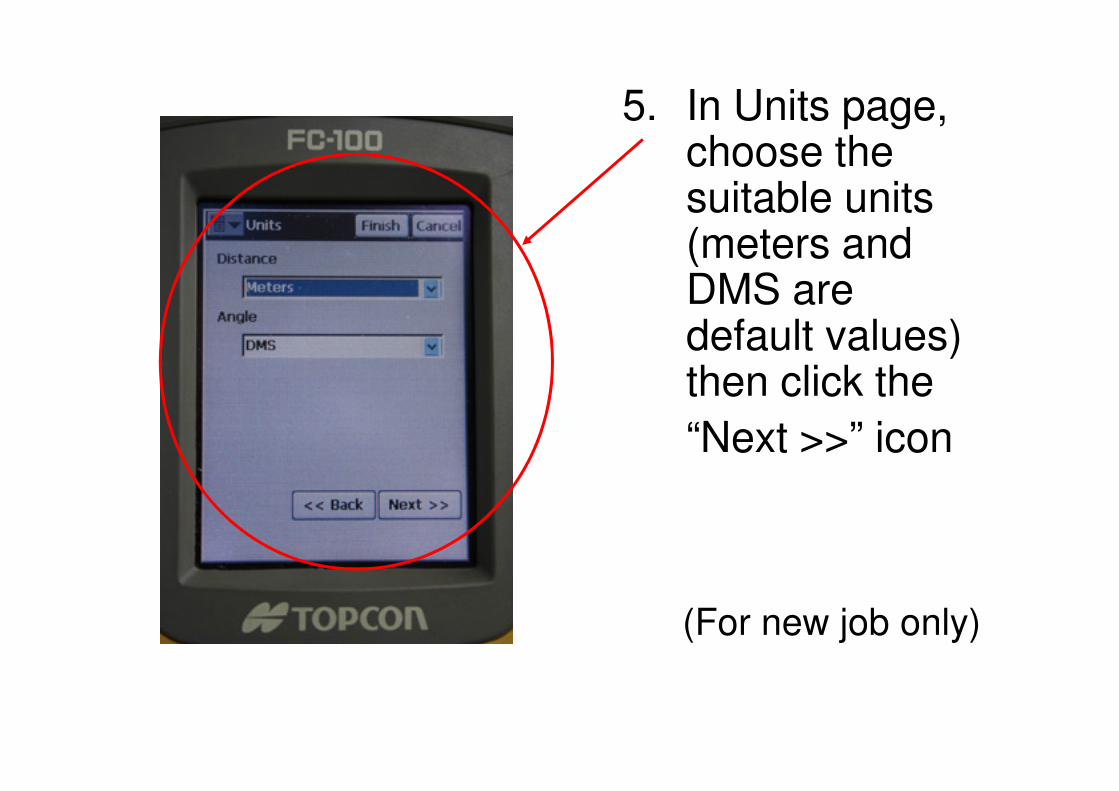
5. In Units page, choose the suitable units (meters and DMS are default values) then click thethen click the
“Next >>” icon
(For new job only)
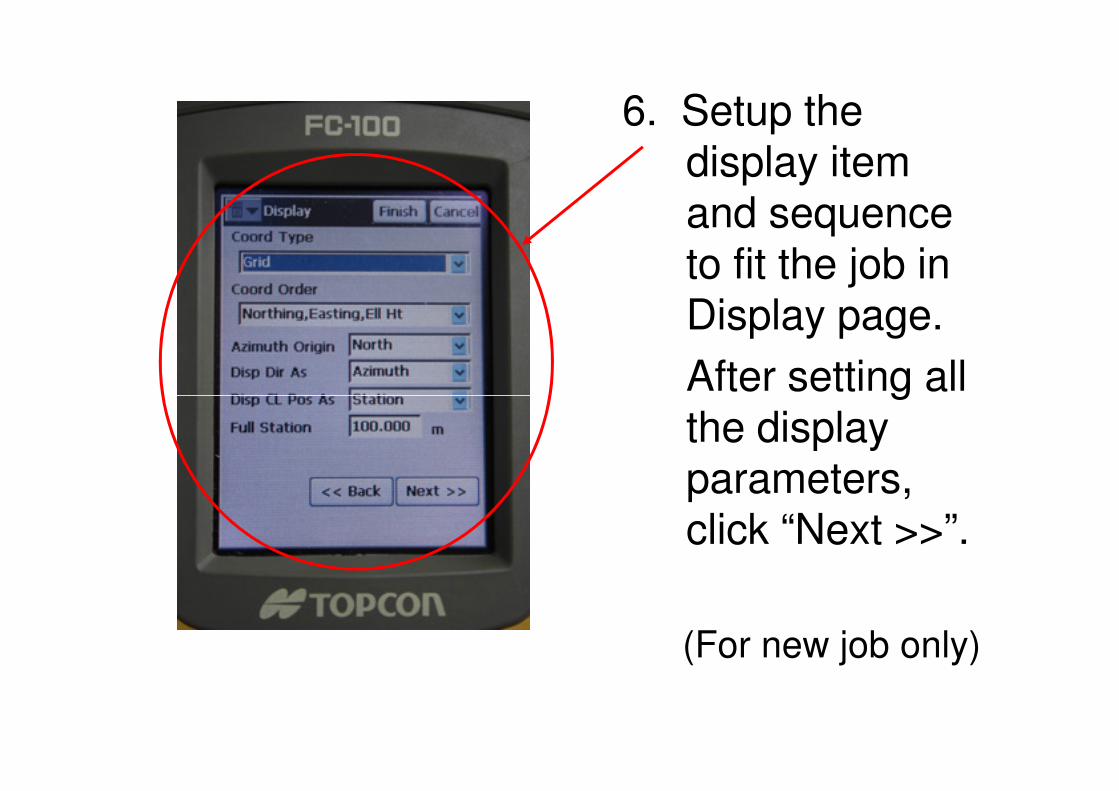
6. Setup the display item and sequence to fit the job in Display page.
After setting all After setting all the display parameters, click “Next >>”.
(For new job only)
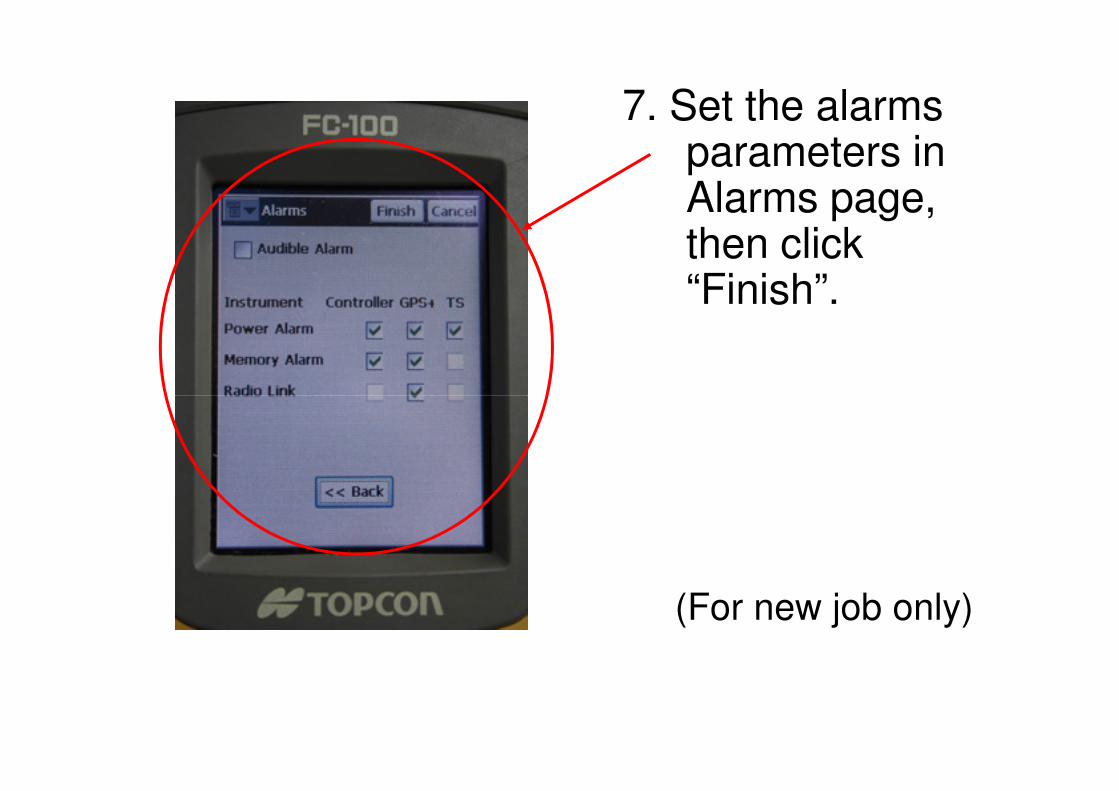
7. Set the alarms parameters in Alarms page, then click “Finish”.
(For new job only)
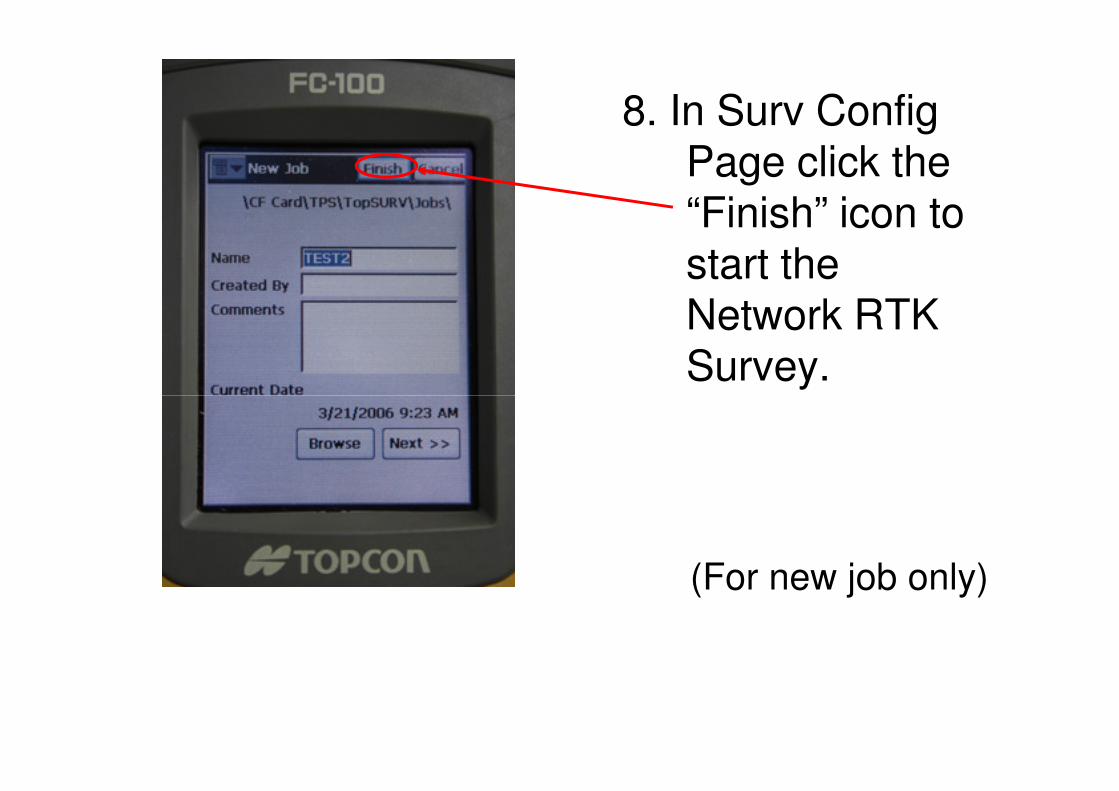
8. In Surv Config Page click the “Finish” icon to start the Network RTK Survey.
(For new job only)
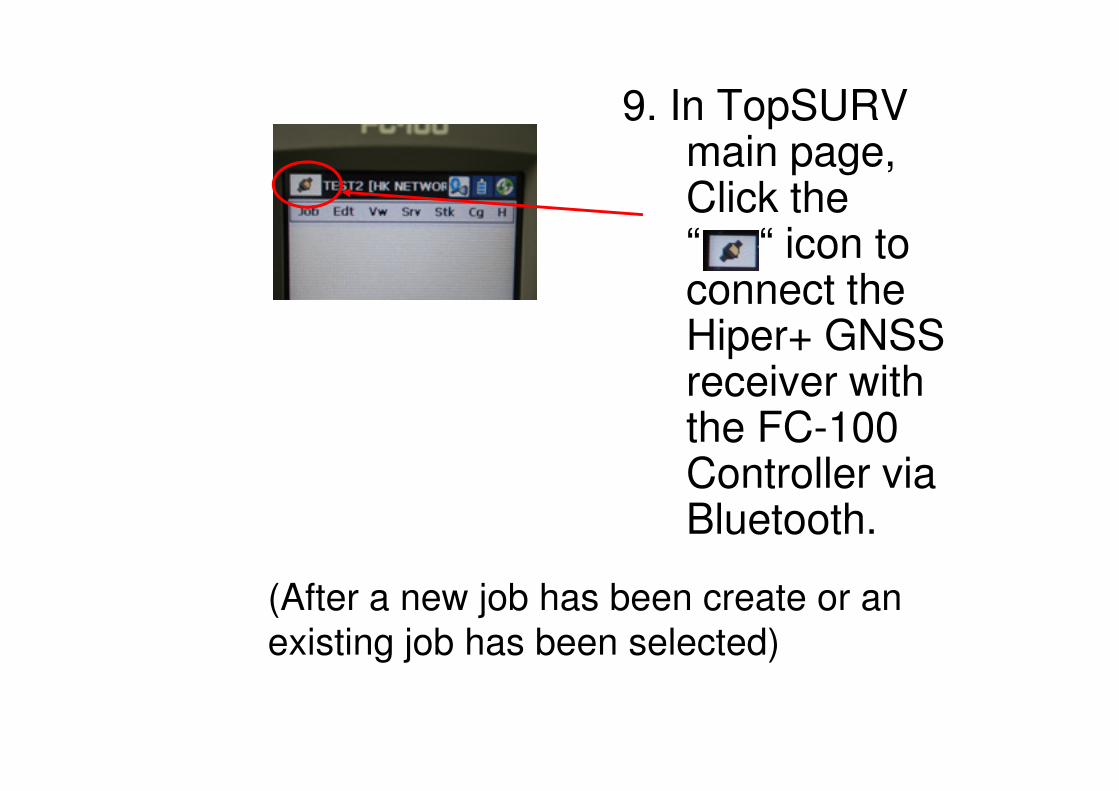
9. In TopSURV main page, Click the “ “ icon to connect the Hiper+ GNSS receiver with receiver with the FC-100 Controller via Bluetooth.
(After a new job has been create or an
existing job has been selected)
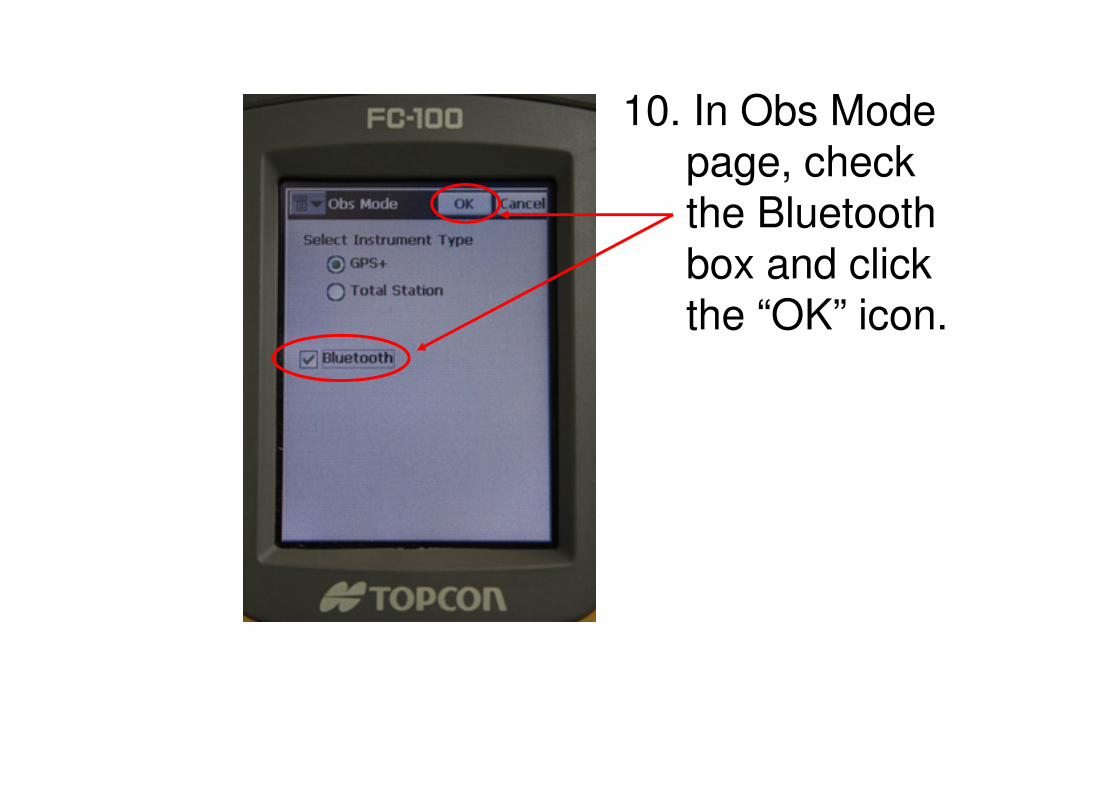
10. In Obs Mode page, check the Bluetooth box and click the “OK” icon.
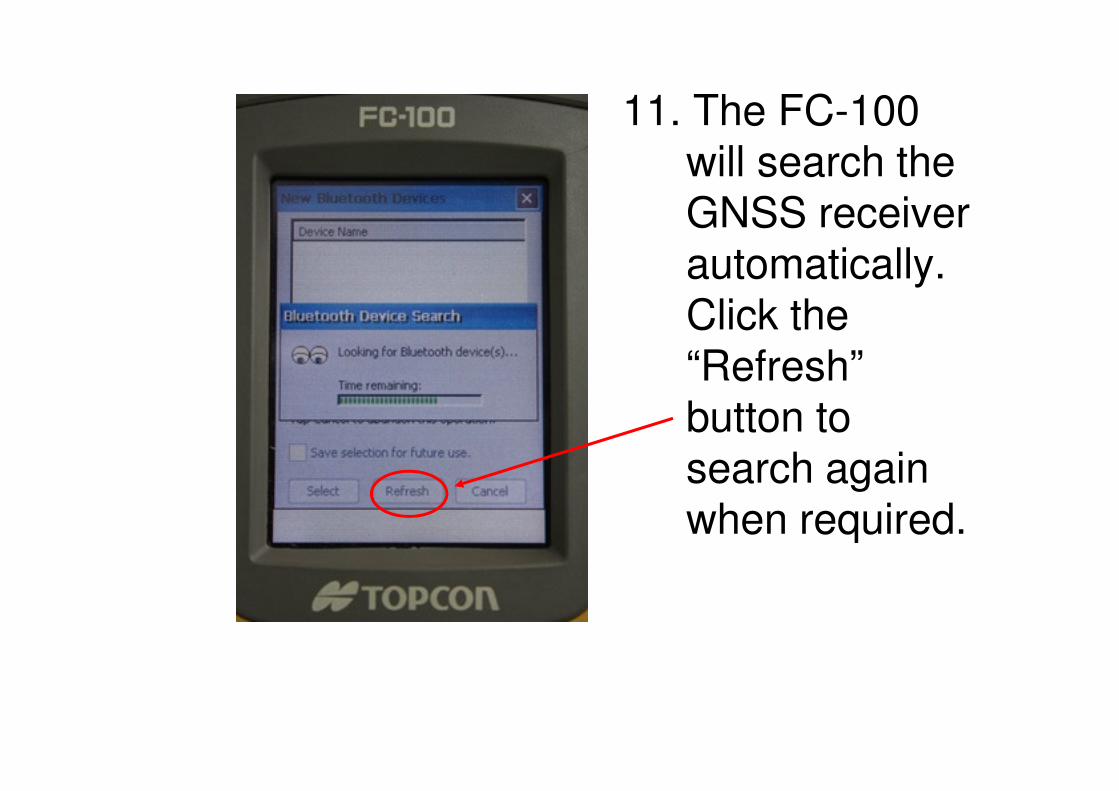
11. The FC-100 will search the GNSS receiver automatically. Click the “Refresh” button to button to search again when required.
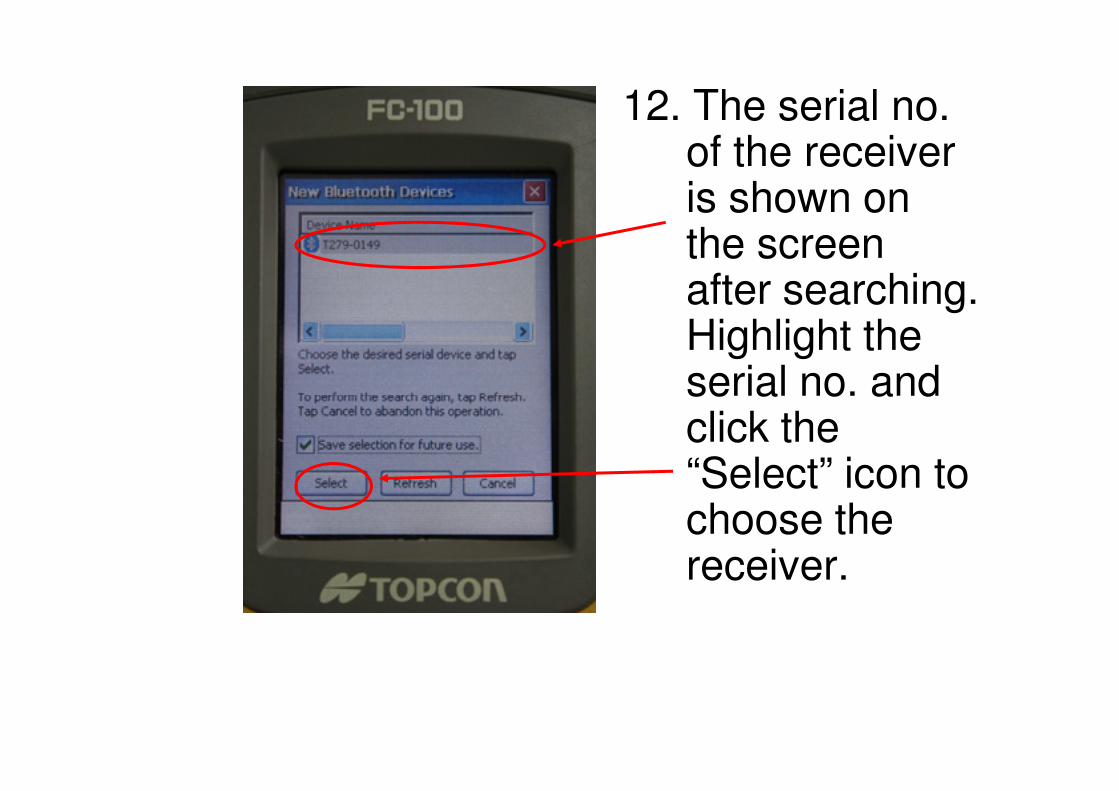
12. The serial no. of the receiver is shown on the screen after searching. Highlight the serial no. and serial no. and click the “Select” icon to choose the receiver.
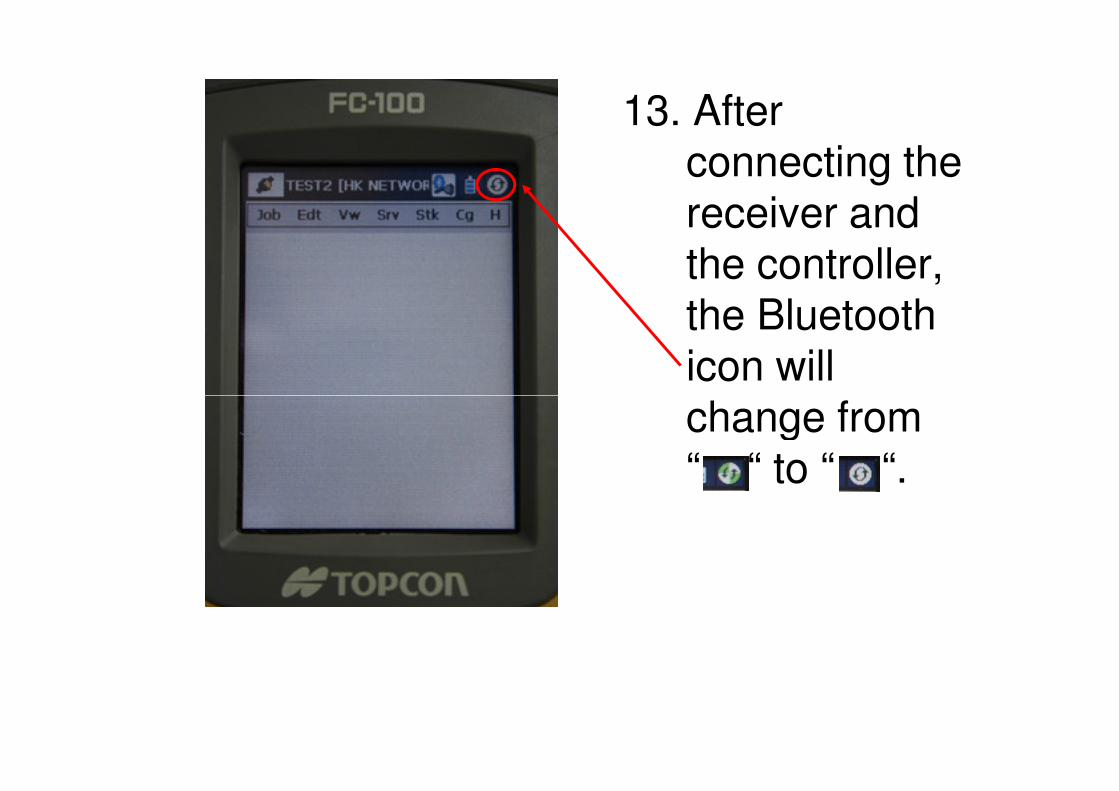
13. After connecting the receiver and the controller, the Bluetooth icon will change from change from “ “ to “ “.
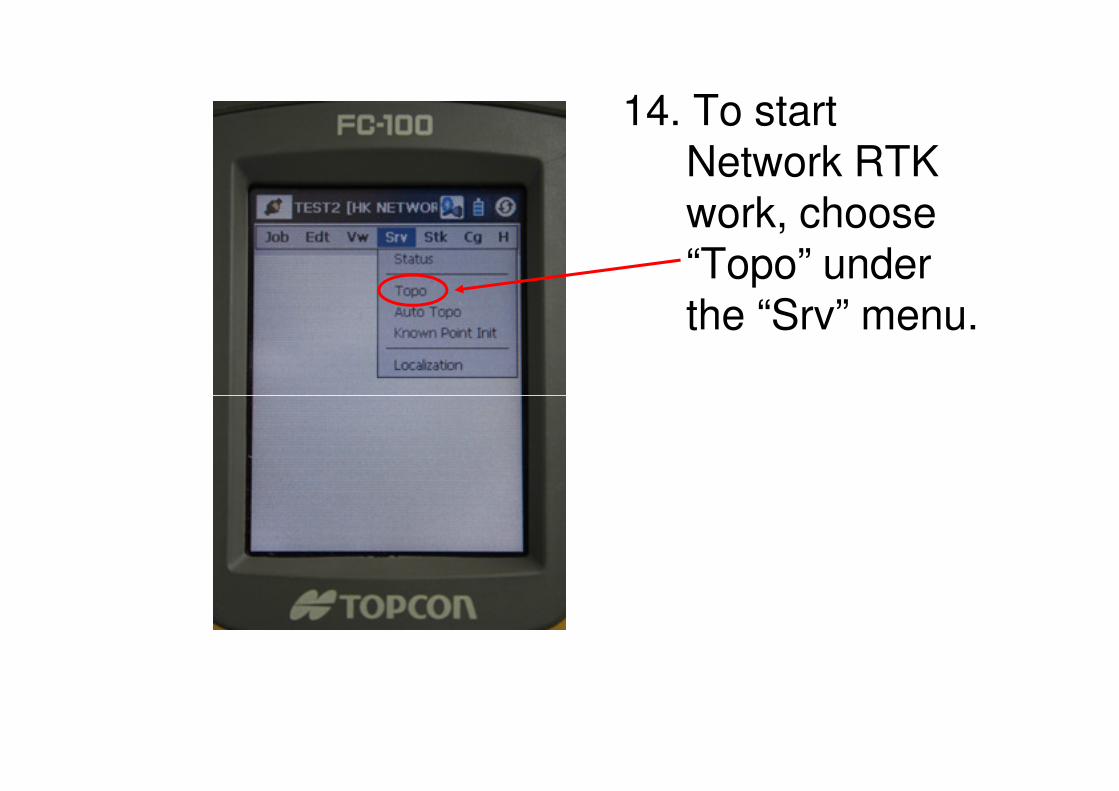
14. To start Network RTK work, choose “Topo” under the “Srv” menu.
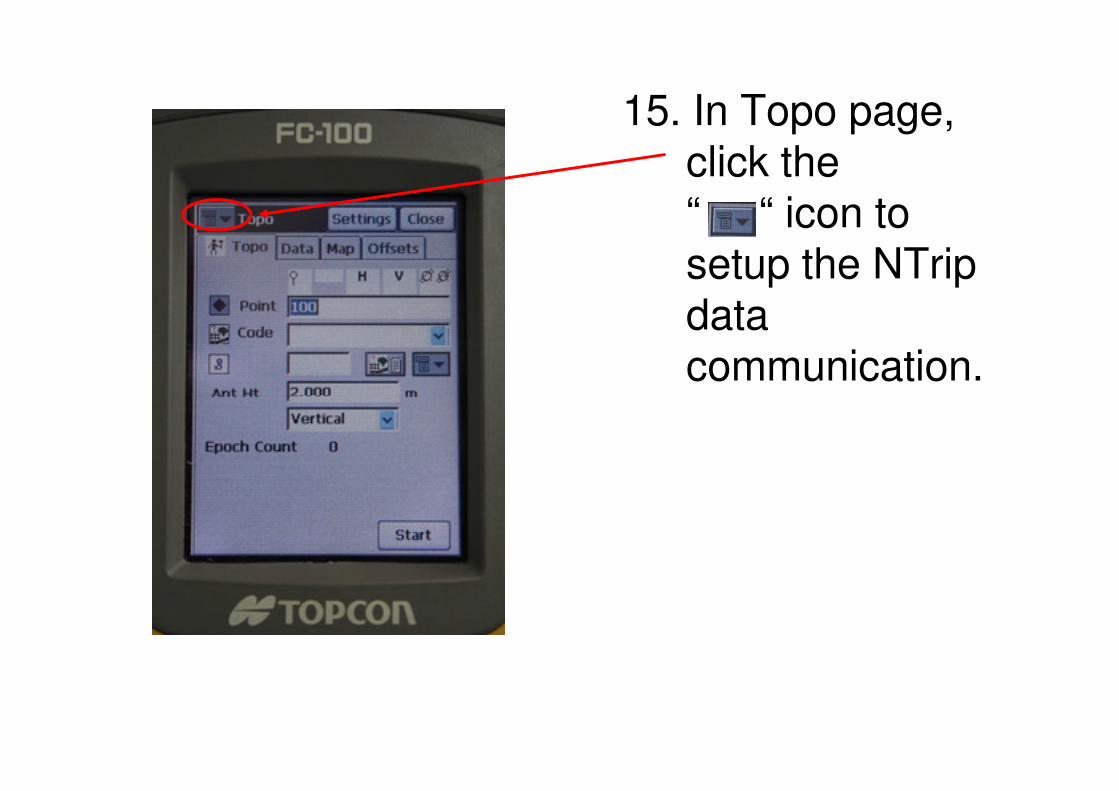
15. In Topo page, click the “ “ icon to setup the NTrip data communication.
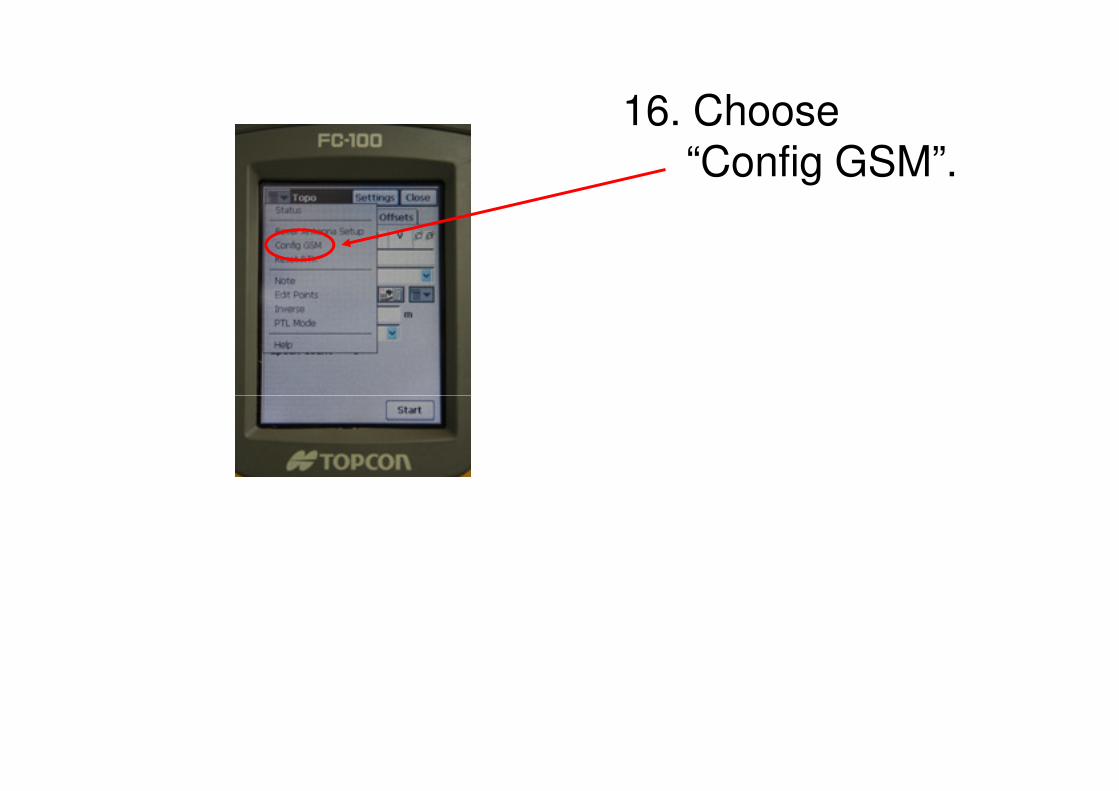
16. Choose “Config GSM”.
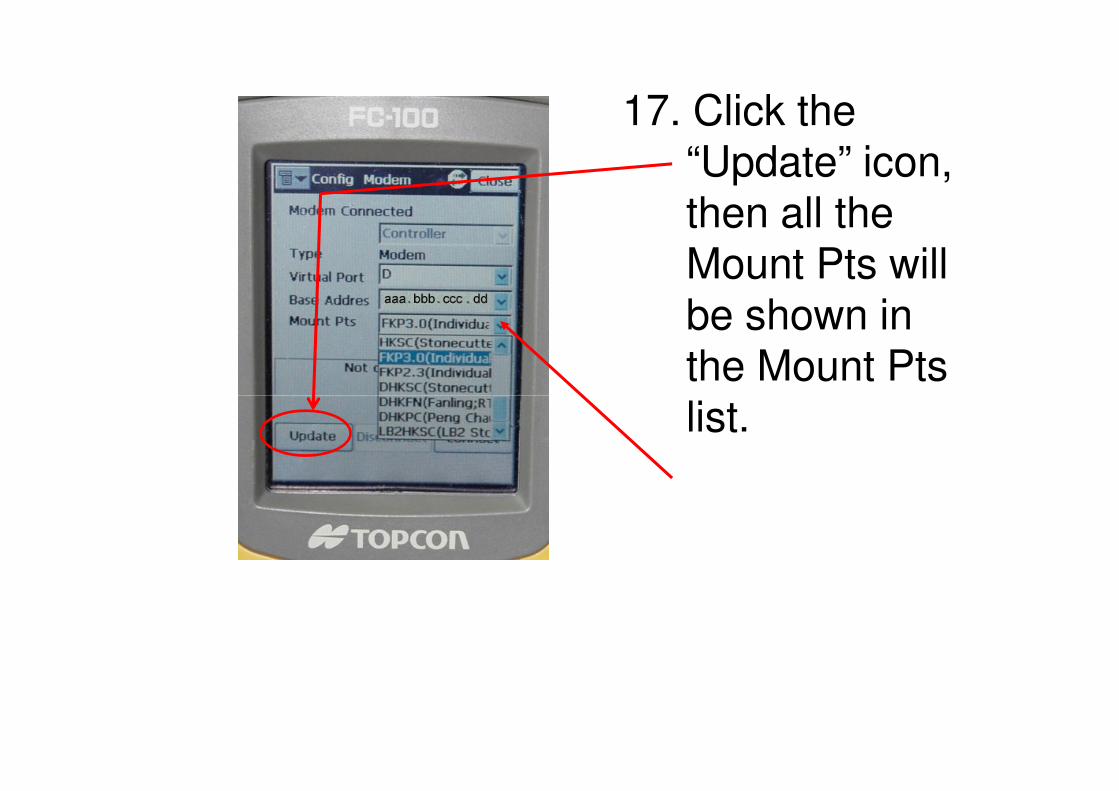
17. Click the “Update” icon, then all the Mount Pts will be shown in the Mount Pts list. list.
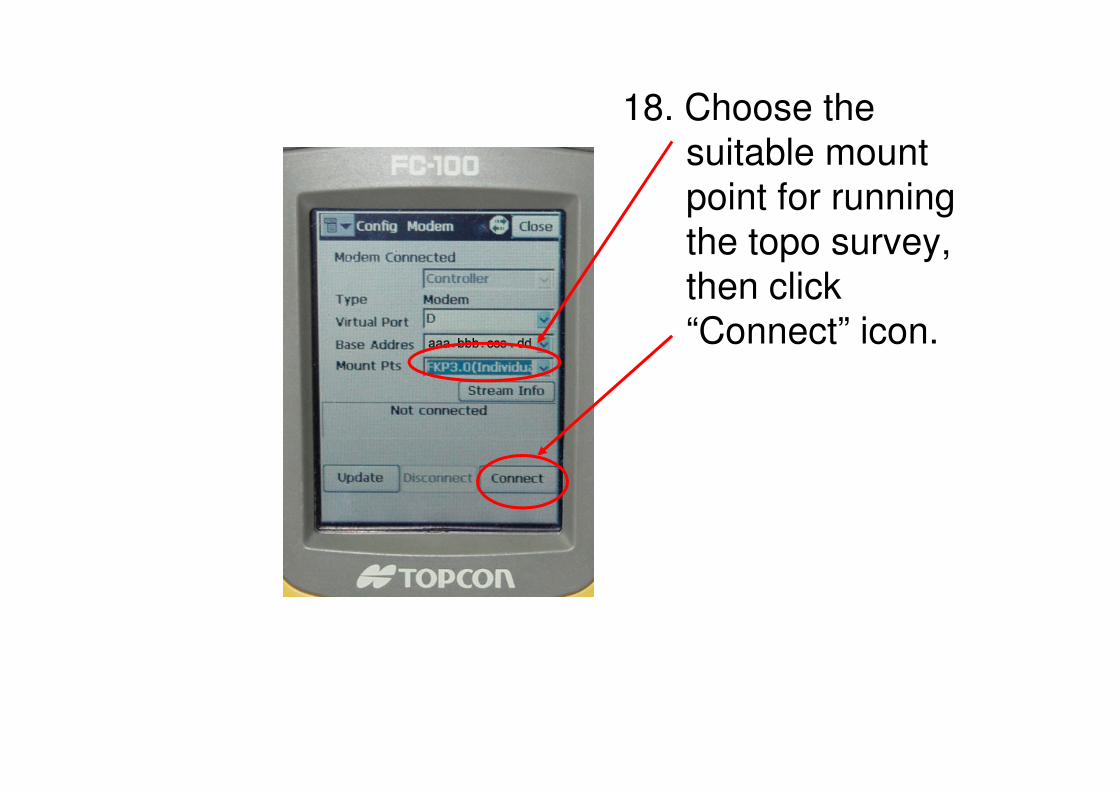
18. Choose the
suitable mount
point for running
the topo survey,
then click
“Connect” icon.
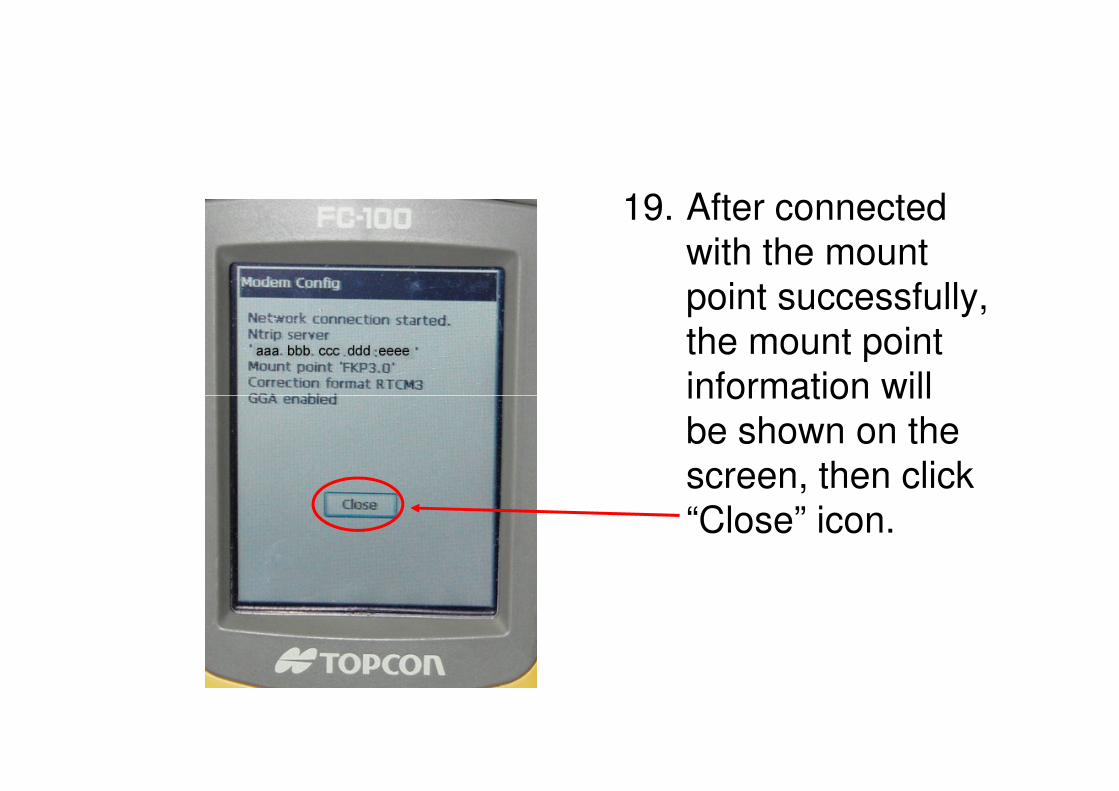
19. After connected
with the mount
point successfully,
the mount point
information will information will
be shown on the
screen, then click
“Close” icon.
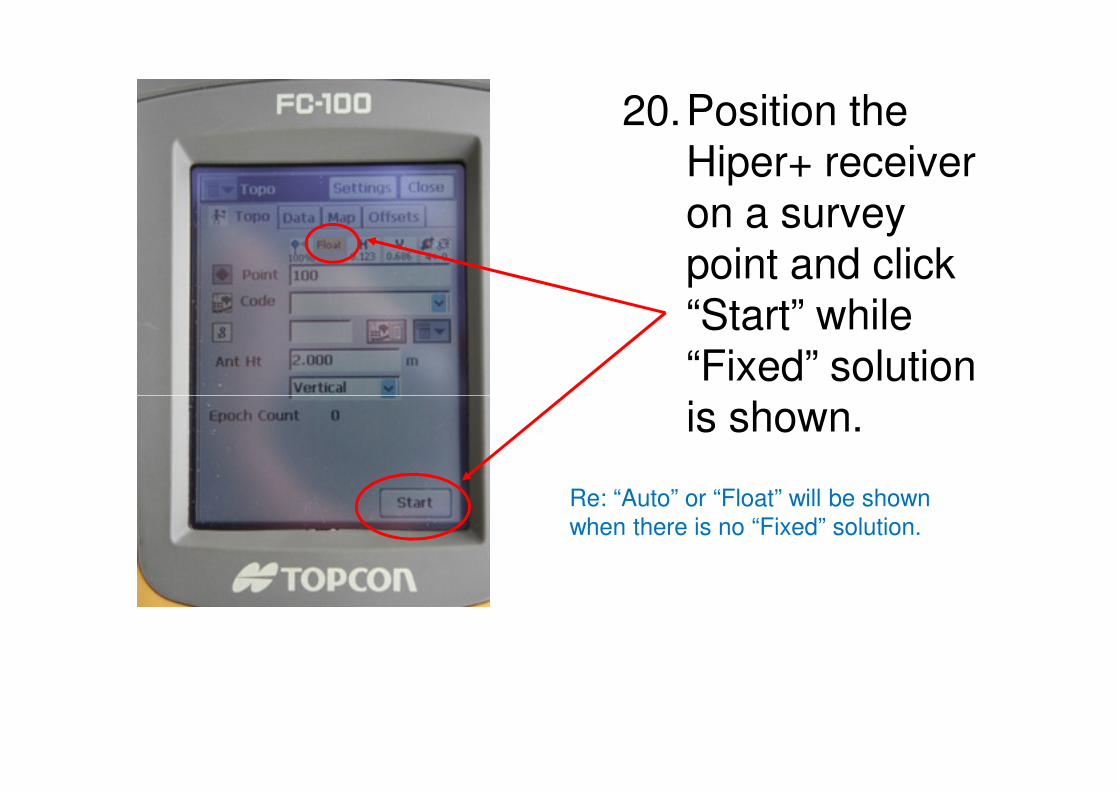
20.Position the Hiper+ receiver on a survey point and click “Start” while “Fixed” solution is shown.is shown.
Re: “Auto” or “Float” will be shown
when there is no “Fixed” solution.
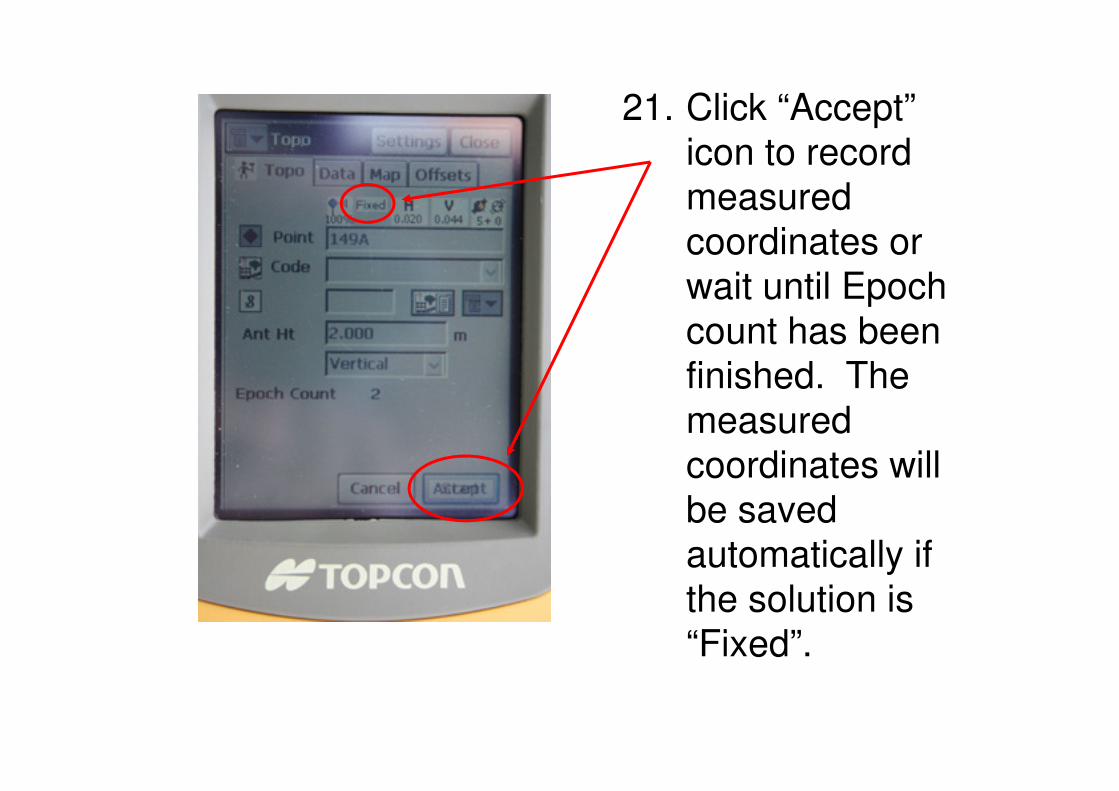
21. Click “Accept”
icon to record
measured
coordinates or
wait until Epoch
count has been
finished. The finished. The
measured
coordinates will
be saved
automatically if
the solution is
“Fixed”.
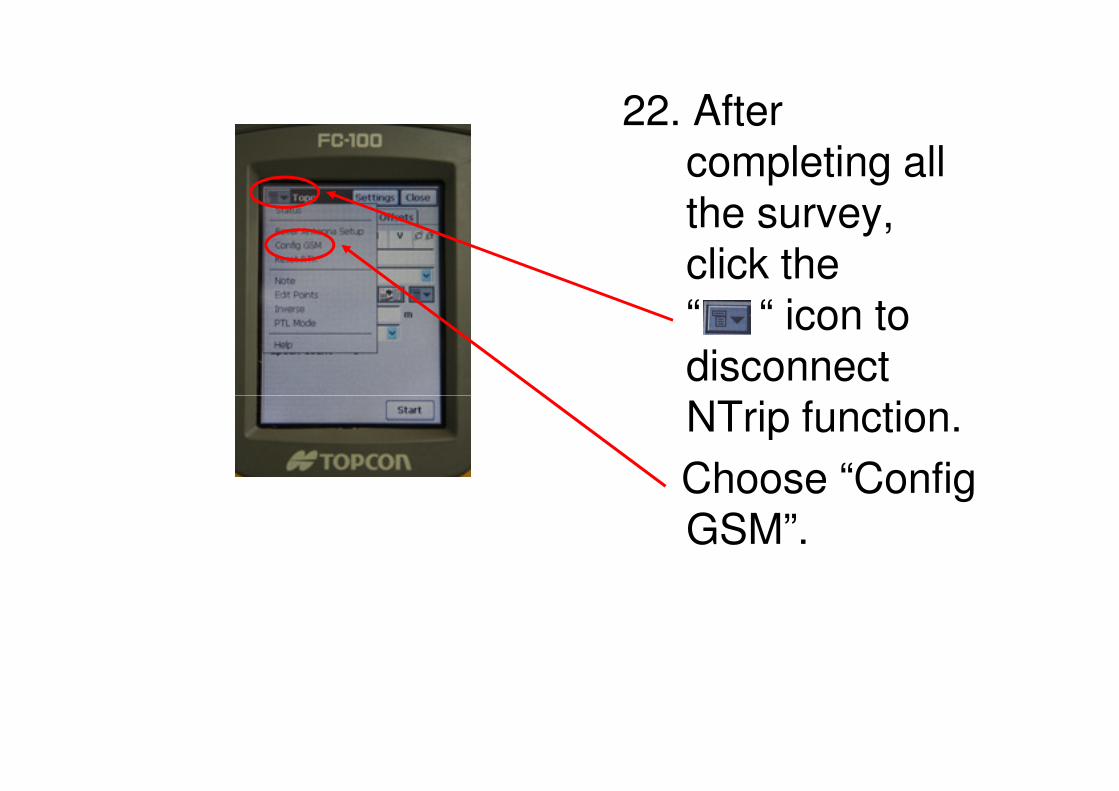
22. After completing all the survey, click the “ “ icon to disconnect NTrip function.NTrip function.
Choose “Config GSM”.
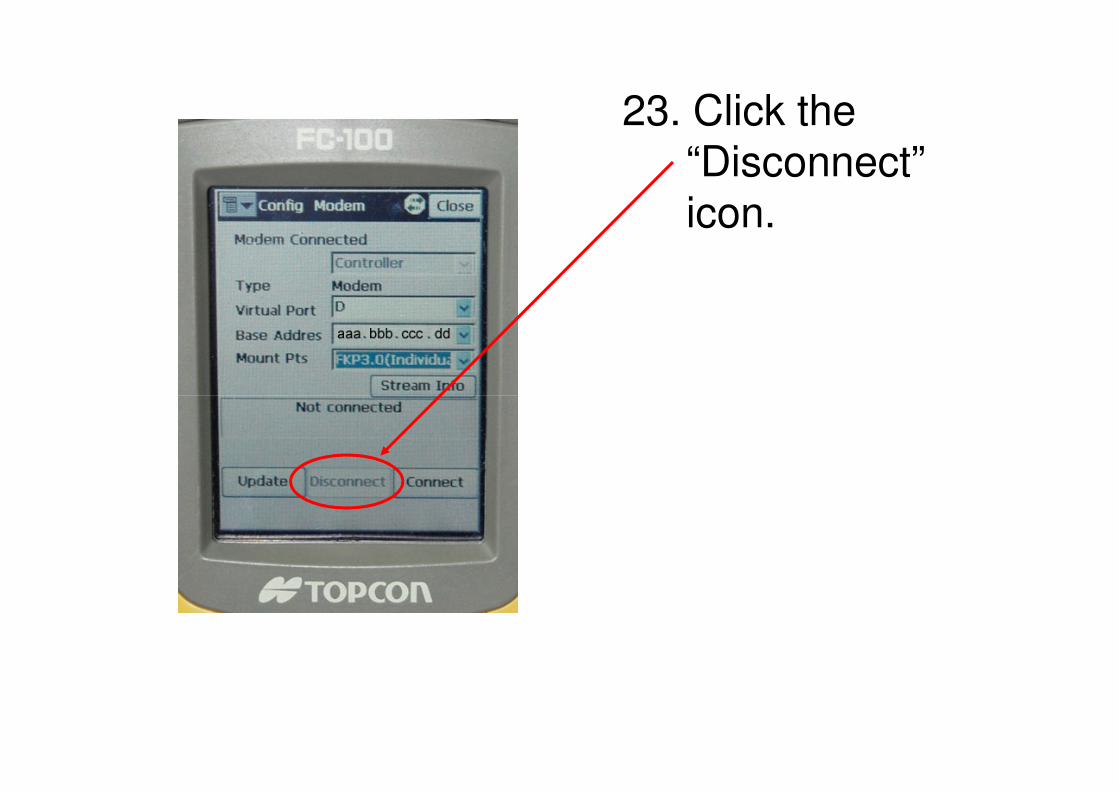
23. Click the “Disconnect” icon.
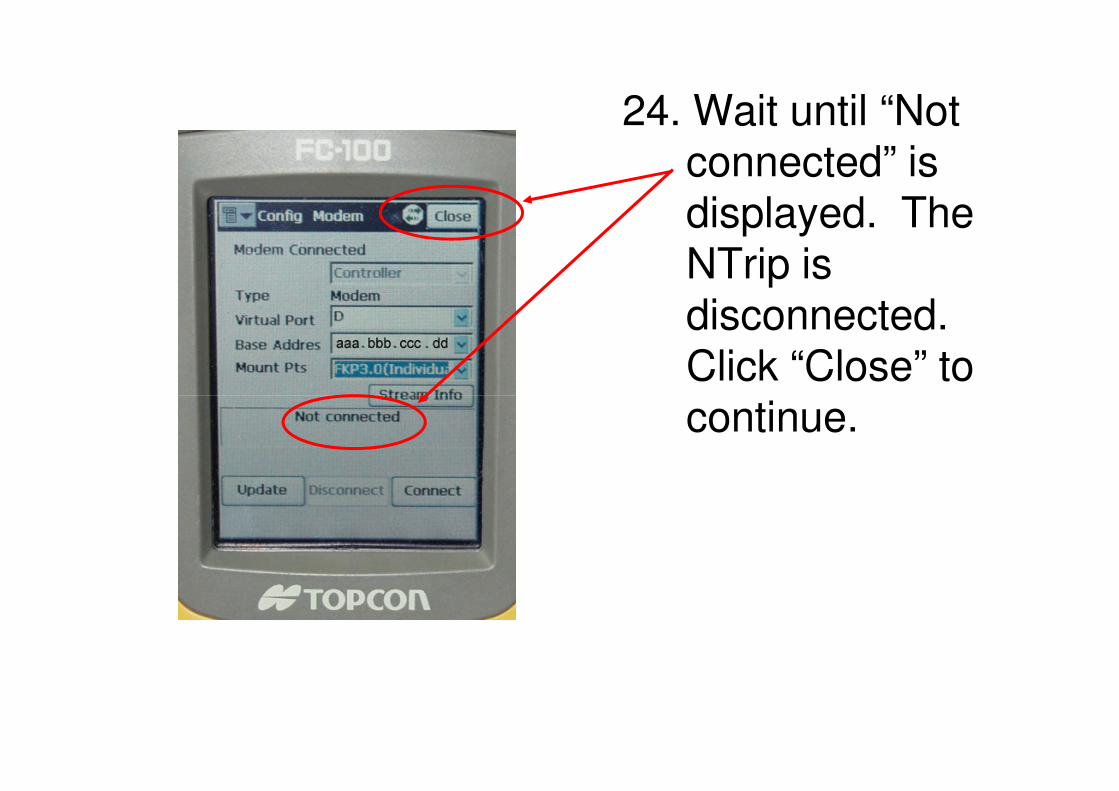
24. Wait until “Not connected” is displayed. The NTrip is disconnected. Click “Close” to continue.continue.

25. Click the “Close” icon to return to the Main Page.

Exporting Survey Data
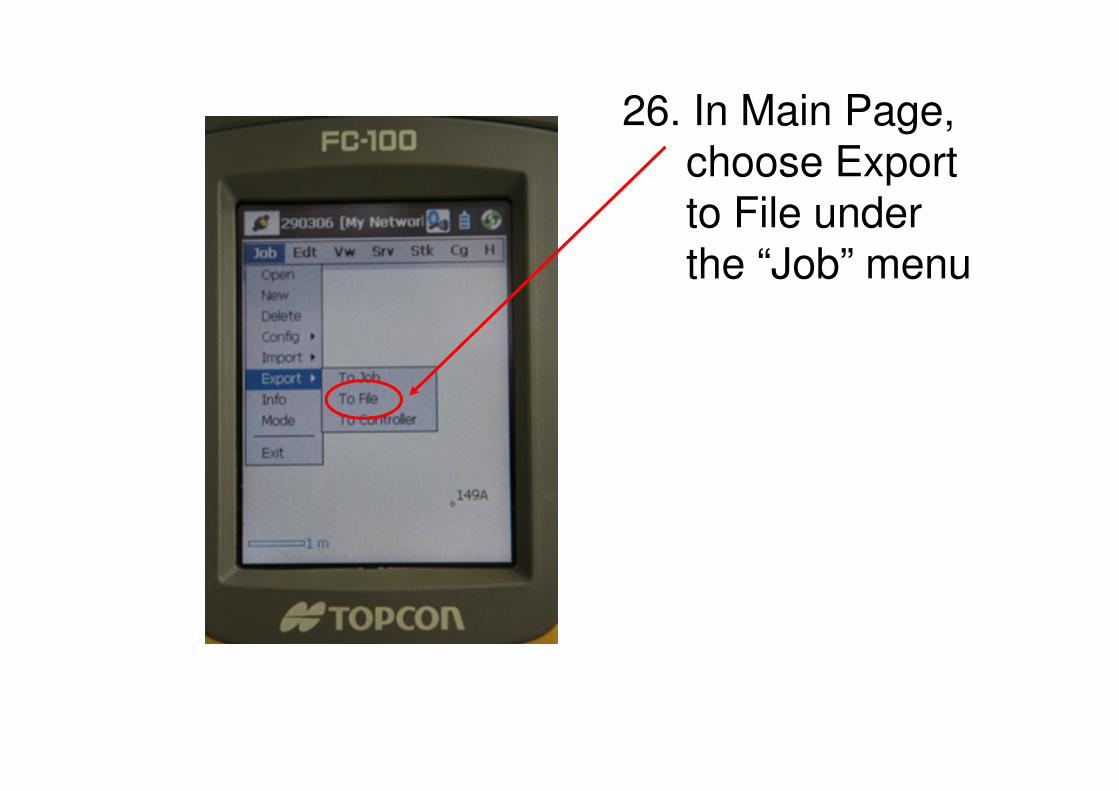
26. In Main Page, choose Export to File under the “Job” menu
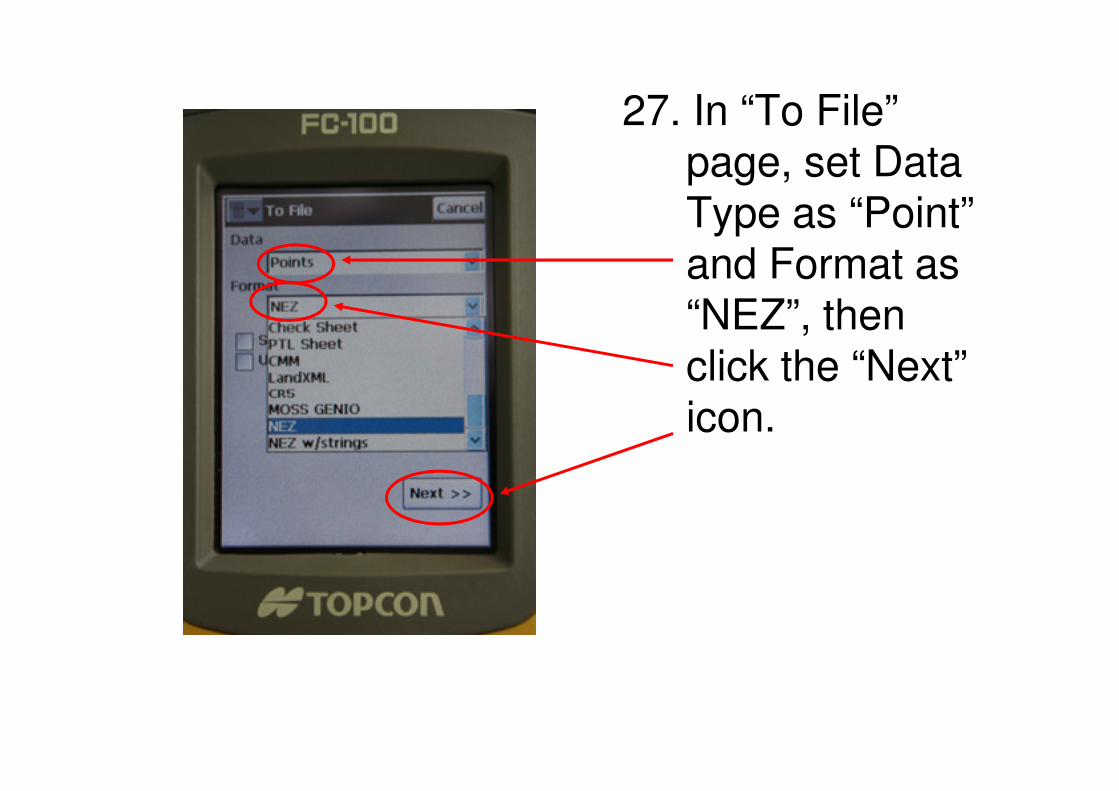
27. In “To File” page, set Data Type as “Point” and Format as “NEZ”, then click the “Next” icon.icon.
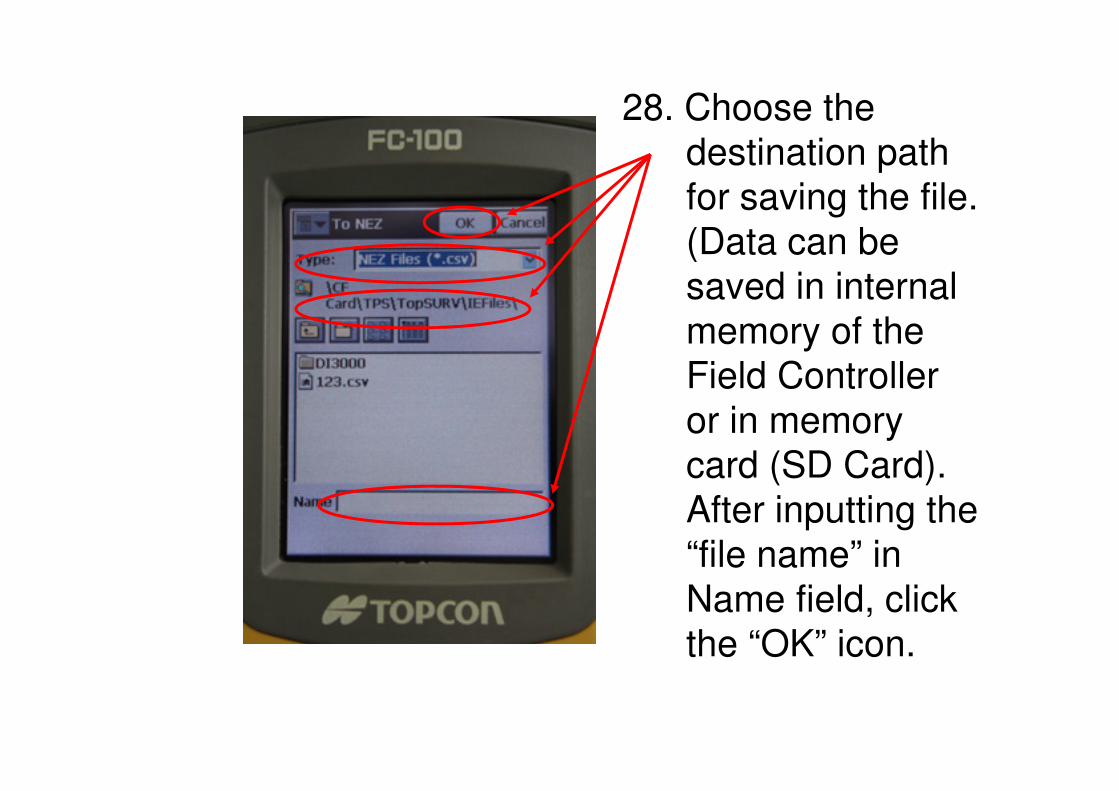
28. Choose the
destination path
for saving the file.
(Data can be
saved in internal
memory of the
Field Controller Field Controller
or in memory
card (SD Card).
After inputting the
“file name” in
Name field, click
the “OK” icon.

29. In Coord System Page, choose HK80 Coordinates System or other desired coordinates coordinates systems, then click the “Finish” icon.
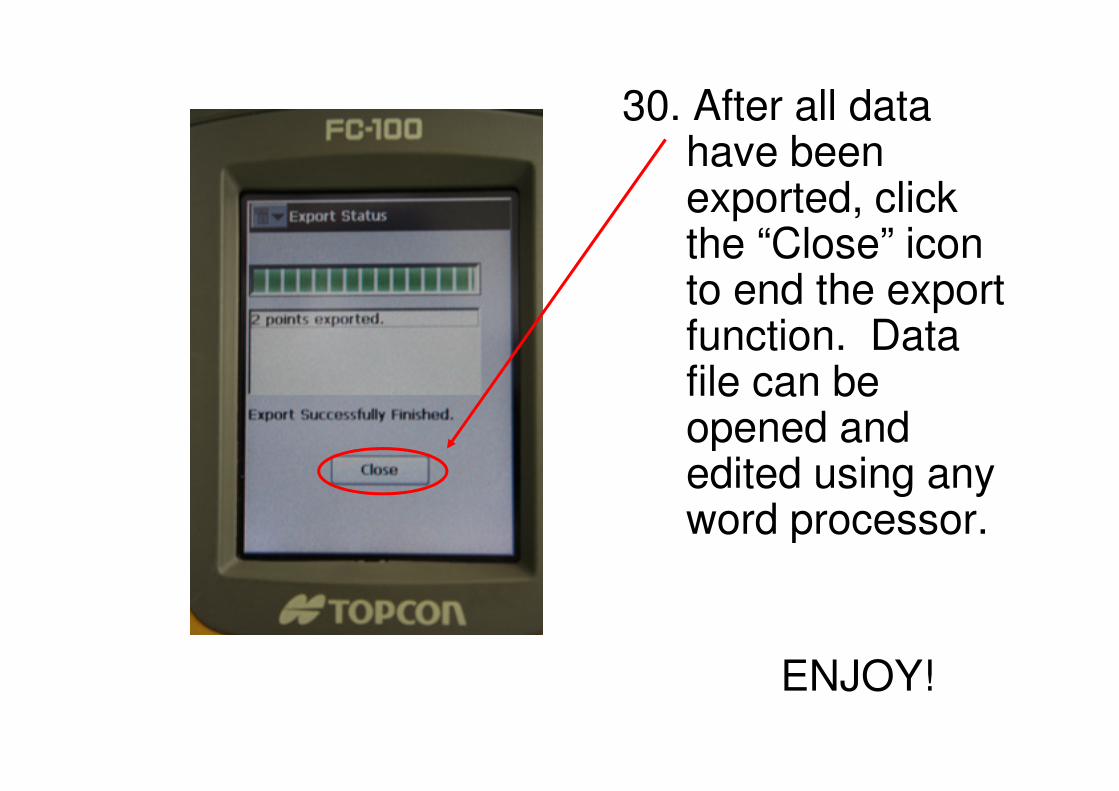
30. After all data have been exported, click the “Close” icon to end the export function. Data file can be file can be opened and edited using any word processor.
ENJOY!