telepon gprs - gscs-b2c.lge.com
TRANSCRIPT

Telepon GPRSBUKU PETUNJUK PENGGUNAAN
MODEL: G5300
Bacalah Buku Petunjuk ini dengan seksamasebelum Anda menggunakan Unit TeleponGenggam Anda. Simpan dokumentasi ini sebagaireferensi.
P/NO : MMBB0077810ISSUE 1.0
PRINTED IN KOREAT • E • L • E • P • O • N • G • P • R • S • T • E • L • E • P • O • N • G • P • R • S

INDONESIA
Telepon GPRSBUKU PETUNJUK PENGGUNAAN
MODEL: G5300Bacalah Buku Petunjuk ini dengan seksama sebelumAnda menggunakan Unit Telepon Genggam Anda.Simpan dokumentasi ini sebagai referensi.

IN
DO
NE
SIA3
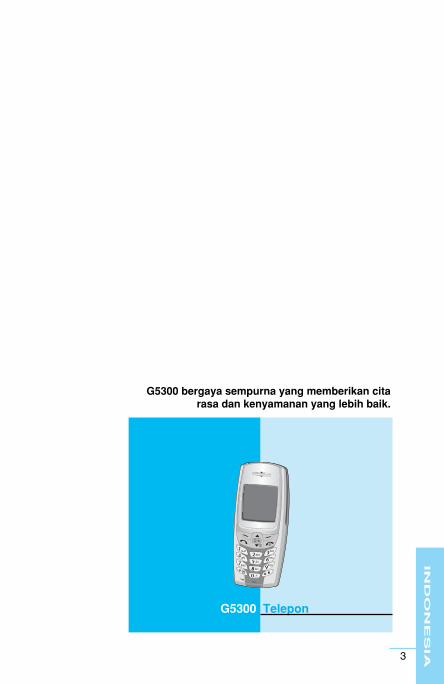
G5300 Telepon
G5300 bergaya sempurna yang memberikan citarasa dan kenyamanan yang lebih baik.
IN
DO
NE
SIA 4
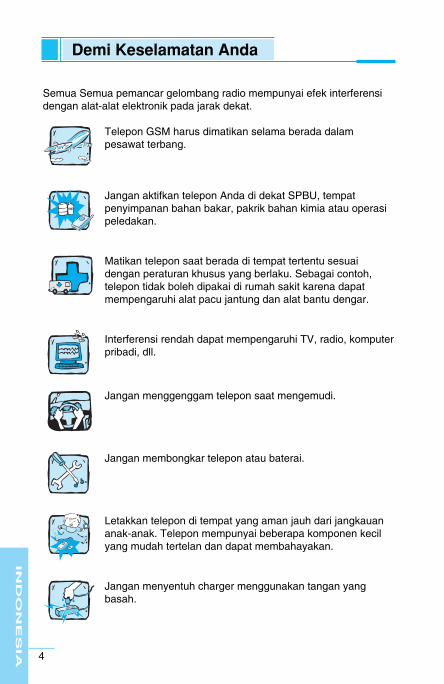
Demi Keselamatan Anda
Semua Semua pemancar gelombang radio mempunyai efek interferensidengan alat-alat elektronik pada jarak dekat.
Telepon GSM harus dimatikan selama berada dalampesawat terbang.
Jangan aktifkan telepon Anda di dekat SPBU, tempatpenyimpanan bahan bakar, pakrik bahan kimia atau operasipeledakan.
Matikan telepon saat berada di tempat tertentu sesuaidengan peraturan khusus yang berlaku. Sebagai contoh,telepon tidak boleh dipakai di rumah sakit karena dapatmempengaruhi alat pacu jantung dan alat bantu dengar.
Interferensi rendah dapat mempengaruhi TV, radio, komputerpribadi, dll.
Jangan menggenggam telepon saat mengemudi.
Jangan membongkar telepon atau baterai.
Letakkan telepon di tempat yang aman jauh dari jangkauananak-anak. Telepon mempunyai beberapa komponen kecilyang mudah tertelan dan dapat membahayakan.
Jangan menyentuh charger menggunakan tangan yangbasah.
IN
DO
NE
SIA5
Catatan:
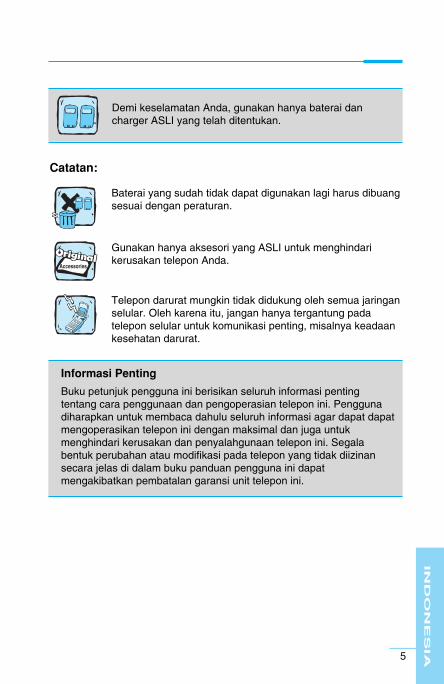
Baterai yang sudah tidak dapat digunakan lagi harus dibuangsesuai dengan peraturan.
Gunakan hanya aksesori yang ASLI untuk menghindarikerusakan telepon Anda.
Telepon darurat mungkin tidak didukung oleh semua jaringanselular. Oleh karena itu, jangan hanya tergantung padatelepon selular untuk komunikasi penting, misalnya keadaankesehatan darurat.
Informasi Penting
Buku petunjuk pengguna ini berisikan seluruh informasi pentingtentang cara penggunaan dan pengoperasian telepon ini. Penggunadiharapkan untuk membaca dahulu seluruh informasi agar dapat dapatmengoperasikan telepon ini dengan maksimal dan juga untukmenghindari kerusakan dan penyalahgunaan telepon ini. Segalabentuk perubahan atau modifikasi pada telepon yang tidak diizinansecara jelas di dalam buku panduan pengguna ini dapatmengakibatkan pembatalan garansi unit telepon ini.
Demi keselamatan Anda, gunakan hanya baterai dancharger ASLI yang telah ditentukan.
IN
DO
NE
SIA 6
OverviewAccessories ................................................................................... 10
Part of the Phone ......................................................................... 12• Front of the Phone ....................................................................... 12• Rear of the Phone........................................................................ 13
Key Description ............................................................................ 14• Alphanumeric Keys...................................................................... 16
Display InformationDisplay Information ...................................................................... 17• On-Screen Icons.......................................................................... 17
Getting StartedInstallation ..................................................................................... 19• Inserting the SIM Card................................................................. 19• Installing the Battery .................................................................... 20• Charging the Battery .................................................................... 21• Disconnecting the charger ........................................................... 22
Powering On Sequence ................................................................ 23• To get started with the phone ...................................................... 23• To turn off the phone.................................................................... 23
Access Codes................................................................................ 24• PIN code (4 to 8 digits) ............................................................... 24• PIN2 code (4 to 8 digits) ............................................................. 24• PUK code (4 to 8 digits) .............................................................. 24• PUK2 code (4 to 8 digits) ............................................................ 25• Security code (4 to 8 digits) ........................................................ 25
Accessing the MenuPhonebook .................................................................................... 26
Menu Tree ..................................................................................... 27
Messages [Menu 1] ...................................................................... 29• Write message [Menu 1-1]........................................................... 29• Inbox [Menu 1-2] ......................................................................... 34• Outbox [Menu 1-3] .......................................................................35• Info service [Menu 1-4] ............................................................... 36
Contents

IN
DO
NE
SIA7
• Voice mail [Menu 1-5] ................................................................. 38• Namecard [Menu 1-6] ................................................................. 39• Templates [Menu 1-7] ................................................................. 39• Delivery reports [Menu 1-8] ......................................................... 40• Settings [Menu 1-9] ..................................................................... 40• Memory status [Menu 1-0] .......................................................... 41
Call Register [Menu 2] ...................................................................42• Missed calls [Menu 2-1] ............................................................... 42• Received calls [Menu 2-2] ........................................................... 42• Dialled calls [Menu 2-3]................................................................ 42• All calls list [Menu 2-4] ..................................................................42• Delete recent calls [Menu 2-5] ..................................................... 42• Call charge [Menu 2-6]................................................................. 43• GPRS information [Menu 2-7]...................................................... 46
Profiles [Menu 3] ........................................................................... 47• Vibrate only [Menu 3-1]................................................................ 47• Quiet [Menu 3-2] .......................................................................... 47• General [Menu 3-3] ..................................................................... 48• Loud [Menu 3-4] .......................................................................... 48• Headset [Menu 3-5] .................................................................... 48• Car [Menu 3-6] ............................................................................ 49
Settings [Menu 4] ......................................................................... 51• Alarm clock [Menu 4-1] ............................................................... 51• Date & time [Menu 4-2] ............................................................... 52• Phone settings [Menu 4-3] .......................................................... 53• Call settings [Menu 4-4] .............................................................. 55• Security settings [Menu 4-5] ....................................................... 57• Network settings [Menu 4-6] ....................................................... 61• Reset setting [Menu 4-7] ............................................................. 61
Call Divert [Menu 5] ...................................................................... 62• All voice calls [Menu 5-1] ............................................................ 62• If busy [Menu 5-2] ....................................................................... 62• If no reply [Menu 5-3] .................................................................. 62• If out of reach [Menu 5-4] ............................................................ 62• All data calls [Menu 5-5] .............................................................. 62• All fax calls [Menu 5-6] ................................................................ 63• Cancel all [Menu 5-7] .................................................................. 64

IN
DO
NE
SIA 8
Organizer [Menu 6] ....................................................................... 65• Scheduler [Menu 6-1] .................................................................. 65• Phone book [Menu 6-2] ............................................................... 68
Fun & Tools [Menu 7].................................................................... 77• My folder [Menu 7-1] .................................................................... 77• Game [Menu 7-2] ......................................................................... 78• Melody composer [Menu 7-3] ...................................................... 79• Graphic editor [Menu 7-4] ............................................................ 79• Unit converter [Menu 7-5] ........................................................... 80• Calculator [Menu 7-6]................................................................... 81• World time [Menu 7-7] ................................................................. 81
WAP services [Menu 8]................................................................. 82• Home [Menu 8-1] ........................................................................ 82• Bookmarks [Menu 8-2] ................................................................ 82• Push messages [menu 8-3] ........................................................ 82• Profiles [Menu 8-4] ..................................................................... 83• Go to URL [Menu 8-5] ................................................................. 85• Cache settings [Menu 8-6] .......................................................... 86• Security certifications [Menu 8-7] ................................................ 86• Reset profiles [Menu 8-8] ............................................................ 86
Internet On-line menu ................................................................... 87
Additional FunctionsHow to Use Data and Fax call ..................................................... 88• Sending Data or Fax Calls .......................................................... 88• Receiving Data or Fax Calls ....................................................... 88
In call Menu ................................................................................... 901. During a call .............................................................................. 902. Multiparty or Conference Calls .................................................. 93
Care and Maintenance ................................................................. 96
Technical Data .............................................................................. 98
IN
DO
NE
SIA9
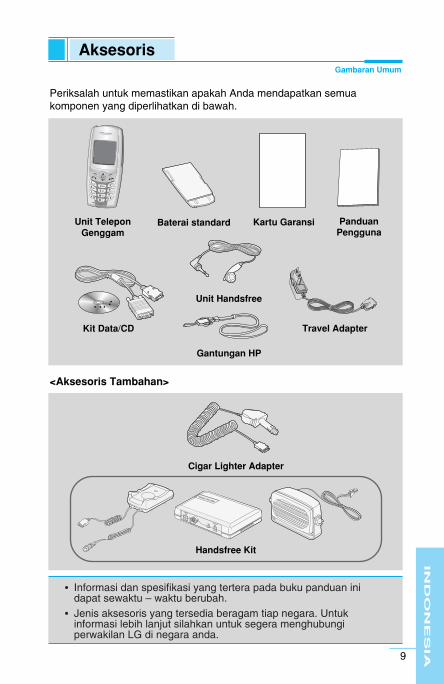
AksesorisGambaran Umum
Periksalah untuk memastikan apakah Anda mendapatkan semuakomponen yang diperlihatkan di bawah.
<Aksesoris Tambahan>
Cigar Lighter Adapter
Handsfree Kit
Unit Telepon Genggam
Travel Adapter
Unit Handsfree
Panduan Pengguna
Baterai standard
Gantungan HP
Kit Data/CD
Kartu Garansi
• Informasi dan spesifikasi yang tertera pada buku panduan inidapat sewaktu – waktu berubah.
• Jenis aksesoris yang tersedia beragam tiap negara. Untukinformasi lebih lanjut silahkan untuk segera menghubungiperwakilan LG di negara anda.
IN
DO
NE
SIA 10
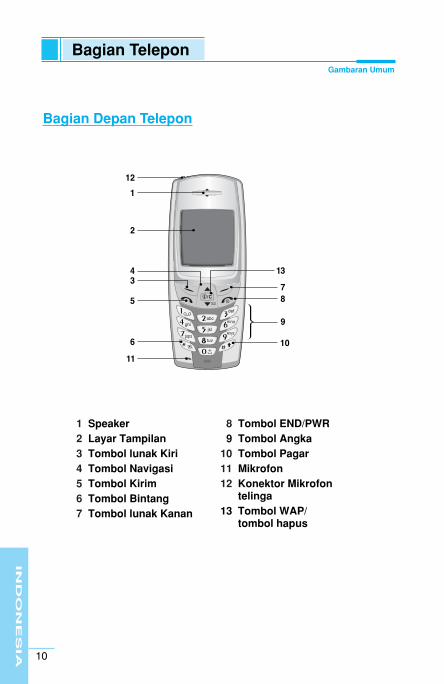
Bagian Depan Telepon
1 Speaker2 Layar Tampilan3 Tombol lunak Kiri4 Tombol Navigasi5 Tombol Kirim6 Tombol Bintang7 Tombol lunak Kanan
8 Tombol END/PWR9 Tombol Angka
10 Tombol Pagar11 Mikrofon12 Konektor Mikrofon
telinga13 Tombol WAP/
tombol hapus
Bagian TeleponGambaran Umum
IN
DO
NE
SIA11
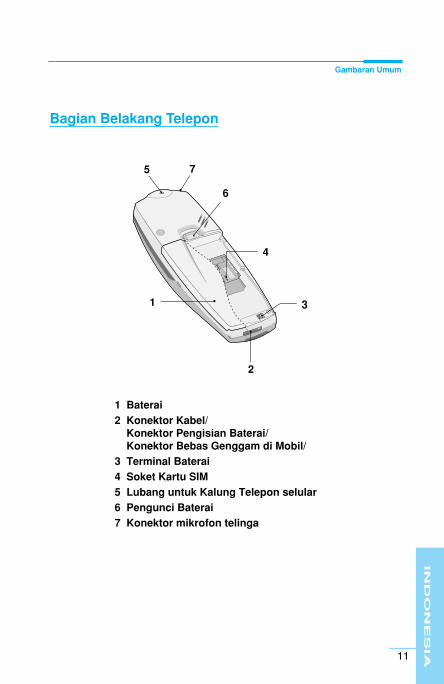
Bagian Belakang Telepon
1 Baterai
2 Konektor Kabel/Konektor Pengisian Baterai/Konektor Bebas Genggam di Mobil/
3 Terminal Baterai
4 Soket Kartu SIM
5 Lubang untuk Kalung Telepon selular
6 Pengunci Baterai
7 Konektor mikrofon telinga
6
5 7
4
3
2
1
Gambaran Umum

IN
DO
NE
SIA 12
Uraian TombolGambaran Umum
Keterangan berikut menjelaskan tombol-tombol telepon.
Uraian TombolTombol Uraian
Tombol lunak Kiri / Tombol lunak KananMasing-masing tombol melakukan fungsi yang ditunjukkanoleh teks yang ditampilkan tepat di atasnya.
Tombol pintas WAPDigunakan untuk menghubungi WAP langsung menekantombol ini. Digunakan untuk menghapus karakter.Tombol NavigasiDigunakan untuk menggulung untuk mencari nama, nomortelepon, menu atau pengaturan pilihan.
Digunakan untuk langsung masuk ke menu Pesan.
Digunakan untuk menggulung layar untuk memilih nama,nomor telepon.
Tombol KirimAnda dapat menghubungi sebuah nomor telepon danmenjawab panggilan. Jika Anda menekan tombol ini tanpamemasukkan nomor, telepon Anda akan memperlihatkannomor yang terakhir Anda hubungi.
Tombol AngkaTombol ini digunakan terutama untuk melakukan panggilandalam mode siaga dan memasukkan nomor atau karakterdalam mode Editing. Jika Anda menekan tombol-tombol inidalam waktu yang lama.• Untuk memanggil voice mailbox Anda melalui 1 .• Untuk panggilan internasional melalui 0 .• Untuk melakukan Panggilan Cepat melalui tombol-tombol
dari 2 ke 9.Digunakan untuk masuk ke mode getar dengan menekantombol ini dalam waktu lamaDigunakan untuk menelepon dengan “voice dial” (panggilansuara) dengan menekan tombol ini cukup lama. Tombol inijuga digunakan sebagai tombol sambungan mikrofon telingajika sedang digunakan.
Tombol END/PWRDigunakan untuk mengakhiri atau menolak panggilan.Tombol ini juga digunakan sebagai Tombol Power denganmenekan dan menahan tombol ini beberapa detik.

IN
DO
NE
SIA13
Gambaran Umum
Tombol Angka dan Huruf
Tombol pada telepon dapat menulis abjad dan nomor yang dapat dilihatpada tabel berikut ini.
Tombol Uraian
. , ' ? ! - & 1
A B C 2 Ä À Á Â Ã Æ Ç a b c ä à á â ã ç
D E F 3 È É Ë Ê d e f è é ë ê
G H I 4 Î Ï Ì Í g h i î ï ì í
J K L 5 j k l
M N O 6 Ö Ô Ò Ó Ø Ñ m n o ö ô ò ó ø ñ
P Q R S 7 p q r s
T U V 8 Ü Ù Û Ú t u v ü ù û ú
W X Y Z 9 w x y z
0 [Tombol Spasi]
IN
DO
NE
SIA 14
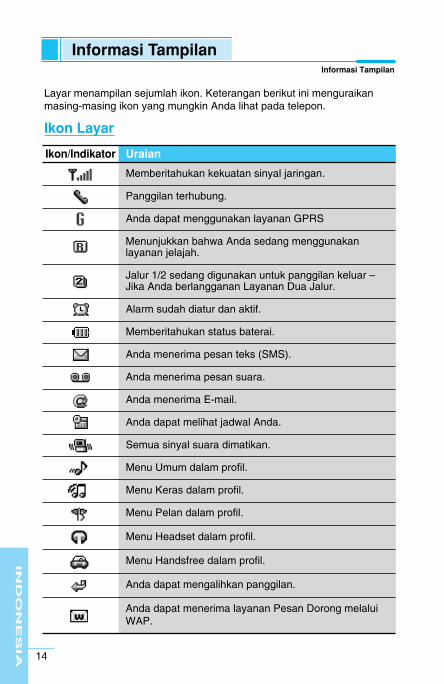
Informasi TampilanInformasi Tampilan
Layar menampilan sejumlah ikon. Keterangan berikut ini menguraikanmasing-masing ikon yang mungkin Anda lihat pada telepon.
Ikon Layar
Ikon/Indikator Uraian
Memberitahukan kekuatan sinyal jaringan.
Panggilan terhubung.
Anda dapat menggunakan layanan GPRS
Menunjukkan bahwa Anda sedang menggunakanlayanan jelajah.
Jalur 1/2 sedang digunakan untuk panggilan keluar –Jika Anda berlangganan Layanan Dua Jalur.
Alarm sudah diatur dan aktif.
Memberitahukan status baterai.
Anda menerima pesan teks (SMS).
Anda menerima pesan suara.
Anda menerima E-mail.
Anda dapat melihat jadwal Anda.
Semua sinyal suara dimatikan.
Menu Umum dalam profil.
Menu Keras dalam profil.
Menu Pelan dalam profil.
Menu Headset dalam profil.
Menu Handsfree dalam profil.
Anda dapat mengalihkan panggilan.
Anda dapat menerima layanan Pesan Dorong melaluiWAP.

IN
DO
NE
SIA15
Informasi Tampilan
Icon Uraian
Pesan
Daftar Pgl.
Profil
Seting
Pengalihan Pgl.
Agenda
Aksesori
Layanan WAP
Layanan SIM
Ikon Menu Utama

IN
DO
NE
SIA 16
PemasanganLangkah Awal
Memasukkan Kartu SIMCari soket kartu SIM di belakang telepon. Ikuti langkah-langkah berikutuntuk memasang kartu SIM.
1. Lepaskan baterai jika terpasang.
2. Masukkan kartu SIM ke slotnya, di bawahgagang berwarna perak, dengan konektorkeemasan menghadap ke bawah dansudut terpotong disebelah kanan.
3. Jika Anda ingin melepas kartu SIM, tekanbagian atas kartu SIM dengan ibu jari,kemudian sorong keluar dari slot kartuSIM dengan hati-hati.
Perhatian• Sebelum memasang, pastikan selalu bahwa telepon sudah
dimatikan dan baterai dikeluarkan.
• Kontak metal pada kartu SIM dapat rusak dengan mudah karenagoresan. Berhati-hatilah saat Anda menangani dan memasangkartu SIM. Ikuti petunjuk yang tersedia pada kartu SIM.
�
�
1. Pasang baterai pada bagian belakangtelepon.
2. Tekan sampai terdengar bunyi klik.
Memasang Baterai

IN
DO
NE
SIA17
Langkah Awal
Mengisi Baterai
Untuk menghubungkan travel adapter ke telepon, Anda harus memasangbaterai dahulu.
1. Masukkan ujung konektor travel adapterke bagian bawah telepon.
�
2. Masukkan ujung konektor travel adapteryang lain ke stop kontak. Gunakan hanya unit pengisi baterai yangAnda terima dalam paket.
Perhatian
• Jangan memasukan kabel pada connector secara paksa karenadapat menyebabkan kerusakan pada ponsel dan/atau traveladapter.
IN
DO
NE
SIA 18
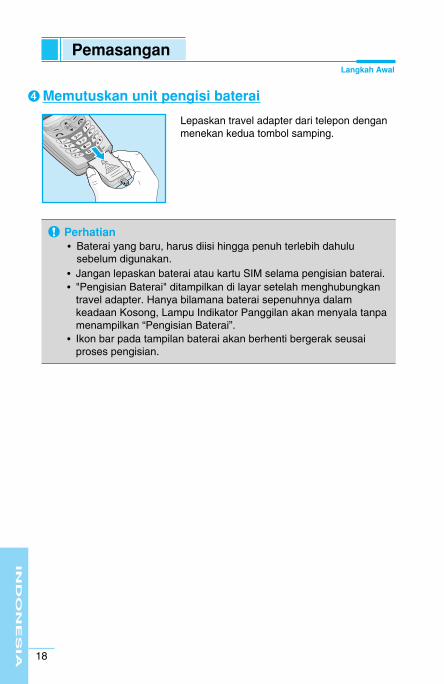
Memutuskan unit pengisi baterai
Lepaskan travel adapter dari telepon denganmenekan kedua tombol samping.
�
Perhatian• Baterai yang baru, harus diisi hingga penuh terlebih dahulu
sebelum digunakan.• Jangan lepaskan baterai atau kartu SIM selama pengisian baterai.• "Pengisian Baterai" ditampilkan di layar setelah menghubungkan
travel adapter. Hanya bilamana baterai sepenuhnya dalamkeadaan Kosong, Lampu Indikator Panggilan akan menyala tanpamenampilkan “Pengisian Baterai”.
• Ikon bar pada tampilan baterai akan berhenti bergerak seusaiproses pengisian.
PemasanganLangkah Awal
IN
DO
NE
SIA19
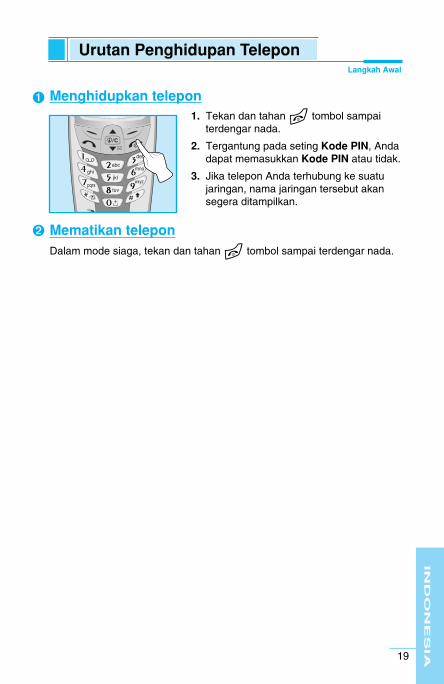
Urutan Penghidupan TeleponLangkah Awal
Menghidupkan telepon1. Tekan dan tahan E tombol sampai
terdengar nada.
2. Tergantung pada seting Kode PIN, Andadapat memasukkan Kode PIN atau tidak.
3. Jika telepon Anda terhubung ke suatujaringan, nama jaringan tersebut akansegera ditampilkan.
Mematikan teleponDalam mode siaga, tekan dan tahan E tombol sampai terdengar nada.
�
�
IN
DO
NE
SIA 20
Kode AksesLangkah Awal
Anda dapat menggunakan kode akses yang dijelaskan pada bagian iniuntuk menghindari penyalahgunaan telepon Anda. Kode-kode akses(kecuali kode PUK dan PUK2) dapat diubah dengan menggunakan [Menu4-5-6].
Kode PIN (4 hingga 8 angka)Kode PIN (Nomor Identifikasi Pribadi) melindungi kartu SIM Anda daripenyalahgunaan. Kode PIN biasanya diberikan bersama kartu SIM. JikaKode PIN berada pada mode Aktifkan, telepon Anda akan meminta kodePIN setiap kali dihidupkan. Sebaliknya, jika Kode PIN berada pada modeNonaktifkan, telepon Anda akan langsung terhubung ke jaringan tanpameminta kode PIN.
Kode PIN2 (4 hingga 8 angka)Kode PIN2, yang tersedia pada kartu SIM, diperlukan untuk mengaksesbeberapa fungsi seperti Jumlah biaya panggilan, Nomor Tetap. Fungsi-fungsi tersebut hanya tersedia jika didukung oleh kartu SIM Anda.
Kode PUK (4 hingga 8 angka)Kode PUK (Personal Unblocking Key) diperlukan untuk mengubah kodePIN yang diblokir. Kode PUK mungkin diberikan bersama kartu SIM. Jikatidak, hubungi penyedia jasa selular Anda untuk meminta kode tersebut.Jika Anda kehilangan kode tersebut, hubungi juga penyedia jasa selularAnda.
Kode PUK2 (4 hingga 8 angka)Kode PUK, yang tersedia pada kartu SIM, diperlukan untuk mengubahkode PIN2 yang diblokir. Jika Anda kehilangan kode tersebut, hubungijuga penyedia jasa selular Anda.
Kode Keamanan (4 hingga 8 angka)Kode keamanan melindungi ponsel anda terhadap penggunaan yang tidakdikehendaki. Kode ini diperlukan dalam melakukan penghapusan seluruhdaftar masukan pada buku telepon dan juga untuk mengaktifkan fungsi“Pengaturan Pabrik” pada menu. Nomor default daripada kode Sekuritiadalah “0000”. Anda dapat juga mengganti kode ini pada menu Sekuriti.
IN
DO
NE
SIA21
Untuk memilih menu di buku telepon, tekan[Nama] dalam mode siaga dan gulung keitem yang diinginkan.
Buku TeleponMengakses Menu
Name Description
1 Cari Untuk mencari nama atau nomor tertentu.
2 Tambah baru Untuk menambah nama dan nomor baru.
3 Putar-cepat Untuk membuat hingga 8 panggilan ( 2 - 9 )cepat melalui sekali tekan
4 Daftar suara Untuk membuat daftar nomor telepon yangmemiliki fasilitas suara.
5 Grup penelpon Untuk menampilkan daftar grup.
6 Copy semua Untuk menyalin entri dari memori telepon Andake kartu SIM atau dari kartu SIM ke memoritelepon.
7 Hapus semua Untuk menghapus semua data pada memoribuku telepon atau kartu SIM Anda.
8 Seting Untuk mengatur memori dan mencari itemmelalui Variabel, nama dan nomor.
9 Informasi Untuk memeriksa status memori, SDN (ServiceDial Number), dan daftar Nomor sendiri.
Nama Uraian
IN
DO
NE
SIA 22
Susunan MenuMengakses Menu
1 Pesan
1 Tulis2 Kotak masuk3 Kotak keluar4 Layanan info5 Voice mail6 Kartu nama7 Template8 Laporan status9 Seting0 Memory Status
2 Daftar pgl.
1 Tak terjawab2 Pgl masuk3 Panggilan keluar4 Daftar semua pgl5 Hapus daftar pgl6 Biaya pgl7 Info GPRS
3 Profil
1 Hanya getar2 Sunyi3 Umum4 Keras5 Headset6 Mobil
4 Seting
1 Jam alarm2 Tgl & Wkt3 Seting telepon4 Seting pgl5 Seting sekuriti6 Seting jaringan7 Reset seting
IN
DO
NE
SIA23
5 Pengalihan pgl
1 Semua pgl2 Jika sibuk3 Jika tk dijawab4 Jika tk jangkau5 Semua pgl data6 Semua pgl fax7 Batal semua
6 Agenda
1 Jadwal2 Buku telepon
7 Aksesori
1 My folder2 Game3 Buat melodi4 Editor grafik5 Unit konversi6 Kalkulator7 Waktu dunia
8 Layanan WAP
1 Rumah2 Bookmark3 Pesan dorong4 Profil5 Kunjungi URL6 Seting cache7 Sertif. sekuriti8 Reset profil
9 Layanan SIMMenu ini tergantung padalayanan operator jaringan.
Mengakses Menu

IN
DO
NE
SIA 24
Menu ini meliputi fungsi-fungsi yang berhubungan dengan SMS (ShortMessage Service), pesan suara dan pesan layanan jaringan.
Tulis [Menu 1-1]Anda dapat menulis dan mengedit pesan teks sampai dengan 918karakter. Anda juga dapat memeriksa jumlah karakter yang Anda tulis.
1. Masuk ke menu Pesan dengan menekan [Pilih].
2. Jika Anda inginmenulis pesan baru, pilih Tulis di dalam menu ini.
3. Masukkan pesan dengan menggunakan teks eZi. Untuk lebih jelasnya,lihat keteranganteks eZi (halaman 26).
4. Saat Anda menulis pesan, > akan berubah menjadi simbol.
5. Apabila Anda telah selesai menulis pesan, tekan [Opsi]. Kemudianmenu pilihan berikutnya akan ditampilkan.
KirimMengirimkan pesan teks.
1. Jika Anda ingin mengirimkan pesan teks, masukan nomor yang Andainginkan.
2. Telepon Anda meminta Anda memasukkan nomor yang akan Andakirimi pesan.
3. Setelah mengirim pesan, telepon Anda bertanya apakah Anda inginmenyimpan pesan yang telah Anda edit.
SimpanSimpan pesan ke dalam Kotak Keluar. Anda akan ditanya apakah akanmerekam pesan yang telah diedit.
TempletTemplet adalah pesan yang siap pakai. Anda dapat menambahkantemplet dari daftar ke pesan saat Anda mengeditnya.
Kartu namaItem pada kartu nama adalah nama, nomor telepon selular, kantor, nomorfaks, dan alamat email. Anda dapat menambah kartu nama ke pesan.
Pesan [Menu 1]Mengakses Menu
IN
DO
NE
SIA25
Fungsi EMSGambar (juga animasi) dan nada dering dapat disisipkan dalammengirimkan pesan singkat. Tekan tombol [Opsi] untuk melampirkan,kemudian akan tampil pilihan sebagai berikut.
• Simbol
• Picture
• Animasi
• Bunyi
Kamus
• Tambah baru
Jika ada kata baru yang sering Anda gunakan, Anda dapatmemasukkannya dengan menekan tombol sekali untuk setiap karakter.
1. Masuk ke menu.
2. Gulung untuk menyorot Tambah baru, lalu tekan [Pilih].
3. Masukkan kata, kemudan tekan [Tambah].
• Daftar kamus
Anda dapat melihat daftar kata yang telah Anda simpan dalam kamus.
1. Masuk ke menu.
2. Gulung untuk menyorot Daftar kamus, lalu tekan [Pilih].
3. Anda dapat melihat daftar kata.
4. Jika Anda ingin menghapus sebuah kata, tekan [Hapus].
5. Jika Anda ingin menghapus semua kata dalam daftar, pilih Hapussemua di bawah daftar dengan menekan [Pilih].
Mengakses Menu
Catatan• Anda dapat melihat lampiran yang telah anda terima pada menu
My folder [Menu 7-1].
IN
DO
NE
SIA 26
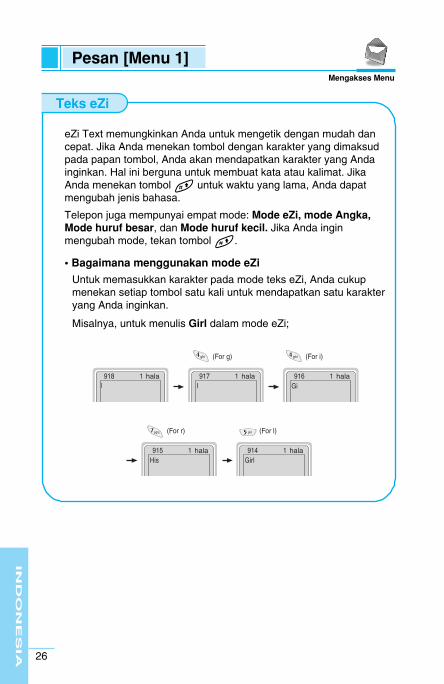
eZi Text memungkinkan Anda untuk mengetik dengan mudah dancepat. Jika Anda menekan tombol dengan karakter yang dimaksudpada papan tombol, Anda akan mendapatkan karakter yang Andainginkan. Hal ini berguna untuk membuat kata atau kalimat. JikaAnda menekan tombol # untuk waktu yang lama, Anda dapatmengubah jenis bahasa.
Telepon juga mempunyai empat mode: Mode eZi, mode Angka,Mode huruf besar, dan Mode huruf kecil. Jika Anda inginmengubah mode, tekan tombol #.
• Bagaimana menggunakan mode eZi
Untuk memasukkan karakter pada mode teks eZi, Anda cukupmenekan setiap tombol satu kali untuk mendapatkan satu karakteryang Anda inginkan.
Misalnya, untuk menulis Girl dalam mode eZi;
Teks eZi
Pesan [Menu 1]Mengakses Menu
IN
DO
NE
SIA27
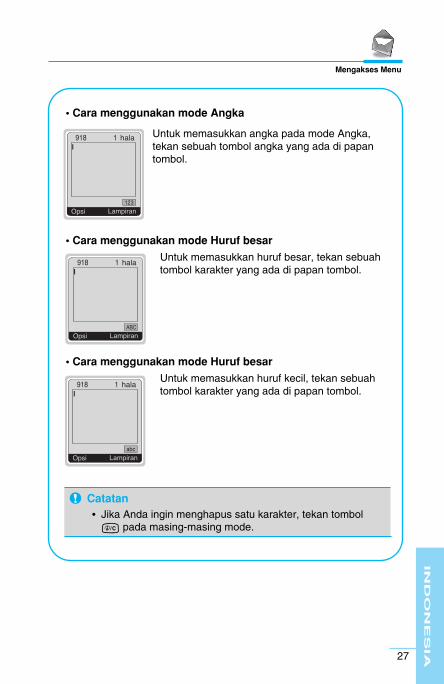
Mengakses Menu
• Cara menggunakan mode Angka
Untuk memasukkan angka pada mode Angka,tekan sebuah tombol angka yang ada di papantombol.
• Cara menggunakan mode Huruf besar
Untuk memasukkan huruf besar, tekan sebuahtombol karakter yang ada di papan tombol.
• Cara menggunakan mode Huruf besar
Untuk memasukkan huruf kecil, tekan sebuahtombol karakter yang ada di papan tombol.
Catatan• Jika Anda ingin menghapus satu karakter, tekan tombol
C pada masing-masing mode.

IN
DO
NE
SIA 28
Pesan [Menu 1]Mengakses Menu
Kotak masuk [Menu 1-2]Saat Anda menerima pesan teks, telepon akan menampilkan simbol danmenyimpannya dalam daftar pesan masuk. Gulung sampai ke pesan yangdiinginkan dengan menggunakan U atau D . Selain itu, Anda jugadapat melihat Hapus semua untuk menghapus semua pesan masuk padaposisi paling bawah. Saat membaca pesan, tekan [Opsi] untuk memilihpilihan yang tersedia.
JawabAnda dapat menjawab pesan kepada pengirim pesan.
TeruskanAnda dapat meneruskan pesan yang telah Anda pilih ke pihak lain.
HapusPesan yang telah Anda pilih akan dihapus.
Ambil nomorJika pesan yang Anda pilih mempunyai nomor telepon, Anda dapatmengambil dan menyimpannya ke dalam buku telepon. Anda juga dapatmenelepon melalui nomor ini.
Simpan lampiranAnda dapat menyimpan file tempelan, misalnya simbol, gambar, animasi,dan suara.
Balas panggilanAnda dapat menelepon pengirim pesan secara otomatis.

IN
DO
NE
SIA29
Mengakses Menu
Kotak keluar [Menu 1-3]Begitu Anda masuk ke menu ini, Anda dapat melihat daftar panggilankeluar. Gulung ke pesan yang diinginkan dengan U , D atau dan tekan< untuk melihat pesan. Jika Anda ingin keluar dari menu Kotak keluar,tekan > .Selain itu, Anda juga dapat melihat Hapus semua untuk menghapussemua pesan masuk pada posisi paling bawah.
Saat membaca pesan, tekan [Opsi] untuk mengakses submenu berikut ini.
TeruskanAnda dapat meneruskan pesan yang telah Anda pilih ke pihak lain.
HapusPesan yang telah Anda pilih akan dihapus.
Ambil nomorJika pesan yang Anda pilih mempunyai nomor telepon, Anda dapatmengambil dan menyimpannya ke dalam buku telepon. Anda juga dapatmenelepon melalui nomor ini.
Layanan info [Menu1-4](Tergantung jaringan dan jenis kartu Anda)
Pesan siaran selular (Pesan CB) adalah pesan teks yang dipancarkanoleh jaringan kepada pengguna telepon GSM. Pesan tersebut berupainformasi umum seperti laporan cuaca, berita lalu-lintas, taksi, apotik danharga saham. Setiap jenis informasi mempunyai nomor; untuk itu, Andadapat menghubungi penyedia jasa selular. Ketika Anda menerima pesanCB, Anda dapat membacanya dengan urutan sebagai berikut:
Baca1. Saat Anda menerima pesan CB, pesan tersebut akan ditampilkan di
layar. Anda dapat membaca pesan dengan menggulung U , atauD .
2. Setelah membaca pesan, tekan E untuk kembali ke mode siaga.Selain itu, Anda dapat menyimpannya sampai pesan yang lainditerima.

IN
DO
NE
SIA 30
Pesan [Menu 1]Mengakses Menu
Receive
• Ya
Bila Anda memilih menu ini, telepon Anda akan menerima pesan cellbroadcast.
• Tidak
Bila Anda memilih menu ini, telepon Anda tidak akan menerima pesancell broadcast lagi.
Peringatan
• Ya
Bila Anda memilih menu ini, telepon Anda akan berbunyi bip saatmenerima pesan CB.
• Tidak
Bila Anda memilih menu ini, telepon Anda tidak akan berbunyi bip saatmenerima pesan CB.
BahasaAnda dapat memilih bahasa yang Anda inginkan. Telepon Anda akanmenerima pesan CB dalam bahasa yang Anda pilih.
Topik (Tergantung jaringan dan jenis kartu Anda)
• Tambah baru
Jika Anda memilih menu ini, Anda dapat menambah kategori pesan CBdalam memori Telepon dengan nama julukan.
• Lihat daftar
Jika Anda memilih menu ini, Anda dapat melihat kategori pesan CB yangtelah Anda tambahkan. Jika Anda menekan [Opsi], Anda dapat mengeditdan menghapus kategori yang telah Anda tambahkan.
• Daftar aktif
Anda dapat memilih kategori pesan CB dalam daftar aktif denganmenekan [Pilih].
IN
DO
NE
SIA31
Mengakses Menu
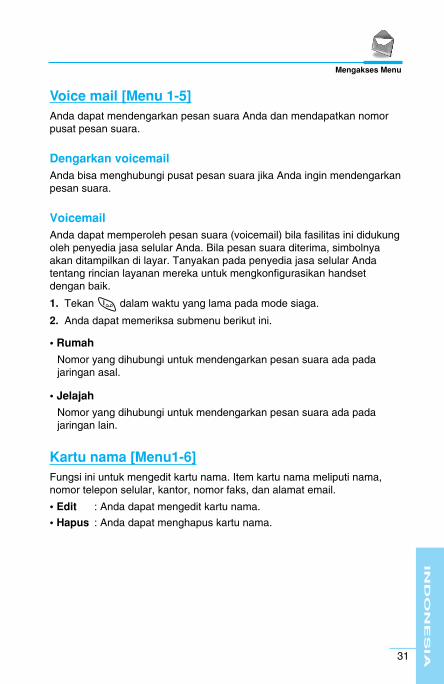
Voice mail [Menu 1-5]Anda dapat mendengarkan pesan suara Anda dan mendapatkan nomorpusat pesan suara.
Dengarkan voicemailAnda bisa menghubungi pusat pesan suara jika Anda ingin mendengarkanpesan suara.
VoicemailAnda dapat memperoleh pesan suara (voicemail) bila fasilitas ini didukungoleh penyedia jasa selular Anda. Bila pesan suara diterima, simbolnyaakan ditampilkan di layar. Tanyakan pada penyedia jasa selular Andatentang rincian layanan mereka untuk mengkonfigurasikan handsetdengan baik.
1. Tekan 1 dalam waktu yang lama pada mode siaga.
2. Anda dapat memeriksa submenu berikut ini.
• Rumah
Nomor yang dihubungi untuk mendengarkan pesan suara ada padajaringan asal.
• Jelajah
Nomor yang dihubungi untuk mendengarkan pesan suara ada padajaringan lain.
Kartu nama [Menu1-6]Fungsi ini untuk mengedit kartu nama. Item kartu nama meliputi nama,nomor telepon selular, kantor, nomor faks, dan alamat email.
• Edit : Anda dapat mengedit kartu nama.
• Hapus : Anda dapat menghapus kartu nama.

IN
DO
NE
SIA 32
Template [Menu 1-7]Fungsi ini untuk mengedit pesan yang siap pakai. Anda dapat melihat 11pesan siap pakai di dalam daftar. Anda dapat menyimpan 6 templetsebelum Anda mengedit. Tetapi Anda juga dapat mengubahnya. Fungsilainnya adalah <Kosong>.
• Edit : Anda dapat mengedit templet.
• Reset : Anda dapat menghapus templet.
Laporan status [Menu 1-8]Anda dapat membaca dan menghapus pesan laporan pengiriman.
Seting [Menu 1-9]
Jenis pesanTeks, Suara, Fax, Natl. paging, X.400, E-mail, ERMES
Biasanya, jenis pesan disetel ke Teks. Anda dapat mengubah teks kedalam format alternatif, yang cocok bagi sarana penerima pesan. Hubungipenyedia jasa selular Anda untuk mengaktifkan fasilitas ini.
Masa berlakuFasilitas jaringan ini memungkinkan Anda untuk menentukan seberapalama pesan teks akan disimpan di pusat pesan sebelum berhasil terkirimkepada Anda.
Laporan statusJika Anda menyetel Ya dalam menu ini, Anda dapat memeriksa apakahpesan Anda berhasil terkirim atau tidak.
Bayar utk jwbKetika pesan terkirim, penerima pesan dapat membalas danmembebankan biaya balasannya ke rekening telepon Anda.
Pesan [Menu 1]Mengakses Menu
IN
DO
NE
SIA33
Mengakses Menu
Pusat SMSJika Anda ingin mengirimkan pesan teks, Anda dapat memperoleh alamatPusat SMS melalui menu ini.
KertasAnda dapat memilih salah satu kertas yang Anda sukai sambil menulispesan.
Memory Status [Menu 1-0]Bila Anda memilih menu ini, telepon akan menampilkan memori yangtelah terpakai dan jumlah keseluruhan memori. Keseluruhan memoriadalah jumlah memori SIM dan Telepon.
IN
DO
NE
SIA 34
Tak terjawab [Menu 2-1]Menu ini menampilkan nomor-nomor terakhir yang tak terjawab. Andadapat memanggil dengan nomor ini, juga menyimpan dan melihat tanggaldan jam pada menu ini.
Pgl masuk [Menu 2-2]Anda bisa memeriksa nomor-nomor yang baru masuk. Anda bisamemanggil dengan nomor ini, menyimpannya dan melihat tanggal danwaktunya pada menu ini.
Panggilan keluar [Menu 2-3]Anda bisa memeriksa nomor-nomor yang baru dipanggil. Anda bisamemanggil dengan nomor ini, menyimpannya dan melihat tanggal danwaktunya pada menu ini.
Daftar semua pgl [Menu 2-4]Anda dapat menyimpan nomor telepon dan memeriksa tanggal dan waktupanggilan. Selain itu, Anda dapat memanggil kembali nomor lain danmenulis pesan.
Hapus daftar pgl [Menu 2-5]Anda bisa menghapus semua rekaman panggilan.
Biaya pgl [Menu 2-6]Dalam submenu ini, Anda bisa melihat durasi dan biaya panggilan Anda.
Durasi pglFungsi ini memungkinkan Anda untuk melihat lama pembicaraan pada Pglterakhir, Semua Pgl, Pgl masuk dan Panggilan Keluar dalam satuan jam,menit dan detik. Anda dapat pula mereset fasilitas penghitung waktu.
1. Tekan [Menu] dalam mode siaga.
2. Tekan 2 untuk mengakses secara langsung atau menggunakan Udan D untuk masuk ke Daftar pgl.
3. Gulung untuk menyorot Biaya pgl kemudian Durasi pgl dan tekan[Pilih].
Daftar pgl. [Menu 2]Mengakses Menu

IN
DO
NE
SIA35
Mengakses Menu
Tampilkan biayaFungsi ini memungkinkan untuk melihat biaya panggilan terakhir Anda,seluruh panggilan, saldo dan mereset biaya. Untuk mereset biaya, Andamemerlukan kode PIN2.
1. Tekan [Menu] dalam mode siaga.
2. Tekan 2 untuk mengakses secara langsung atau gunakan U danD untuk masuk ke Daftar pgl.
3. Gulung untuk menyorot Biaya pgl kemudian Tampilkan biaya dantekan [Pilih] untuk masuk.Submenu berikut ini: Pgl terakhir, Semua pgl, Saldo biaya dan Resetsemua.
Seting [Tergantung SIM]
• Set tarif
Anda dapat mengatur jenis mata uang dan harga satuannya. Hubungipenyedia jasa selular Anda untuk mendapatkan harga satuanpembebanan. Untuk memilih mata uang atau satuan dalam menu ini,Anda memerlukan kode PIN2.
1. Tekan [Menu] dalam mode siaga.
2. Tekan 2 untuk mengakses secara langsung atau gunakan Udan D untuk masuk ke Daftar pgl.
3. Gulung untuk menyorot Seting dan tekan [Pilih] untuk masuk.
4. Pilih Set tarif.
• Set kredit
Dengan fasilitas jaringan ini Anda dapat membatasi biaya panggilandengan unit biaya yang dipilih. Jika Anda memilih Baca, angka unit saldoditampilkan. Jika Anda memilih Rubah, Anda dapat mengubah batasbiaya Anda.
1. Tekan [Menu] dalam mode siaga.
2. Tekan 2 untuk mengakses secara langsung atau gunakan Udan D untuk masuk ke Daftar pgl.
3. Gulung untuk menyorot Seting dan tekan [Pilih] untuk masuk.
4. Pilih Set kredit.
Catatan• Biaya sebenarnya bisa berbeda bergantung pada fasilitas jaringan,
penagihan, dan pajak.
• Tampilan Oto.
Dengan fasilitas jaringan ini Anda dapat melihat secara otomatis biayadari panggilan terakhir Anda. Jika Anda memilih Ya pada menuTampilan Oto., Anda dapat melihat biaya terakhir saat panggilandilakukan.
1. Tekan [Menu] dalam mode siaga.
2. Tekan 2 untuk mengakses secara langsung atau gunakan Udan D untuk masuk ke Daftar pgl.
3. Gulung untuk menyorot Seting dan tekan [Pilih] untuk masuk.
4. Pilih Tampilan Oto.
Info GPRS [Menu 2-7]Anda dapat memeriksa jumlah data yang dikirim lewat jaringan melaluifasilitas GPRS. Selain itu Anda juga dapat melihat lama waktu Andaonline.
Durasi pglAnda dapat memeriksa durasi panggilan GPRS. Anda juga dapat meresetfasilitas penghitung waktu panggilan.
• Pgl terakhir
• Semua pgl
• Reset
Vol dataAnda dapat memeriksa volume data.
• Sudah Dikirim
• Diterima
• Semua
• Reset semua
Catatan• Bila semua satuan telah digunakan, panggilan tidak dapat
dilakukan kecuali panggilan darurat. Tergantung pada kartu SIM,Anda memerlukan kode PIN2 untuk mengatur Batas Biaya.
IN
DO
NE
SIA 36
Daftar pgl. [Menu 2]Mengakses Menu
IN
DO
NE
SIA37
Dalam menu ini, Anda dapat mengatur dan memodifikasi nada deringuntuk peristiwa, lingkungan dan kelompok panggilan yang berbeda.
Hanya getar [Menu 3-1]• Aktifkan : Anda dapat mengatur Profil suara sebagai Getaran jika
Anda menginginkan mode getar.
Sunyi [Menu 3-2]• Aktifkan : Anda dapat mengatur profil suara menjadi profil Tenang
jika berada di tempat yang tenang.
• Personalisasi : Anda dapat mengubah nilai submenu Profil suara.
Umum [Menu 3-3]• Aktifkan : Anda bisa mengatur profil menjadi Umum.
• Personalisasi : Anda dapat mengubah nilai submenu Profil suara.
Keras [Menu 3-4]• Aktifkan : Anda dapat mengatur profil sebagai Keras jika berada
dalam lingkungan bising.
• Personalisasi : Anda dapat mengubah nilai submenu Profil suara.
Headset [Menu 3-5]• Aktifkan : Anda dapat merubah profil menjadi headset bila Anda
memakai headset.
• Personalisasi : Anda dapat mengubah nilai submenu Profil suara.
Catatan• Jika tersambung ke perangkat Handsfree, telepon Anda akan
otomatis diatur ke menu profil Mobil dan jika tersambung kemikrofon telinga, telepon Anda akan otomatis diatur ke menuprofil Headset, kemudian semua menu yang terkait dengan profilHeadset akan ditampilkan secara otomatis.
Profil [Menu 3]Mengakses Menu

Mobil [Menu 3-6]• Aktifkan : Anda dapat mengatur profil sebagai Mobil pada saat
mengaktifkan Perangkat bebas genggam.
• Personalisasi : Anda dapat mengubah nilai submenu Profil suara.
Kelompok A untuk submenu Profil [Menu 3-x-x]Menu Profil memiliki submenu di bawah ini.
Tanda pglMengaktifkan tanda bila ada Panggilan Masuk sesuai dengan kondisitertentu.
SoundMengaktifkan jenis dering sesuai dengan kondisi tertentu.
Vol deringMengaktifkan volume dering sesuai dengan kondisi tertentu.
Jenis tandaMengaktifkan tanda peringatan pada saat menerima sebuah pesan sesuaidengan kondisi tertentu: Dering sekali, Getar, dan Diam.
Vol tombolMengaktifkan volume tombol sesuai dengan kondisi tertentu.
IN
DO
NE
SIA 38
Profil [Menu 3]Mengakses Menu

IN
DO
NE
SIA39
Mengakses Menu
Jwb autoMemungkinkan pengaturan jawab otomatis sesuai dengan kondisitertentu. Perhatikan bahwa pengaturan submenu ini hanya dapatdilakukan pada profil Mobil dan Headset.
• Off
Meskipun berdering, telepon selular Anda tidak akan menjawab secaraotomatis.
• Stl 5 detik
Setelah 5 detik telepon selular Anda akan menjawab secara otomatis.
• Stl 10 detik
Setelah 10 detik, telepon selular Anda akan menjawab secara otomatis.
Catatan• Jika Anda memasang perangkat handsfree (bebas genggam) pada
telepon selular, maka Anda tidak dapat mengaktifkan getaran yangberhubungan dengan menu peringatan panggilan masuk ataupesan masuk. Oleh karena itu, pada menu Handsfree, Anda dapatmenampilkan submenu berikut ini;
- Tanda pgl : Dering, Diam
- Jenis tanda : Dering sekali, Diam.
IN
DO
NE
SIA 40
Seting [Menu 4]Mengakses Menu
Anda dapat mengatur menu berikut ini untuk kenyamanan dan sebagaipilihan Anda.
Jam alarm [Menu 4-1]Anda dapat mengatur telepon selular untuk alarm sesuai keperluan dalammenu ini.
OnAnda dapat menyetel waktu (Jam dan Menit) untuk mengaktifkan alarm.
1. Masuk ke menu.
2. Pilih On dengan menekan [Pilih], dan kemudian memasukkan waktualarm yang diinginkan.
3. Tekan [Ok].
4. Pilih periode pengulangan: Sekali, Harian, Mingguan, dan Bulanan.
5. Jika Anda memilih Ya pada Alarm power off, sinyal alarm akanberbunyi pada waktu yang telah disetel, meskipun telepon selulardalam keadaan mati.
OffAnda dapat membatalkan seting jam alarm.
1. Masuk ke menu
2. Pilih Off dengan menekan [Pilih].
3. Pesan Batal alarm ditampilkan.
4. Jika Anda ingin membatalkan, tekan [Ya]. Jika tidak, tekan [Tidak].
Tgl & Wkt [Menu 4-2]
Tanggal
• Set tanggal
Pada menu ini, Anda dapat mengatur tanggal telepon selular Anda.
1. Masuk ke menu.
2. Pilih Set tanggal dengan menekan [Pilih].
3. Masukkan angka sesuai keinginan Anda untuk mengatur tanggal.
4. Tekan [Ok].

IN
DO
NE
SIA41
Mengakses Menu
• Format tanggal
Anda dapat memprogram Format tanggal pada menu ini.
WaktuTelepon selular memiliki fungsi jam sendiri. Pada menu ini Anda dapatmemprogram waktu dan memilih antara format waktu 12-jam atau 24-jam.
1. Masuk ke menu.
2. Gulung layar untuk menampilkan waktu dengan menekan [Pilih].
• Set waktu:
Dalam menu ini Anda dapat memprogram waktu pada telepon selularAnda.
1. Pilih Atur waktu dengan menekan [Pilih].
2. Masukkan angka sesuai keinginan Anda untuk menyetel waktu.
3. Pilih AM/PM sesuai keinginan Anda untuk mengatur format waktudengan menekan tombol U , D .
4. Tekan [Ok].
• Format waktu:
Anda dapat memilih format waktu antara 12 jam atau 24 jam.
1. Gulung layar untuk menampilkan Format waktu dengan menekan[Pilih].
2. Pilih 12 jam atau 24 jam sesuai keinginan Anda dengan menekan[Pilih].
Seting telepon [Menu 4-3]Anda dapat mengatur seting telepon selular sesuai keinginan. Gulungtombol layar untuk menampilkan menu Seting telepon, dan kemudiantekan [Pilih].
Seting Tampilan
• Screen saver
Jika Anda tidak mengaktifkan fungsi apapun dalam 20 detik, gambar iniakan tampil pada mode siaga.
IN
DO
NE
SIA 42
• Panggilan
Anda dapat mengatur animasi waktu sedang menelepon.
• Wallpaper
Anda dapat memilih gambar latar dalam mode siaga.
• Teks sambutan
Anda dapat mengatur pesan pada tampilan saat Anda menghidupkantelepon.
• Teks salam
Jika Anda memilih On, menu ini memungkinkan Anda memilih tampilansiaga. Di dalam mode teks, Anda dapat mengedit teks.
• Nama jaringan
Bila anda memilih On, anda dapat memilih operator jaringan yang terterapada layar.
• Backlight
Anda dapat menata durasi penyalaan yang diinginkan ketika menekansebuah tombol.
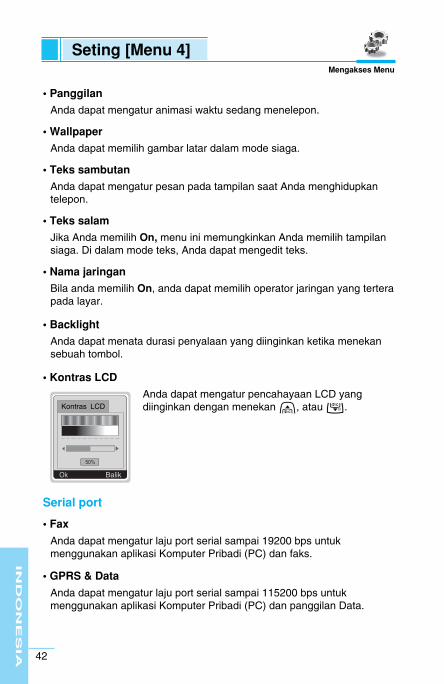
• Kontras LCD
Anda dapat mengatur pencahayaan LCD yangdiinginkan dengan menekan U, atau D.
Serial port
• Fax
Anda dapat mengatur laju port serial sampai 19200 bps untukmenggunakan aplikasi Komputer Pribadi (PC) dan faks.
• GPRS & Data
Anda dapat mengatur laju port serial sampai 115200 bps untukmenggunakan aplikasi Komputer Pribadi (PC) dan panggilan Data.
Seting [Menu 4]Mengakses Menu

IN
DO
NE
SIA43
Mengakses Menu
BahasaAnda bisa memilih bahasa yang akan ditampilkan pada telepon.
Seting pgl [Menu 4-4]Anda dapat mengatur menu sesuai panggilan dengan menekan [Pilih]dalam menu Seting.
Tombol jwb bebas
• On
Jika Anda memilih menu ini, Anda dapat menerima panggilan masukdengan menekan tombol apa saja kecuali tombol E.
• Off
Anda dapat menerima panggilan hanya dengan menggunakan tombolS.
Kirim no. (Tergantung jaringan dan layanan kartu Anda)
• On
Jika Anda memilih ini, Anda dapat mengirim nomor telepon Anda kepadapihak lain. Dengan demikian, nomor telepon Anda akan ditampilkanpada layar telepon selular penerima.
• Off
Jika memilih ini, Anda tidak dapat mengirim nomor telepon Anda.
Catatan• Cara menggunakan perangkat bebas genggam portable:
Jikan Anda ingin menggunakan perangkat bebas genggamportable (mikrofon telinga), silakan tekan tombol # cukup lamasetelah memasang mikrofon telinga pada konektor untukmenerima panggilan.
IN
DO
NE
SIA 44
Pgl tunggu(tergantung jaringan)
Jika layanan ini Aktif, Anda dapat menerima panggilan (masuk) yangmenunggu.
• On
Mengaktifkan layanan terkait.
• Off
Menonaktifkan layanan terkait.
• Lihat status
Memeriksa Status layanan.
Nada 1 menitJika Anda memilih On, Anda dapat memeriksa durasi panggilan dengansuara bip setiap menitnya saat sedang menelepon.
Pgl ulg auto
• On
Pada saat fungsi ini diaktifkan, telepon selular Anda akan berusahamemanggil ulang sampai 10 kali sebelum berhasil tersambung.
• Off
Telepon selular Anda tidak akan berusaha menghubungkan kembalisebuah panggilan setelah gagal terhubung pertama kali.
Pilih lineFasilitas ini hanya digunakan jika penyedia layanan mendukung layanandua jalur. Telepon selular terdaftar pada dua buah nomor terpisah.Dengan fasilitas ini Anda dapat memilih nomor telepon selular yang inginAnda gunakan. Jika fasilitas ini didukung oleh penyedia jasa selular Anda,menu berikut ini akan ditampilkan.
• Line 1 : Pilih Line 1 sebagai nomor telepon selular yang Anda gunakan.
• Line 2 : Pilih Line 2 sebagai nomor telepon selular yang Anda gunakan.
Seting [Menu 4]Mengakses Menu

IN
DO
NE
SIA45
Mengakses Menu
Seting sekuriti [Menu 4-5]
Permintaan PINDi dalam menu ini, Anda dapat mengatur telepon untuk meminta kode PINdari kartu SIM Anda pada saat telepon diaktifkan. Jika fungsi ini diaktifkan,Anda akan diminta memasukkan kode PIN.
1. Tekan [Menu] dalam mode siaga.
2. Tekan tombol 4 untuk akses langsung atau gunakan U dan Duntuk masuk ke Seting.
3. Gulung layar untuk menampilkan menu Seting sekuriti.
4. Pilih Permintaan PIN dengan menekan [Pilih].
5. Anda dapat melihat submenu berikut ini.
• On : Untuk mengaktifkan permintaan kode PIN.
• Off : Untuk menonaktifkan permintaan kode PIN.
Kunci teleponAnda bisa menggunakan kode pengaman untuk menghindaripenyalahgunaan telepon Anda. Jika Anda mengaktifkan telepon, teleponAnda akan selalu meminta kode pengaman jika Anda mengatur kuncitelepon ke posisi “On”. Jika kunci telepon Anda atur ke “Otomatis”,telepon Anda akan meminta kode pengaman hanya jika Anda menggantikartu SIM.
• On
• Off
• Otomatis
Kunci tombol otomatis Jika Anda mengaktifkan Kunci tombol otomatis, papan tombol akanotomatis terkunci setelah layar diam selama 25 detik tanpa ada tombolyang ditekan.
• On
• Off

IN
DO
NE
SIA 46
Pembatasn pgl Fasilitas pembatasan panggilan ini berfungsi untuk membantu Anda Agartidak mengirim atau menerima panggilan dengan kategori tertentu.Fasilitas ini memerlukan password pembatasan Panggilan. Anda dapatmelihat submenu berikut ini.
• Semua keluar:
Membatasi semua panggilan keluar.
• Internasional:
Membatasi semua panggilan keluar internasional.
• Int’l kecuali negara asal:
Membatasi semua panggilan keluar internasional, kecuali ke negara asalAnda sendiri.
• Semua masuk:
Membatasi semua panggilan masuk.
• Msk jk jelajah:
Membatasi semua panggilan masuk ketika berada di luar negeri.
• Batal semua:
Anda dapat membatalkan semua fasilitas pembatasan panggilan.
• Ganti passw:
Anda dapat mengganti password untuk fasilitas Pembatasan Panggilan.
Seting [Menu 4]Mengakses Menu
Catatan• Jika Anda ingin mengunci papan tombol telepon secara manual,
masuk ke menu Atas lalu tekan tombol * .• Jika Anda ingin membuka kunci papan tombol telepon, tekan
tombol * [Buka kunci] lalu tekan tombol *. Tetapi jikasebelumnya Anda mengaktikan kunci tombol Otomatis, papantombol Anda akan terbuka kuncinya dan otomatis mengunci lagisetelah 25 detik tidak digunakan.

IN
DO
NE
SIA47
Mengakses Menu
Nomor tetap (Tergantung SIM)Anda dapat membatasi panggilan keluar untuk nomor yang dipilih. Nomortersebut dilindungi dengan kode PIN2 Anda.
1. Tekan [Menu] dalam mode siaga.
2. Tekan 4 tombol untuk akses langsung atau gunakan U dan Duntuk masuk ke Seting.
3. Gulung layar untuk menyorot menu Seting sekuriti.
4. Pilih Nomor tetap dengan menekan [Pilih].
5. Jika kode PIN 2 benar, Anda dapat melihat submenu berikut ini.
• Aktifkan : Anda dapat membatasi panggilan keluar untuk nomoryang dipilih.
• Batal : Anda dapat melakukan panggilan tanpa membatasinomor telepon.
• Daftar nomor : Anda dapat melihat daftar nomor yang tersimpansebagai Nomor panggilan Tetap.
Ganti kodeAnda dapat mengganti kode akses: Kode PIN, Kode PIN2, Kode keamanan.
1. Tekan [Menu] dalam mode siaga.
2. Tekan 4 tombol untuk akses langsung atau gunakan U dan Duntuk masuk ke Seting.
3. Gulung layar untuk menyorot menu Seting sekuriti.
4. Pilih Ganti kode dengan menekan [Pilih].
5. Jika Anda ingin mengubah Kode PIN/Kode PIN2/Kode keamanan,masukkan kode aslinya, dan kemudian tekan [Ok].
6. Masukkan Kode PIN/Kode PIN2/Kode keamanan baru, dan lakukanverifikasi.
IN
DO
NE
SIA 48
Seting jaringan [Menu 4-6]Anda dapat memilih jaringan yang akan menjadi langganan Anda secaraotomatis atau secara manual. Biasanya, pilihan jaringan yang digunakantelepon selular adalah otomatis.
OtomatisTelepon selular secara otomatis memilih jaringan yang dapat terjangkau diarea Anda.
ManualTelepon selular akan mencari daftar jaringan yang ada danmenampilkankannya pada Anda. Kemudian Anda dapat memilih jaringanyang ingin Anda gunakan bila jaringan ini adalah rekanan operatorjaringan Anda dalam layanan jelajah (roaming) di luar area.
PreferensiAnda dapat menampilkan daftar jaringan preferensi. Anda harusmendaftarkan telepon Anda ke jaringan ini sebelum mencoba mendaftarpada jaringan lain. Daftar ini dibuat berdasarkan daftar awal pada teleponAnda dari jaringan-jaringan yang telah dikenal.
PemakaiAnda dapat menambah atau menghapus jaringan baru dari daftarjaringan. Ini bahkan berlaku untuk jaringan baru yang kode jaringannyatidak dikenal oleh telepon Anda. Untuk menambah jaringan baru jenis ini,pilih dan kemudian masukkan kode jaringan, kode negara dan namajaringan.
Reset seting [Menu 4-7]Anda dapat mengembalikan seting telepon pada konfigurasi asalnyadengan memilih menu ini. Anda memerlukan Kode Pengamanmengaktifkan fungsi ini.
Seting [Menu 4]Mengakses Menu
IN
DO
NE
SIA49
Pengalihan pgl [Menu 5]Mengakses Menu(Tergantung jaringan dan layanan kartu Anda)
Fasilitas Pengalihan Panggilan akan mengalihkan panggilan masukberupa panggilan suara, faks dan data ke nomor lain. Untuk informasilebih lanjut hubungi penyedia jasa selular Anda.
Semua pgl [Menu 5-1]Mengalihkan panggilan suara secara langsung.
Jika sibuk [Menu 5-2]Mengalihkan panggilan suara jika telepon sedang digunakan.
Jika tk dijawab [Menu 5-3]Mengalihkan panggilan suara yang tidak Anda jawab.
Jika tk jangkau [Menu 5-4]Mengalihkan panggilan suara jika telepon dimatikan atau di luarjangkauan.
Semua pgl data [Menu 5-5]Mengalihkan ke nomor dengan sambungan komputer secara langsung.
Semua pgl fax [Menu 5-6]Mengalihkan ke nomor dengan sambungan faks secara langsung.
Submenu [Menu 5-x-x]Menu Pengalihan pgl mempunyai submenu seperti di bawah ini.
AktifkanMengaktifkan layanan terkait.
• Ke no. lain
Memasukkan nomor untuk pengalihan.
• Ke no. favorit
Menampilkan daftar 5 nomor pengalihan.
IN
DO
NE
SIA 50
• Ke voice mail
Meneruskan ke pusat pesan. Fungsi ini tidak termasuk di dalam menuSemua pgl data dan Semua pgl fax.
BatalMenonaktifkan layanan terkait.
Lihat statusMemeriksa status dari layanan terkait.
Batal semua [Menu 5-7]Membatalkan semua layanan pengalihan panggilan.
Catatan• Anda dapat memilih nomor yang Anda inginkan di dalam menu
Favorit.
Pengalihan pgl [Menu 5]Mengakses Menu(Tergantung jaringan dan layanan kartu Anda)
IN
DO
NE
SIA51
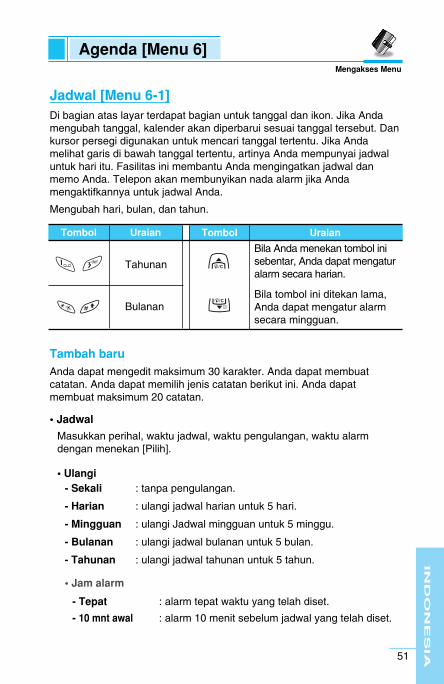
Agenda [Menu 6]Mengakses Menu
Jadwal [Menu 6-1]Di bagian atas layar terdapat bagian untuk tanggal dan ikon. Jika Andamengubah tanggal, kalender akan diperbarui sesuai tanggal tersebut. Dankursor persegi digunakan untuk mencari tanggal tertentu. Jika Andamelihat garis di bawah tanggal tertentu, artinya Anda mempunyai jadwaluntuk hari itu. Fasilitas ini membantu Anda mengingatkan jadwal danmemo Anda. Telepon akan membunyikan nada alarm jika Andamengaktifkannya untuk jadwal Anda.
Mengubah hari, bulan, dan tahun.
Tambah baruAnda dapat mengedit maksimum 30 karakter. Anda dapat membuatcatatan. Anda dapat memilih jenis catatan berikut ini. Anda dapatmembuat maksimum 20 catatan.
• Jadwal
Masukkan perihal, waktu jadwal, waktu pengulangan, waktu alarmdengan menekan [Pilih].
• Ulangi- Sekali : tanpa pengulangan.
- Harian : ulangi jadwal harian untuk 5 hari.
- Mingguan : ulangi Jadwal mingguan untuk 5 minggu.
- Bulanan : ulangi jadwal bulanan untuk 5 bulan.
- Tahunan : ulangi jadwal tahunan untuk 5 tahun.
• Jam alarm
- Tepat : alarm tepat waktu yang telah diset.
- 10 mnt awal : alarm 10 menit sebelum jadwal yang telah diset.
Tombol Uraian Tombol Uraian
Tahunan
Bulanan
Bila Anda menekan tombol inisebentar, Anda dapat mengaturalarm secara harian.
Bila tombol ini ditekan lama,Anda dapat mengatur alarmsecara mingguan.
IN
DO
NE
SIA 52
- 30 mnt awal : alarm 30 menit sebelum jadwal yang telah diset.
- 1 jam awal : alarm 1 jam sebelum jadwal yang telah diset.
- 1 hari awal : alarm 1 hari sebelum dari jadwal yang telah diset.
• Memo1. Pilih Tambah baru dengan menekan [Pilih].
2. Gulung layar untuk menyorot Memo.
3. Tekan [Pilih].
4. Masukkan memo dan kemudian tekan [Pilih].
Lihat hariTampilkan catatan untuk hari yang dipilih. Gunakan U , D untukmencari dalam daftar catatan. Bila Anda memprogram alarm untukcatatan, jam alarm akan ditampilkan. Tekan [Opsi] untuk menghapus ataumengedit catatan yang Anda pilih.
• Opsi
- Edit
Anda dapat mengedit perihal, waktu, waktu pengulangan dan waktualarm dengan menekan [Pilih]
- Hapus
Anda dapat menghapus catatan.
Lihat semuaMenampilkan catatan yang telah dibuat untuk semua hari. Gunakan U ,D untuk mencari dalam daftar catatan. Anda dapat menggunakanmenu yang sama dengan menu “Lihat tanngal” dengan menekan [Opsi].
Hapus terakhirAnda dapat menghapus jadwal terakhir yang telah diingatkan.
Hapus semuaAnda dapat menghapus semua catatan.
Agenda [Menu 6]Mengakses Menu
IN
DO
NE
SIA53
Mengakses Menu
Buku telepon [Menu 6-2]
Cari(Memanggil dari buku telepon)
1. Buka buku telepon terlebih dahulu dengan menekan [Nama] dalammode siaga.
2. Cari dengan menekan [Pilih] untuk masuk.
3. Tergantung pada seting Cari dengan dengan, menu di bawah inimungkin tidak muncul.
• Nama
• Nomor
4. Anda dapat mencari sebuah entri melalui nama dan nomor.
5. Pilih [Cari].
6. Anda bisa memeriksa nama dan nomor dengan menekan [Daftar].
7. Jika Anda ingin mengedit, menghapus, menyalin entri, atau menambahsuara ke sebuah nomor, pilih [Opsi]. Menu di bawah ini akanditampilkan.
• Edit : Anda dapat mengedit nama, nomor, E-mail, danfaks dengan menekan [Ok].
• Hapus : Anda dapat menghapus entri.
• Tulis : Anda menulis pesan.
• Copy : Anda dapat menyalin entri dari memori kartu SIMke memori telepon atau sebaliknya.
• Panggilan : Anda dapat melakukan panggilan melalui entri yangdipilih.
• Suara : Anda dapat menambah suara ke entri ataumengubah label suara.
• Nomor utama : Anda dapat memilih nomor telepon selular, rumah,atau kantor Anda yang sering Anda gunakan.Nomor utama ini akan ditampilkan dahulu, jikaAnda mengaktifkan menu ini.
Tambah baruAnda dapat menambah entri buku telepon dengan menggunakan fungsiini. Kapasitas memori telepon adalah 200 entri. Kapasitas memori kartuSIM tergantung pada penyedia jasa selular.

IN
DO
NE
SIA 54
Anda juga dapat menyimpan 20 karakter nama di memori telepon dansejumlah karakter di memori kartu SIM. Jumlah karakter tergantung padafasilitas SIM.
1. Buka buku telepon terlebih dahulu dengan menekan [Nama] dalammode siaga.
2. Gulung untuk menyorot Tambah baru, dan tekan [Pilih] untuk masuk.
3. Pilih memori yang ingin Anda simpan: SIM atau Telepon.
• SIM : Anda dapat menambah nama dan nomor entri.
a. Tulis nama yang akan ditambahkan.b. Tekan [Ok], lalu Anda dapat memasukkan nomor.c. Tekan [Ok].d. Jika Anda ingin menambah suara, tekan [Ya].
• Telepon : Anda dapat menambah nama, nomor telepon selular,telepon rumah, telepon kantor, nomor faks, dan alamatemail.
a. Anda dapat memilih nomor telepon dari nomor teleponselular, rumah, kantor, dengan menekan [Pilih].
b. Tulis nama baru.c. Masukkan nomor telepon selular, rumah, kantor, dengan
menekan [Berikutnya] untuk langkah selanjutnya,[Hapus] untuk membatalkan dan C menyimpan dankeluar.
d. Jika Anda ingin menambah suara, tekan [Ya].
Sebaiknya ucapkan kata dalam 2 detik, dan telepon akan meminta Andauntuk mengulanginya untuk memastikan keakuratan pengenalan suara.Setelah pengenalan suara selesai, Suara akan tersimpan secara otomatis.
Catatan• Suara hanya bisa disimpan untuk nomor utama yang Anda
tetapkan. Sebagai contoh, jika Anda mengganti nomor utamasuara akan otomatis terpasang pada nomor baru tersebut.
• Anda dapat menambah label suara ke nomor telepon di kartu SIM.Label suara dapat terhapus dengan melepas atau mengganti kartuSIM. Dan label suara yang terpasang ke nomor telepon di kartuSIM dapat dipasang ke nomor telepon lain saat Anda menggantikartu SIM. Kenapa? Karena kartu SIM tidak memiliki informasitentang label suara.
Agenda [Menu 6]Mengakses Menu

IN
DO
NE
SIA55
Mengakses Menu
Putar-cepatAnda dapat menghubungan tombol 2 hingga 9 dengan entri yang terdapatdalam daftar Nama. Anda dapat menelpon langsung dengan menekantombol bersangkutan selama 2-3 detik.
1. Buka buku telepon terlebih dahulu dengan menekan [Nama] dalammode siaga.
2. Gulung ke Putar-cepat, lalu tekan [Pilih] untuk masuk ke menu ini.
3. Setiap Panggilan cepat akan ditampilkan.
4. Jika Anda ingin menambah Putar Cepat, Pilih <Kosong>. Kemudian,Anda dapat mencari nama di buku telepon.
5. Jika Anda memilih nama yang telah dipasangi putar cepat, Anda dapatmelihat submenu berikut ini.
• Rubah : Anda dapat mengganti alokasi nomor Panggilan cepat.
• Batal : Anda dapat membatalkan alokasi nomor Panggilan cepat.
Daftar suaraAnda dapat melihat semua nomor telepon yang mengandung suara. Andajuga dapat memanggil secara langsung dengan menekan [Kirim]. Setelahmemilih nomor telepon dengan menggunakan Udan Ddan menekan[Opsi], Anda dapat melihat submenu berikut ini.
• Putar : Anda dapat memainkan suara yang terhubung padanomor telepon.
• Rubah : Anda dapat mengganti suara yang terhubung pada nomortelepon.
• Hapus : Anda dapat menghapus suara yang terhubung padanomor telepon.
• Panggilan : Anda dapat melekukan panggilan (menelepon) denganmemilih menu ini.
Grup penelponAnda dapat membuat daftar samapai dengan 20 anggota untuk satu grup.Anda dapat membuat daftar hingga 7 grup.
1. Tekan [Nama] untuk masuk ke buku telepon dalam mode siaga.
2. Gulung ke item Grup penelpon lalu tekan [Pilih] untuk masuk ke menuini.
IN
DO
NE
SIA 56
3. Setiap Daftar kelompok akan menampilkan: Famili, Teman, Kolega,VIP, Grup1, Grup2, dan Lainnya.
4. Pilih Nama kelompok yang ingin Anda atur dengan menekan [Pilih].
5. Kemudian submenu di bawah ini akan ditampilkan.
• Lihat anggota
- Anda bisa melihat daftar nomor dalam grup Penelepon.
- Anda bisa memilih anggota yang Anda inginkan dengan menekan[Opsi] lalu Anda bisa mengaktifkan submenu seperti Edit, Hapus,Tulis, Copy, Suara dan Nomor utama.
• Nada dering grup
Anda bisa mengatur nada dering untuk setiap Grup.
• Animasi grup penelpon
Anda bisa mengatur animasi untuk setiap Grup.
• Tmbh anggota
Anda bisa menambahkan nomor pada grup Penelepon.
1. Gulung layar untuk menyorot Tmbh anggota, kemudian tekan[Pilih] untuk masuk.
2. Anggota grup tidak boleh melebihi 20. Kalau lebih akan munculpesan kesalahan.
3. Tekan [Ok] untuk menambah anggota
• Keluarkan anggota
Anda dapat menghapus anggota yang telah disimpan di dalam bukutelepon.
• Namai ulang
Anda dapat mengganti nama grup.
Agenda [Menu 6]Mengakses Menu
IN
DO
NE
SIA57
Mengakses Menu
Copy semuaAnda dapat menyalin/memindahkan entri dari memori kartu SIM kememori telepon atau dari memori telepon ke memori kartu SIM.
1. Buka buku telepon terlebih dahulu dengan menekan [Nama] dalammode siaga.
2. Gulung ke Copy semua, lalu tekan [Pilih] untuk masuk ke menu ini.
3. Kemudian submenu di bawah ini akan ditampilkan.
• SIM ke Tel : Anda dapat menyalin entri dari memori kartu SIM kememori telepon.
• Tel ke SIM : Anda dapat menyalin entri dari memori Telepon kememori Kartu SIM.
Hapus semuaAnda dapat menghapus semua entri di SIM, Telepon, dan Suara. Fungsiini memerlukan Kode pengaman.
1. Tekan [Nama] untuk masuk ke buku telepon dalam mode siaga.
2. Gulung ke Hapus semua, lalu tekan [Pilih].
3. Lalu pilih memori yang akan dihapus: SIM, Telepon, Suara.
4. Dan kemudian Anda akan diminta untuk memasukkan Kodepengaman.
5. Tekan [Ok] atau, tekan [Balik] untuk membatalkan.
SetingAnda dapat mengatur memori yang disukai, meliputi Variabel, SIM atauTelepon dan metode pencarian yang disukai, meliputi Variabel, Namadan Nomor.
1. Buka buku telepon terlebih dahulu dengan menekan [Nama] dalammode siaga.
2. Gulung ke Seting, lalu tekan [Pilih] untuk masuk.
3. Kemudian submenu di bawah ini akan ditampilkan.
• Setel memori
1. Gulung untuk menyorot Setel memori, kemudian tekan [Pilih]untuk masuk.
IN
DO
NE
SIA 58
2. Submenu berikut akan ditampilkan.
- Variabel : Jika Anda memilih Variabel, telepon akanmenanyakan tempat penyimpanan entri pada saatAnda menambah entri.
- SIM : Jika Anda memilih SIM, telepon akan langsungmenyimpan entri di SIM tanpa bertanya lebih dahulu.
- Telepon : Jika Anda memilih Telepon, telepon akan langsungmenyimpan entri di Telepon tanpa bertanya lebihdahulu.
• Cari dengan
1. Gulung untuk menyorot Cari dengan, kemudian tekan [Pilih] untukmasuk.
2. Tiga submenu ditampilkan.
- Variabel : Jika Anda memilih Variabel, telepon akanmenanyakan cara pencarian entri.
- Nama : Jika Anda memilih Nama, telepon akan mencarientri berdasarkan nama.
- Nomor : Jika Anda memilih Nomor, telepon akan mencarientri berdasarkan nomor.
Informasi
No putar lynGunakan fungsi ini untuk mengakses daftar khusus yang diberikan olehoperator jaringan Anda (jika didukung oleh kartu SIM).
1. Buka buku telepon terlebih dahulu dengan menekan [Nama] dalammode siaga.
2. Gulung ke No putar lyn, kemudian tekan [Pilih] untuk masuk.
3. Nama-nama dari layanan yang tersedia akan muncul.
4. Gunakan U dan D untuk memilih layanan. Tekan [Kirim].
Agenda [Menu 6]Mengakses Menu
IN
DO
NE
SIA59
Mengakses Menu
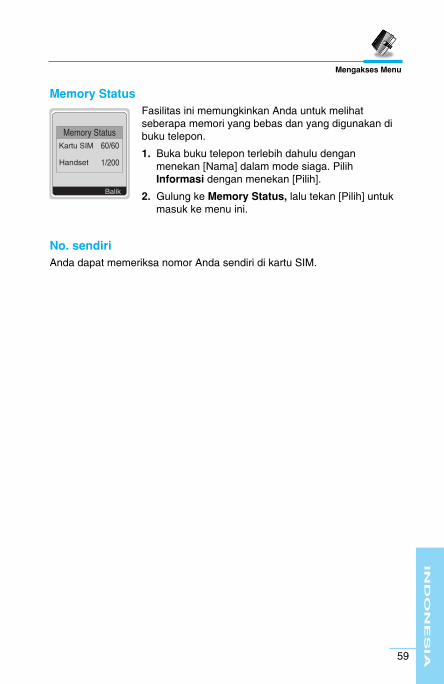
Memory StatusFasilitas ini memungkinkan Anda untuk melihatseberapa memori yang bebas dan yang digunakan dibuku telepon.
1. Buka buku telepon terlebih dahulu denganmenekan [Nama] dalam mode siaga. PilihInformasi dengan menekan [Pilih].
2. Gulung ke Memory Status, lalu tekan [Pilih] untukmasuk ke menu ini.
No. sendiriAnda dapat memeriksa nomor Anda sendiri di kartu SIM.

IN
DO
NE
SIA 60
Aksesori [Menu 7]Mengakses Menu
My folder [Menu 7-1]Semua jenis lampiran yang didownload melalui EMS atau WAP sepertigambar, nada dering, dll, dapat dilihat pada menu My Folder.
Pada menu ini anda dapat melihat lampiran tersebut, merubah namanya,bahkan memilihnya sebagai Wallpaper atau Nada dering.
Nada dering polyphonic yang didownload harus diaktifkan terlebih dahulupada menu ini sebelum pengguna dapat mengaktifkannya sebagai nadadering pada menu Profil. Anda hanya dapat mengaktifkan satu nadadering polyphonic pada setiap saat.
Game [Menu 7-2]Telepon ini menyediakan beberapa jenis permainan yang menyenangkan.
Catatan
Untuk setiap permainan, tombol pengontrolnya berbeda-beda.Namun setiap permainan memiliki tampilan yang akan menjelaskantombol pengontrol utama. Tombol pengontrol umum lainnya adalahsebagai berikut.
[Fungsi Tombol Umum]
• < [Tombol Lunak 1] : Memulai permainan, and tombol OK
• C [CLR] : Berhenti
• > [Tombol Lunak 2] : Kembali
• E [END] : Keluar
• 0 ~ 9 : Kontrol tingkat kesulitan
• U , D [Tombol naik, turun] : Kontrol volume suara
• * [Tombol bintang] : Gerak ke kiri
• # [Tombol bintang] : Gerak ke kanan
CatatanAnda dapat melakukan perubahan pada nada dering atau gambarEMS dengan menggunakan menu Buat melodi [Menu 7-3] danEditor grafik [Menu 7-4]. Hasil rubahan ini juga dapat anda sisipkanpada pesan pendek seperti yang dijelaskan pada menu SMS [Menu 1-1].

IN
DO
NE
SIA61
Mengakses Menu
Buat melodi [Menu 7-3]Anda dapat menciptakan suara dering sesuai keinginan Anda. Jika Andamasuk ke fungsi ini, nada yang Anda ciptakan sebelumnya ditampilkan.Untuk memasukkan nada baru atau mengubah nada yang telah ada:
1. Masukkan nada yang diinginkan. ( 1 : 7 CDEFGAB)
2. Untuk menyesuaikan karakter nada, lakukan seperti berikut:
• Durasi : 8 memperpendek dan 9 memperpanjang durasinada atau waktu jeda.
• Istirahat : 0 menyisipkan jeda dengan durasi yang samadengan nada sebelumnya.
• Otaf : * mengatur oktaf untuk nada baru.
• Nada # : # membuat nada tinggi.
• Hapus : C menghapus nada satu per satu.
Mis) 28# fi 8#d1
Editor grafik [Menu 7-4]Anda dapat mengedit gambar atau grafik dari gambar yang sudah adasesuai keinginan Anda.
1. Untuk mengedit, pilih gambar yang diinginkan.
2. Untuk menyesuaikan gambar, lakukan langkah berikut:
• Ubah mode:
Berpindah antara mode main dan mode pindah.
• Gambar dan Hapus:
Berpindah antara pilihan gambar dan hapus.
3. Untuk bantuan lebih lanjut, tekan 0 dalam waktu cukup lama.
Catatan
Di dalam mode edit, seting asalnya adalah mode pindah dangambar. Dengan menekan * sekali, Anda dapat berpindahdengan cepat dari satu piksel ke piksel lain.

IN
DO
NE
SIA 62
Unit konversi [Menu 7-5]Fasilitas ini dapat melakukan konversi bermacamukuran ke dalam satuan yang diinginkan. Ada 4 jenisukuran yang dapat dikonversi ke dalam satuan:Panjang, Area, Berat, dan Volume.
1. Anda dapat memilih salah satu dari keempat jenissatuan ukuran dengan menekan tombol[Berikutnya].
2. Pilih satuan yang ingin Anda konversikan denganmenekan U dan D .
3. Anda dapat berpindah antara Skrng dan Konversi dengan menekantombol U dan D cukup lama.
4. Anda dapat memasukkan angka pada posisi desimal dengan menekantombol # .
5. Anda dapat menghapus angka yang Anda inginkan dengan menekanC.
6. Tekan tombol E atau [Balik] jika Anda ingin mengakhiri proseskonversi nilai.
Kalkulator [Menu 7-6]Menu ini memuat fungsi standar seperti +, –, *, ÷ : Tambah, Kurangi, Kalidan Bagi.
1. Masukkan angka dengan menekan tombol angka.
2. Tekan tombol U sekali untuk Tambah dan tekan lama untuk Kali.Tekan tombol D sekali untuk Kurang dan tekan lama untuk Bagi.
3. Tekan tombol * untuk memasukan angka Positif dan # untukmemasukkan angka Negatif.
4. Anda dapat melihat hasilnya dengan menekan tombol [Hasil].
5. Jika Anda ingin melanjutkan perhitungan, ulangi proses di atas.
6. Anda dapat menghapus angka atau tanda yang Anda inginkan denganmenekan C.
7. Tekan tombol E jika Anda ingin mengakhiri proses menghitung.
Aksesori [Menu 7]Mengakses Menu

IN
DO
NE
SIA63
Mengakses Menu
Waktu dunia [Menu 7-7]Anda dapat melihat waktu untuk semua kota di dunia.
Jika Anda menekan U , D sebentar, Anda dapat melihat kota yangberada di zona waktu berbeda dan jika Anda menekan U , D cukuplama, Anda dapat melihat semua kota dalam zona waktu yang sama.
Jika Anda ingin memilih negara yang Anda inginkan, tekan tombol [Set].
IN
DO
NE
SIA 64
Layanan WAP [Menu 8]Mengakses Menu
Telepon Anda mendukung layanan Wireless Application Protocol (WAP).Anda dapat mengakses layanan yang didukung oleh jaringan Anda. Menulayanan ini memungkinkan Anda memperoleh informasi seperti berita,laporan cuaca, dan jadwal penerbangan.
Rumah [Menu 8-1]Anda bisa tersambung ke homepage yang diatur pada profil yang sedangaktif.
Bookmark [Menu 8-2]Pada saat Anda masuk pada menu ini, Anda dapat melihat alamat favorit.Kemudian tekan tombol < untuk mengakses pilihan yang ada, atautekan > untuk keluar.
• Menghubungkan : Menghubungkan ke alamat favorit yang dipilih.
• Tambah baru : Menambahkan alamat favorit baru secara manual.
• Edit : Mengedit judul dan alamat favorit yang dipilih.
• Hapus : Menghapus alamat favorit yang dipilih dari daftaralamat favorit.
Pesan dorong [Menu 8-3]Anda dapat menerima pesan melalui WAP yang berupa alamat tujuanURL. Anda kemudian dapat langsung melakukan sambungan WAP kealamat URL tersebut.
Kotak masukAnda dapat membaca atau menghapus pesan penting.
SetingAnda dapat mengatur pesan penting.
Profil [Menu 8-4]Anda dapat membuat sampai 5 profil dan hanya mengaktifkan satudiantaranya. Pilih profil yang diinginkan dan tekan < untuk mengaksespilihan yang ada.
IN
DO
NE
SIA65
Mengakses Menu
• Aktifkan
Mengaktifkan profil yang telah Anda pilih.
• Seting
Anda dapat mengedit dan mengubah seting WAP dari profil pilihan.
- Homepage
Seting ini memungkinkan Anda masuk ke alamat situs (URL) inginAnda jadikan homepage. Anda tidak perlu menuliskan “http://” di depansetiap URL karena Browser WAP akan secara otomatismemasukkannya.
- Tampil. gambar
Anda dapat memilih apakah gambar pada kartu WAP ditampilkan atautidak.
- Jenis koneksi
Pilihan untuk jenis sambungan adalah Temporer atau Kontinyu dantergantung pada gateway yang digunakan.
Temporer
Layanan yang tidak memerlukan konfirmasi (nirsambung).
Kontinyu
Mekanisme pengiriman yang dikonfirmasi tetapi menghasilkanlalulintas jaringan yang padat.
- Opsi koneksi
Pilihannya On dan Off tergantung dari gateway yang Anda gunakan.
- Info gateway
Sebagian besar gateway WAP tidak membutuhkan User ID danPassword. Jika gateway Anda memintanya agar bisa tersambung,maka penyedia jasa jaringan Anda akan menyediakannya, dan Andaharus mengaturnya dengan benar sebelum mencoba menjelajah kesebuah situs WAP.
- Pembawa
Data
GPRS
IN
DO
NE
SIA 66
- Seting data
Nilai-nilai seting ini diberikan oleh jaringan Anda.
Alamat IP : Masukkan alamat IP dari gateway WAP yang Andagunakan untuk mengakses.
No. panggil : Masukkan nomor telepon ini untuk mengaksesgateway WAP Anda.
Jenis pgl : Pilih jenis panggilan data: Analog atau ISDN (Digital).
Kecepatan pgl : Kecepatan sambungan data Anda.
User ID : Identitas pengguna untuk server dial-up Anda (dan BUKAN gateway WAP).
Password : Pasword diperlukan oleh server dial-up (dan BUKANgateway WAP) untuk mengidentifikasi Anda.
- Seting GPRS
Seting layanan hanya tersedia jika GPRS dipilih sebagai layananpembawa data.
- Linger-time
Anda dapat memasukkan periode waktu tunggu antara 30dtk dan300dtk. Jika tidak ada data yang dimasukkan atau ditransfer dalamjangka waktu tersebut, layanan akan terputus.
• Namai ulang
Mengedit Nama Profil.
• Server email
Menyimpan URL dari server E-mail yang sering Anda gunakan.
- Menghubungkan
Menyambung ke server E-mail yang telah Anda atur konfigurasinya.
- Edit alamat
Mengedit URL dari server E-mail.
Layanan WAP [Menu 8]Mengakses Menu
IN
DO
NE
SIA67
Kunjungi URL [Menu 8-5]Anda bisa langsung menyambung ke situs yang Anda inginkan. Andaharus memasukkan URL tertentu yang ingin langsung Anda kunjungi.
Seting cache [Menu 8-6]Anda dapat menghapus isi memori cache atau mengubah mode cache.
Kosong cacheMenghapus isi memori cache.
Periksa cacheAnda dapat mengubah waktu untuk memeriksa memori cache.
• SelaluCache selalu diperiksa pada saat URL dikunjungi atau dijelajahi.
• Hanya startCache hanya diperiksa pada saat layanan WAP dimulai.
• OffCache tidak pernah diperiksa.
Sertif. sekuriti [Menu 8-7]Daftar sertifikat yang ada ditampilkan.
Reset profil [Menu 8-8]Anda bisa mengatur ulang semua seting profil ke nilai default pabrik.
Mengakses Menu

IN
DO
NE
SIA 68
Jika Anda sedang on line, Anda dapat melihat menu ini.
❏ Rumah
Sama dengan [Menu 8-1]
❏ Muat ulang
Memuat ulang halaman yang sedang ditampilkan.
❏ Bookmark
Sama dengan [Menu 8-2]
❏ Rekam Bookmark
Simpan URL yang aktif sebagai alamat favorit. Anda bisa jugamengedit judul bookmark.
❏ Kunjungi URL
Sama dengan [Menu 8-5]
Menyambungkan ke server E-mail yang telah Anda aturkonfigurasinya.
❏ Set email
Menyimpan URL yang aktif sebagai server E-mail.
❏ Save image
Menyimpan gambar sedang yang dibuka.
Menu Online InternetMengakses Menu
IN
DO
NE
SIA69
Bagaimana Melakukan Panggilan Data dan FaksFasilitas Tambahan
Untuk mengaktifkan fasilitas data atau faks, Anda perlu menggunakansoftware seperti program data atau faks. Sebelum menggunakan fasilitas-fasilitas tersebut, Anda harus menghubungkan telepon selular Andadengan komputer atau telah memastikan bahwa telepon selular Andasudah terhubung dengan perangkat yang kompatibel.
Pengiriman Panggilan Data atau Faks1. Hubungkan komputer ke telepon selular Anda.
2. Setelah menjalankan software penghubung, lakukan sebuah panggilandan kirim data atau faks.
3. Setelah data atau faks terkirim, Anda dapat mengakhiri panggilanhanya dengan mengakhiri software penghubung, yaitu menekan[Akhiri].
Menerima Panggilan Data atau FaksJika Anda memisahkan nomor panggilan untuk suara, data dan faks,maka telepon selular Anda dapat mengenali jenis penggilan tersebut.
Menerima Panggilan Data atau Faks – Nomor Terpisah(Banyak-nomor)Untuk memanfaatkan fasilitas data atau faks, layar telepon selularmenampilkan jenis panggilan yang sedang Anda terima.
Untuk menerima panggilan data atau faks
1. Hubungkan komputer ke telepon selular Anda.
2. Setelah menjalankan software penghubung, jawab panggilan danterima data atau faks (jika tidak dijawab secara otomatis).
3. Setelah data atau faks diterima, Anda dapat mengakhiri panggilanhanya dengan mengakhiri software penghubung, yaitu menekan[Akhiri].
IN
DO
NE
SIA 70
Menerima Panggilan Data atau Faks – Nomor tunggalJika Anda memiliki sebuah kartu SIM yang tidak mendukung nomorterpisah untuk suara, data dan faks, telepon selular tidak akan mengenalijenis panggilan masuk.
Untuk menggunakan layanan data atau faks, pastikan bahwa Anda inginmenerima mode panggilan data atau faks. Pertama kali, Anda harusmenyetel telepon selular pada salah satu dari opsi ini dalam modepanggilan sub menu (Seting ➝ Seting panggilan ➝ Pgl Berikut)
Untuk menerima panggilan data atau faks
1. Tekan [Menu] dalam mode siaga.
2. Pilih jenis panggilan yang Anda inginkan (suara, data atau faks) dantekan [OK].
3. Hubungkan komputer ke telepon selular Anda.
4. Setelah menjalankan software penghubung, jawab panggilan danterima data atau faks (jika tidak dijawab secara otomatis).
5. Setelah data atau faks diterima, Anda dapat mengakhiri panggilanhanya dengan mengakhiri software penghubung, yaitu menekan[Akhiri].
Setelah Anda menyetel telepon selular Anda untuk panggilan masuktertentu, maka seting tersebut tetap berlaku sampai Anda mengubahnya.
Bagaimana Melakukan Panggilan Data dan FaksFasilitas Tambahan
PC SyncPC Sync adalah sebuah program yang memungkinkan pertukarandata antara PC dan ponsel melalui kabel data. Dibutuhkan aksesoristambahan berupa CD dan kabel data untuk mengaktifkan fungsi ini.Untuk keterangan lebih lanjut, silahkan untuk melihat buku panduanPC Sync yang terlampir saat anda membeli. Atau fungsi Help padaCD PC Sync.
IN
DO
NE
SIA71
Menu yang ditampilkan pada layar telepon selular selama panggilanberjalan, adalah berbeda dengan menu utama default yang dicapai darilayar idle, dan opsi tersebut dijelaskan disini.
1 Selama Panggilan Berjalan
1-1 Panggilan dalam mode tahanAnda dapat menahan panggilan masuk atau mengambilnya kembalidengan menekan tombol [Kirim]. Selama ada sebuah panggilan ataupanggilan dijawab, tekan tombol [Kirim] untuk menahan panggilan. Padasaat panggilan ditahan, tekan tombol [Kirim] untuk mengaktifkannya.
1-2 Melakukan Panggilan KeduaAnda dapat memutar nomor dari buku telepon untuk melakukan panggilankedua. Tekan tombol [Nama] kemudian Cari. Untuk menyimpan nomor kedalam buku telepon selama panggilan, tekan tombol [Nama] kemudianpilih Tambah Entri.
1-3 Mempertukarkan Antara Dua PanggilanUntuk beralih antara dua panggilan, pilih tombol [Menu], kemudian pilihTukar atau tekan tombol [Kirim]. Anda dapat melakukan satu atau duapanggilan dengan cara menekan tombol tanda panah atas/bawah. JikaAnda ingin mengakhiri salah satu dari dua panggilan yang ada, fokuskanpanggilan yang akan Anda akhiri, kemudian tekan tombol [Akhiri] padasaat panggilan yang akan Anda akhiri berlangsung.
Menu panggilan berjalanFasilitas Tambahan
IN
DO
NE
SIA 72
Menu panggilan berjalanFasilitas Tambahan
1-4 Menjawab Panggilan MasukUntuk menjawab panggilan masuk pada saat telepon selular berdering,tekan tombol [Kirim]. Telepon selular juga dapat memberikan peringatanpanggilan masuk kepada Anda ketika Anda telah siap menerimanya.Sebuah nada berdering dari speaker telinga, dan layar telepon selularakan menunjukkan bahwa panggilan kedua menunggu. Fasilitas ini,diketahui sebagai Panggilan Tunggu, dan hanya ada jika jaringan Andamendukung layanan ini. Penjelasan lengkap mengenai bagaimanamengaktifkan dan menonaktifkannya lihat Pgl Tunggu [Menu 4-4-4]. Jikaterdapat panggilan tunggu, Anda dapat menempatkan panggilan pertamapada mode tahan dan menjawab panggilan ke dua, dengan menekan[Kirim] atau dengan memilih tombol [Menu], kemudian Tahan & Jawab.Anda dapat mengakhiri panggilan yang sedang berlangsung danmenjawab panggilan tunggu dengan memilih tombol [Menu], kemudianAkhiri & Jawab.
1-5 Menolak sebuah panggilan masukPada saat tidak melakukan panggilan, Anda dapat menolak sebuahpanggilan masuk tanpa menjawabnya dengan menekan tombol [Akhiri].Jika sedang melakukan panggilan, Anda dapat menolak sebuah panggilanmasuk dengan menekan tombol [Menu] dan memilih Multiparty/Tolakatau tekan tombol [Akhiri].
1-6 Mengatur volume selama panggilanAnda bisa mengatur volume selama panggilan berlangsung denganmenekan tombol [Menu] lalu memilih Volume.
1-7 Mode sunyi mikrofonAnda dapat menyetel mikrofon dalam mode sunyi selama melakukanpanggilan dengan menekan tombol [Menu] dan kemudian memilih Sunyi.Mode sunyi telepon selular dapat dibatalkan dengan [Bunyi]. Selamatelepon selular dalam mode sunyi, penelepon tidak dapat mendengarkanAnda, tetapi Anda masih dapat mendengar mereka.
1-8 Pengalihan nada DTMF selama melakukan panggilanUntuk mengaktifkan DTMF selama melakukan panggilan, sebagai contoh,agar telepon selular Anda memanfaatkan switchboard otomatis, pilihtombol [Menu], lalu DTMF On. Nada DTMF dapat dinonaktifkan dengancara yang sama.
IN
DO
NE
SIA73
Fasilitas Tambahan
1-9 Memanggil Menu UtamaPesan dan opsi menu utama perangkat SIM dapat diakses dari menupanggilan berjalan dengan memilih tombol [Menu], lalu Menu Utama.Menu Perangkat SIM ditampilkan hanya ketika SIM di dalam teleponselular memiliki dukungan terhadap fasilitas Perangkat SIM.
2 Multiparty atau Panggilan KonferensiLayanan multiparty atau konferensi memberi Anda kemampuan untukmemiliki percakapan yang simultan dengan lebih dari satu penelepon, jikapenyedia layanan jaringan Anda mendukung fasilitas ini. Sebuahpanggilan multiparty hanya dapat dilakukan jika Anda memiliki satupanggilan aktif dan satu panggilan dalam mode tahan, dimana keduapanggilan tersebut sudah dijawab. Setelah sebuah panggilan multipartydilakukan, panggilan dapat bertambah, diputus atau dipisahkan (yaitu,dikeluarkan dari panggilan multiparty tetapi masih terhubung denganAnda) oleh orang yang melakukan panggilan multiparty. Semua opsi initersedia dalam menu panggilan berjalan dan terdapat dalam daftarBagian. Jumlah penelepon maksimum dalam panggilan multiparty adalahlima orang. Setelah dimulai, Anda berada dalam pengawasan panggilanmultiparty, dan hanya Anda yang dapat melakukan panggilan untukpanggilan multiparty.
2-1 Melakukan Panggilan KeduaAnda dapat melakukan panggilan ke dua, jika sudah siap. Untukmelakukan ini, masukkan nomor ke dua dan tekan [Kirim]. Pada saatAnda mendapatkan panggilan kedua, maka panggilan pertama secaraotomatis diset ke mode tahan. Anda dapat beralih antara panggilandengan memilih tombol [Menu] kemudian Tukar.
2-2 Seting panggilan MultipartyAnda dapat menghubungkan sebuah panggilan dalam mode tahan padapanggilan yang sedang aktif untuk membentuk panggilan multipartydengan memilih tombol [Menu] lalu Multiparty/Gabung semua.
2-3 Panggilan Multiparty pada mode tahanUntuk menempatkan panggilan multiparty dalam mode tahan, pilih tombol[Menu] kemudian Multiparty/Tahan semua.

IN
DO
NE
SIA 74
2-4 Aktifkan Panggilan Multiparty pada mode tahanUntuk mengaktifkan panggilan multiparty dalam mode tahan, pilih tombol[Menu] kemudian Multiparty/Gabung semua.
2-5 Menambahkan panggilan pada panggilan multipartyUntuk menggabungkan panggilan aktif pada panggilan multiparty dalammode tahan, pilih tombol [Menu] kemudian Multiparty/Gabung semua.
2-6 Menampilkan penelepon dalam sebuah panggilanMultiparty
Untuk mengetahui nomor penelepon yang melakukan panggilan multipartypada layar telepon selular, tekan tombol U dan D.
2-7 Menempatkan anggota panggilan multiparty pada modetahan
Untuk menempatkan satu penelepon yang dipilih (nomor teleponnyaditampilkan di layar) untuk panggilan multiparty pada mode tahan, pilihtombol [Menu] kemudian Multiparty/Keluarkan.
2-8 Panggilan privat dalam sebuah Panggilan MultipartyUntuk melakukan panggilan privat dengan salah satu penelepon daripanggilan multiparty, tampilkan nomor penelepon yang akan Anda ajakbicara pada layar telepon selular, kemudian pilih tombol [Menu] danMultiparty/Privat untuk menempatkan penelepon lainnya pada modetahan.
2-9 Mengakhiri sebuah Panggilan MultipartyPenelepon dari panggilan multiparty yang sedang ditampilkan dapatdiputus dengan menekan tombol [Akhiri]. Untuk mengakhiri sebuahpanggilan multiparty, tekan tombol [Menu] kemudian pilihMultiparty/Akhiri multiparty. Memilih tombol [Menu] kemudianMultiparty/Akhiri semua, akan mengakhiri semua panggilan yang aktifdan panggilan dalam mode tahan.
2-10 Explicit Call Transfer (ECT)Jika Anda memiliki satu penelepon dalam mode tahan dan panggilan aktiflainnya, Anda dapat menghubungkan satu panggilan party ke panggilanparty lainnya dan kemudian meninggalkan panggilan tersebut. Hal inidilakukan dengan memilih opsi Multiparty/Transfer dari menu panggilanberjalan.
Menu panggilan berjalanFasilitas Tambahan
IN
DO
NE
SIA75
Ketika menggunakan telepon selular ini, patuhi selalu petunjukkeamanan umum di bawah ini.
• Jangan menyentuh adapter dengan tangan basah.
• Jangan membongkar unit telepon selular ini. (Mintalah bantuan servisdari teknisi yang berpengalanan bila memang harus direparasi.)
• Jauhkan dari perangkat elektronik seperti TV, radio atau komputer.
• Telepon selular harus dijauhkan dari sumber panas seperti radiator ataupemanas.
• Telepon selular jangan sampai terjatuh.
• Telepon selular ini tidak boleh mengalami guncangan atau getaran yangkeras.
• Lapisan pelindung telepon selular dapat rusak jika hanya menggunakansarung pelindung biasa atau yang terbuat dari bahan plastik.
• Gunakan kain kering untuk membersihkan bagian luar unit baterai.(Jangan gunakan bahan pelarut seperti bensin, thinner atau alkohol.)
• Hindari telepon selular dari asap yang berlebihan dan debu.
• Jangan menyimpan telepon di dekat kartu kredit atau tiket perjalanan, iabisa mengubah informasi pada strip magnetis.
• Jangan mengetuk layar dengan benda tajam; karena bisa merusaktelepon.
• Jangan biarkan telepon terkena cairan atau kelembaban.
• Gunakan aksesori seperti earphone dengan hati-hati. Janganmenyentuh antena jika tidak perlu.
Perawatan dan Pemeliharaan
IN
DO
NE
SIA 76
� Pemeliharaan Baterai
• Anda tidak perlu mengosongkan baterai Anda terlebih dahulusebelum mengisi ulang. Berbeda dari sistem baterai lain, tidak adaefek pada memori yang dapat merusak performa baterai.
• Gunakan hanya baterai dan charger LG. Charger LG dirancanguntuk memaksimalkan masa pakai baterai.
• Jangan membongkar baterai dan hindarkan dari hubung singkat.
• Pastikan agar permukaan kontak logam unit baterai tetap bersih.
• Ganti unit baterai bila performa baterai tidak lagi memadai. Bateraidapat diisi ulang sampai ratusan kali hingga masa pakainyaberakhir.
• Isi ulang baterai, jika tidak digunakan dalam waktu lama agarperforma baterai tetap maksimum.
• Charger baterai tidak boleh terkena sinar matahari langsung ataudigunakan di ruangan dengan kelembaban tinggi seperti di kamarmandi.
• Jangan meninggalkan baterai di tempat panas atau dingin, karenaakan merusak performa baterai.
Perawatan dan Pemeliharaan
IN
DO
NE
SIA77
Data Teknis
Umum
Nama Produk : G5300
Sistem : GSM 900/DCS 1800
Suhu Sekitar
Maks : +55°C
Min : -10°C

Memo
IN
DO
NE
SIA 78
GPRS手机手机手机手机手机用户手册用户手册用户手册用户手册用户手册
型号型号型号型号型号: : : : : G5300操作前请仔细阅读该手册。
留作以后参考。
简体中文

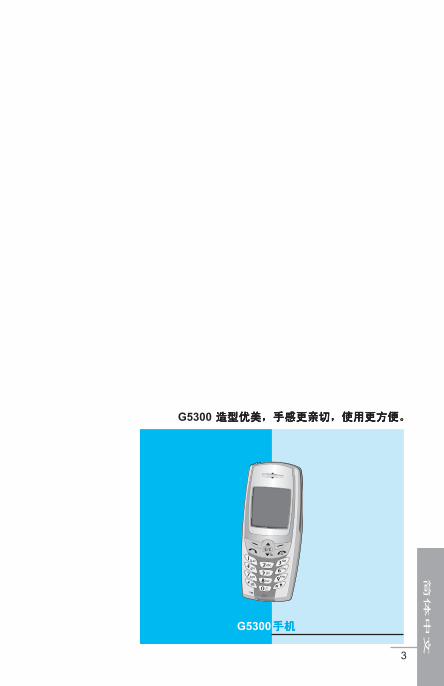
3
简体中文
G5300 造型优美,手感更亲切,使用更方便。造型优美,手感更亲切,使用更方便。造型优美,手感更亲切,使用更方便。造型优美,手感更亲切,使用更方便。造型优美,手感更亲切,使用更方便。
手机手机手机手机手机G5300
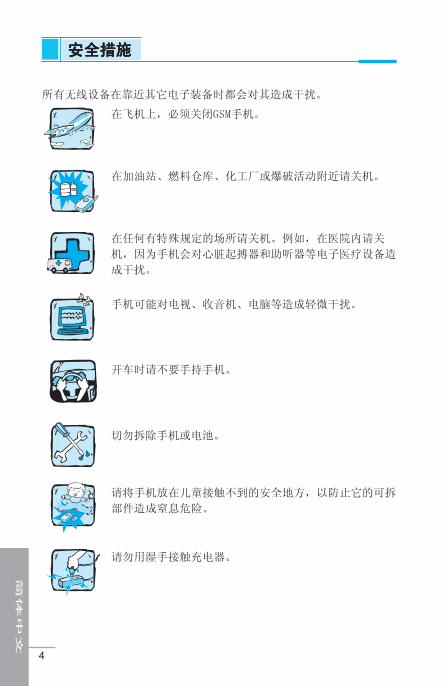
4
简体中文
所有无线设备在靠近其它电子装备时都会对其造成干扰。
在飞机上,必须关闭GSM手机。
在加油站、燃料仓库、化工厂或爆破活动附近请关机。
在任何有特殊规定的场所请关机。例如,在医院内请关
机,因为手机会对心脏起搏器和助听器等电子医疗设备造
成干扰。
手机可能对电视、收音机、电脑等造成轻微干扰。
开车时请不要手持手机。
切勿拆除手机或电池。
安全措施安全措施安全措施安全措施安全措施
请将手机放在儿童接触不到的安全地方,以防止它的可拆
部件造成窒息危险。
请勿用湿手接触充电器。
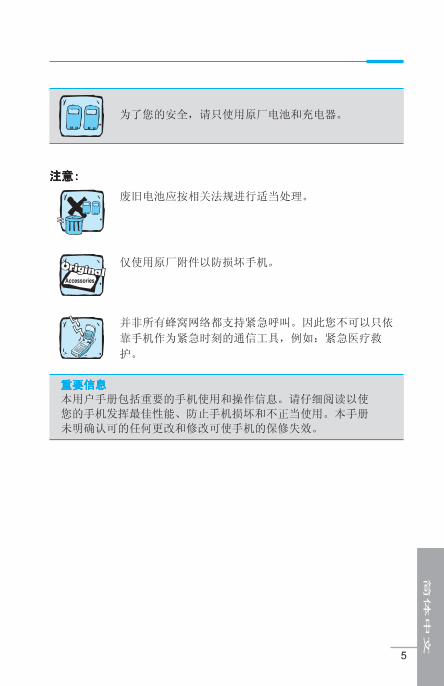
5
简体中文
注意注意注意注意注意:::::
废旧电池应按相关法规进行适当处理。
仅使用原厂附件以防损坏手机。
并非所有蜂窝网络都支持紧急呼叫。因此您不可以只依
靠手机作为紧急时刻的通信工具,例如:紧急医疗救
护。
重要信息重要信息重要信息重要信息重要信息
本用户手册包括重要的手机使用和操作信息。请仔细阅读以使
您的手机发挥最佳性能、防止手机损坏和不正当使用。本手册
未明确认可的任何更改和修改可使手机的保修失效。
为了您的安全,请只使用原厂电池和充电器。
6
简体中文
概述概述概述概述概述
附件附件附件附件附件 ............................................................................................................................................................................................................................................................... 99999
手机部件手机部件手机部件手机部件手机部件 ...................................................................................................................................................................................................................................... 1010101010
手机正面 ............................................... 10
手机背面 ............................................... 10
按键描述按键描述按键描述按键描述按键描述 ...................................................................................................................................................................................................................................... 1111111111
字母数字键 ............................................. 12
显示信息显示信息显示信息显示信息显示信息
显示信息显示信息显示信息显示信息显示信息 ...................................................................................................................................................................................................................................... 1313131313
屏幕上的图标 ........................................... 13
第一次使用前第一次使用前第一次使用前第一次使用前第一次使用前
安装安装安装安装安装 .......................................................................................................................................................................................................................................................... 1515151515
插入SIM卡 .............................................. 15
安装电池 ............................................... 15
给电池充电 ............................................. 16
断开充电器 ............................................. 16
开关机顺序开关机顺序开关机顺序开关机顺序开关机顺序 ............................................................................................................................................................................................................................ 1717171717
开机 .................................................... 17
关机 .................................................... 17
访问密码访问密码访问密码访问密码访问密码 ...................................................................................................................................................................................................................................... 1818181818
PIN码(4至8位数字) .................................... 18
PIN2码(4至8位数字) ................................... 18
PUK码(4至8位数字) .................................... 18
PUK2码(4至8位数字) ................................... 18
安全密码(4至8位数字) ................................. 18
访问功能表访问功能表访问功能表访问功能表访问功能表
电话簿电话簿电话簿电话簿电话簿 ................................................................................................................................................................................................................................................ 1919191919
功能表一览功能表一览功能表一览功能表一览功能表一览 ............................................................................................................................................................................................................................ 2020202020
信息信息信息信息信息[[[[[功能表功能表功能表功能表功能表1]1]1]1]1] ............................................................................................................................................................................................................. 2222222222
写信息[功能表1-1] ...................................... 22
收信箱[功能表1-2] ...................................... 27
发信箱[功能表1-3] ...................................... 27
小区广播[功能表1-4] .................................... 28
语音信息[功能表1-5] .................................... 29
名片[功能表1-6] ........................................ 30
目目目目目 录录录录录
7
简体中文
常用短语[功能表1-7] .................................... 30
状态报告[功能表1-8] .................................... 30
设定[功能表1-9] ........................................ 30
内存状态[功能表1-0] .................................... 31
通话记录通话记录通话记录通话记录通话记录[[[[[功能表功能表功能表功能表功能表2]2]2]2]2] ......................................................................................................................................................................................... 3232323232
未接来电[功能表2-1] .................................... 32
已接来电[功能表2-2] .................................... 32
拨出电话[功能表2-3] .................................... 32
全部呼叫[功能表2-4] .................................... 32
清除最近记录[功能表2-5] ................................ 32
通话计费[功能表2-6] .................................... 32
GPRS信息[菜单2-7] ...................................... 34
情景模式情景模式情景模式情景模式情景模式[[[[[功能表功能表功能表功能表功能表3]3]3]3]3] ......................................................................................................................................................................................... 3535353535
振动[功能表3-1] ........................................ 35
静音[功能表3-2] ........................................ 35
私人[功能表3-3] ........................................ 35
大声[功能表3-4] ........................................ 35
耳机[功能表3-5] ........................................ 35
汽车[功能表3-6] ........................................ 36
设定设定设定设定设定[[[[[功能表功能表功能表功能表功能表4]4]4]4]4] ............................................................................................................................................................................................................. 3838383838
闹钟[功能表4-1] ........................................ 38
日期和时间[功能表4-2] .................................. 39
手机设定[功能表4-3] .................................... 40
通话设定[功能表4-4] .................................... 41
保密[功能表4-5] ........................................ 42
网络[功能表4-6] ........................................ 45
恢复初始设定[功能表4-7] ................................ 45
呼叫转接呼叫转接呼叫转接呼叫转接呼叫转接[[[[[功能表功能表功能表功能表功能表5]5]5]5]5] ......................................................................................................................................................................................... 4646464646
全部通话[功能表5-1] .................................... 46
正在通话时[功能表5-2] .................................. 46
无人接听时[功能表5-3] .................................. 46
无网络或关机时[功能表5-4] .............................. 46
所有数据来电[功能表5-5] ................................ 46
所有传真来电[功能表5-6] ................................ 46
全部取消[功能表5-7] .................................... 47
公文包公文包公文包公文包公文包[[[[[功能表功能表功能表功能表功能表6]6]6]6]6] ................................................................................................................................................................................................... 4848484848
日程表[功能表6-1] ...................................... 48
电话本[功能表6-2] ...................................... 50
8
简体中文
附件附件附件附件附件[[[[[功能表功能表功能表功能表功能表7]7]7]7]7] ............................................................................................................................................................................................................. 5656565656
我的文件夹[功能表7-1] .................................. 56
游戏[功能表7-2] ........................................ 56
作曲家[功能表7-3] ...................................... 57
图形编辑器[功能表7-4] .................................. 57
单位转换器[功能表7-5] .................................. 58
计算器[功能表7-6] ...................................... 58
时区设置[功能表7-7] .................................... 58
互联网互联网互联网互联网互联网[[[[[功能表功能表功能表功能表功能表8]8]8]8]8] ................................................................................................................................................................................................... 5959595959
主页[功能表8-1] ........................................ 59
书签[功能表8-2] ........................................ 59
PUSH信息[功能表8-3] .................................... 59
上网设定[功能表8-4] .................................... 60
转到URL [功能表8-5] .................................... 61
缓存[功能表8-6] ........................................ 62
安全认证[功能表8-7] .................................... 62
重设上网设定[功能表8-8] ................................ 62
在线功能表在线功能表在线功能表在线功能表在线功能表 ............................................................................................................................................................................................................................ 6363636363
附加功能附加功能附加功能附加功能附加功能
如何使用数据和传真呼叫如何使用数据和传真呼叫如何使用数据和传真呼叫如何使用数据和传真呼叫如何使用数据和传真呼叫 ................................................................................................................................................................ 6464646464
发送数据或传真呼叫 ..................................... 64
接收数据或传真来电 ..................................... 64
通话中功能表通话中功能表通话中功能表通话中功能表通话中功能表 .................................................................................................................................................................................................................. 6666666666
1 通话中 ............................................... 66
2 多方通话或会议通话 ................................... 67
保养和维护保养和维护保养和维护保养和维护保养和维护 ............................................................................................................................................................................................................................ 6969696969
技术数据技术数据技术数据技术数据技术数据 ...................................................................................................................................................................................................................................... 7171717171
9
简体中文
检查以确保您拥有如下显示的所有部件。
概述概述概述概述概述
附件附件附件附件附件
<<<<<可选附件可选附件可选附件可选附件可选附件>>>>>
卡卡卡卡卡 用户手册用户手册用户手册用户手册用户手册
便携式耳机便携式耳机便携式耳机便携式耳机便携式耳机
标准电池标准电池标准电池标准电池标准电池
旅行用适配器旅行用适配器旅行用适配器旅行用适配器旅行用适配器
点烟适配器点烟适配器点烟适配器点烟适配器点烟适配器
耳机套件耳机套件耳机套件耳机套件耳机套件
数据套件数据套件数据套件数据套件数据套件/CD/CD/CD/CD/CD
手机手机手机手机手机
手机挂绳手机挂绳手机挂绳手机挂绳手机挂绳
• 本手册所涉及的内容可以在没有预先说明的情况下进行改动。
• 以上附件可因区域的不同而有所变化,详情您可咨询我们的区域
服务商或代理商。

10
简体中文
概述概述概述概述概述
手机正面手机正面手机正面手机正面手机正面
11111 听筒听筒听筒听筒听筒22222 显示屏显示屏显示屏显示屏显示屏33333 左软键左软键左软键左软键左软键44444 导航键导航键导航键导航键导航键55555 发送键发送键发送键发送键发送键66666 *键*键*键*键*键77777 右软键右软键右软键右软键右软键88888 END/PWREND/PWREND/PWREND/PWREND/PWR键键键键键
(((((结束通话结束通话结束通话结束通话结束通话/////拒接来电拒接来电拒接来电拒接来电拒接来电/////开关键开关键开关键开关键开关键)))))
99999 数字键数字键数字键数字键数字键1010101010 #键#键#键#键#键1111111111 话筒话筒话筒话筒话筒1212121212 耳机话筒接口耳机话筒接口耳机话筒接口耳机话筒接口耳机话筒接口1313131313 WAPWAPWAPWAPWAP键键键键键/////清除键清除键清除键清除键清除键
11111 电池电池电池电池电池22222 电缆接口电缆接口电缆接口电缆接口电缆接口/////
电池充电接口电池充电接口电池充电接口电池充电接口电池充电接口/////免提车用组合接口免提车用组合接口免提车用组合接口免提车用组合接口免提车用组合接口
33333 电池终端电池终端电池终端电池终端电池终端44444 SIMSIMSIMSIMSIM卡插槽卡插槽卡插槽卡插槽卡插槽55555 手带孔手带孔手带孔手带孔手带孔66666 电池锁电池锁电池锁电池锁电池锁77777 耳机话筒接口耳机话筒接口耳机话筒接口耳机话筒接口耳机话筒接口
手机背面手机背面手机背面手机背面手机背面
手机部件手机部件手机部件手机部件手机部件
11
简体中文
概述概述概述概述概述
按键描述按键描述按键描述按键描述按键描述
按按按按按 键键键键键 描描描描描 述述述述述
左软键左软键左软键左软键左软键/////右软键右软键右软键右软键右软键
此软键执行出现在其上方屏幕上所显示的功能。
WAPWAPWAPWAPWAP键键键键键/////清除键清除键清除键清除键清除键
按该键可以直接连接到WAP。
用来删除字符。
导航键导航键导航键导航键导航键
可以在姓名、电话号码、功能表或设定选项中翻阅。
用来直接进入信息功能表。
用来浏览姓名、电话号码。
发送键发送键发送键发送键发送键
您可以拨打电话号码及接听来电。如果您直接按该键
而没有输入任何号码,您的手机将显示您最后拨打的
号码。
数字键数字键数字键数字键数字键
这些键主要用来在待机模式下拨号以及在编辑模式下
输入数字或字符。如果长按以下各键:
• 长按1进入语音信箱
• 长按0拨打国际电话
• 长按2至9可以快速拨号
长按该键可进入震动模式
长按该键可通过语音拨号呼叫。当连接耳机时,该键
也可用作 Ear mic. Hook(耳机通话键)。
END/PWR END/PWR END/PWR END/PWR END/PWR 键键键键键
用来结束通话或拒接来电。该键也可以用作开关键。
按住该键几秒钟可开机或关机。
以下是手机的主要元件。
键盘描述键盘描述键盘描述键盘描述键盘描述

12
简体中文
概述概述概述概述概述
字母数字键字母数字键字母数字键字母数字键字母数字键
字母和数字键的对应关系如下。
按按按按按 键键键键键
1
2
3
4
5
6
7
8
9
0
描描描描描 述述述述述
0 [ [ [ [ [空格键空格键空格键空格键空格键]]]]]
描描描描描 述述述述述
. , ‘ ? ! - & 1
A B C 2 Å Ä À Á Â Ã Æ Ç a b c å ä à á â ã ç
D E F 3 È É Ë Ê d e f è é ë ê
G H I 4 Î Ï Ì Í g h i î ï ì í
J K L 5 j k l
M N O 6 Ö Ô Ò Ó Ø Ñ m n o ö ô ò ó ø ñ
P Q R S 7 p q r s
T U V 8 Ü Ù Û Ú t u v ü ù û ú
W X Y Z 9 w x y z
按键描述按键描述按键描述按键描述按键描述
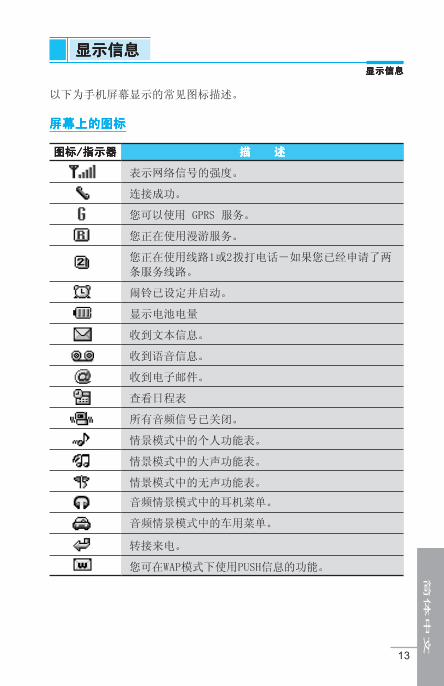
13
简体中文
显示信息显示信息显示信息显示信息显示信息
以下为手机屏幕显示的常见图标描述。
屏幕上的图标屏幕上的图标屏幕上的图标屏幕上的图标屏幕上的图标
描描描描描 述述述述述
表示网络信号的强度。
连接成功。
您可以使用 GPRS 服务。
您正在使用漫游服务。
您正在使用线路1或2拨打电话-如果您已经申请了两
条服务线路。
闹铃已设定并启动。
显示电池电量
收到文本信息。
收到语音信息。
收到电子邮件。
查看日程表
所有音频信号已关闭。
情景模式中的个人功能表。
情景模式中的大声功能表。
情景模式中的无声功能表。
音频情景模式中的耳机菜单。
音频情景模式中的车用菜单。
转接来电。
您可在WAP模式下使用PUSH信息的功能。
显示信息显示信息显示信息显示信息显示信息
图标图标图标图标图标/////指示器指示器指示器指示器指示器
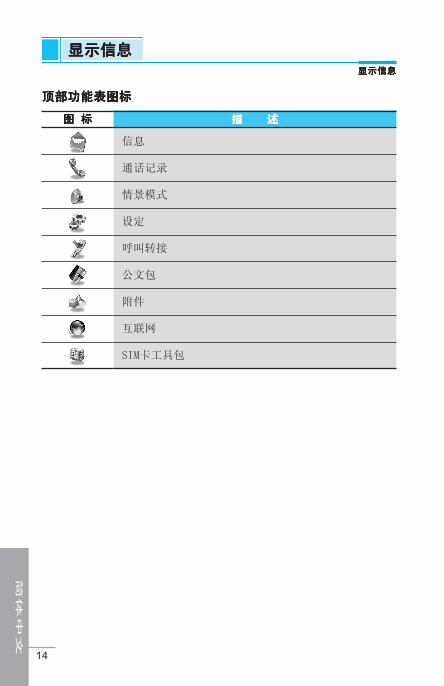
14
简体中文
显示信息显示信息显示信息显示信息显示信息
顶部功能表图标顶部功能表图标顶部功能表图标顶部功能表图标顶部功能表图标
图图图图图 标标标标标 描描描描描 述述述述述
信息
通话记录
情景模式
设定
呼叫转接
公文包
附件
互联网
SIM卡工具包
显示信息显示信息显示信息显示信息显示信息
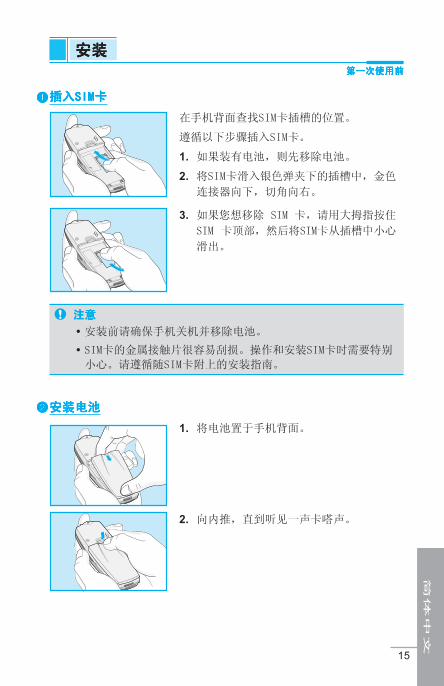
15
简体中文
插入插入插入插入插入SIMSIMSIMSIMSIM卡卡卡卡卡
在手机背面查找SIM卡插槽的位置。
遵循以下步骤插入SIM卡。
1. 如果装有电池,则先移除电池。
2. 将SIM卡滑入银色弹夹下的插槽中,金色
连接器向下,切角向右。
3. 如果您想移除 SIM 卡,请用大拇指按住
SIM 卡顶部,然后将SIM卡从插槽中小心
滑出。
安装安装安装安装安装第一次使用前第一次使用前第一次使用前第一次使用前第一次使用前
� � � � �
� � � � �
注意注意注意注意注意
• 安装前请确保手机关机并移除电池。
• SIM卡的金属接触片很容易刮损。操作和安装SIM卡时需要特别
小心。请遵循随SIM卡附上的安装指南。
安装电池安装电池安装电池安装电池安装电池
1. 将电池置于手机背面。
2. 向内推,直到听见一声卡嗒声。
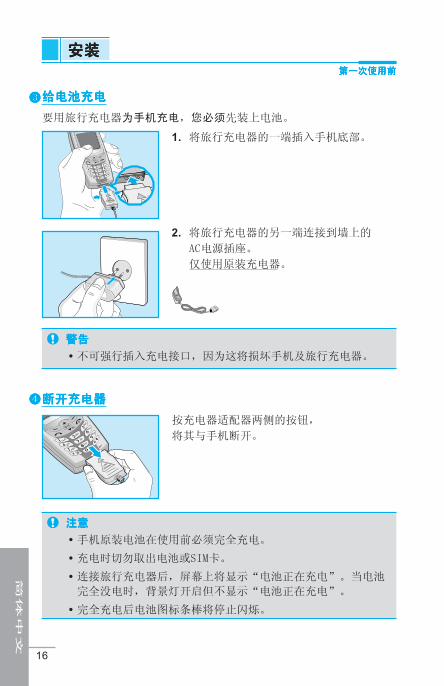
16
简体中文
给电池充电给电池充电给电池充电给电池充电给电池充电
要用旅行充电器为手机充电,您必须先装上电池。
1. 将旅行充电器的一端插入手机底部。
2. 将旅行充电器的另一端连接到墙上的
AC电源插座。
仅使用原装充电器。
第一次使用前第一次使用前第一次使用前第一次使用前第一次使用前
� � � � �
警告警告警告警告警告
• 不可强行插入充电接口,因为这将损坏手机及旅行充电器。
断开充电器断开充电器断开充电器断开充电器断开充电器
按充电器适配器两侧的按钮,
将其与手机断开。
� � � � �
注意注意注意注意注意
• 手机原装电池在使用前必须完全充电。
• 充电时切勿取出电池或SIM卡。
• 连接旅行充电器后,屏幕上将显示“电池正在充电”。当电池
完全没电时,背景灯开启但不显示“电池正在充电”。
• 完全充电后电池图标条棒将停止闪烁。
安装安装安装安装安装
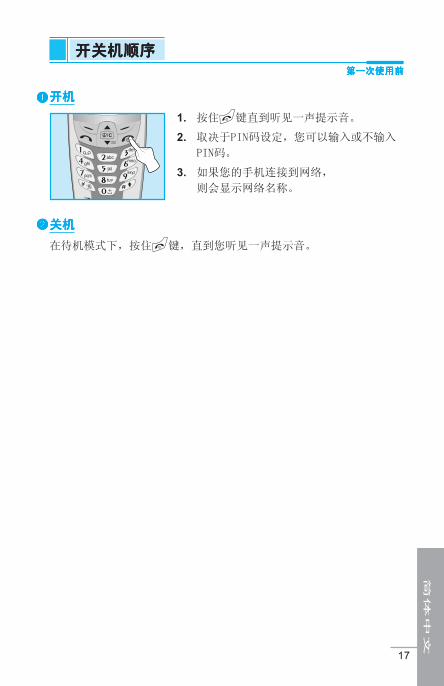
17
简体中文
开机开机开机开机开机
1. 按住 键直到听见一声提示音。
2. 取决于PIN码设定,您可以输入或不输入
PIN码。
3. 如果您的手机连接到网络,
则会显示网络名称。
关机关机关机关机关机
在待机模式下,按住 键,直到您听见一声提示音。
开关机顺序开关机顺序开关机顺序开关机顺序开关机顺序第一次使用前第一次使用前第一次使用前第一次使用前第一次使用前
� � � � �
� � � � �
18
简体中文
您可以使用该节中描述的访问密码来避免他人使用您的手机。可以利用
[功能表4-5-4]来更改访问密码(除PUK1和PUK2码外)。
PINPINPINPINPIN码(码(码(码(码(44444至至至至至88888位数字)位数字)位数字)位数字)位数字)
PIN码(个人识别号码)防止他人在未经授权的情况下使用您的SIM卡。
PIN码通常与SIM卡一起提供。当PINPINPINPINPIN码码码码码设定为启动启动启动启动启动时,您的手机每次开
机时都会要求您输入PIN码。相反,当PINPINPINPINPIN码码码码码设定为关闭关闭关闭关闭关闭时,您的手机
则无需PIN码即可直接连接到网络。
PIN2PIN2PIN2PIN2PIN2码(码(码(码(码(44444至至至至至88888位数字)位数字)位数字)位数字)位数字)
某些SIM卡会提供PIN2码,用于访问一些功能,例如:通话费用通知、
固定拨打号码。这些功能只有在您的SIM卡支持时才可用。
PUKPUKPUKPUKPUK码(码(码(码(码(44444至至至至至88888位数字)位数字)位数字)位数字)位数字)
更改锁定的PIN码需要PUK码(私人解锁密码)。PUK码与SIM卡一起提供。
否则,请与您的服务提供商联系以索取密码。如果您丢失此密码,请同
样与您的服务提供商联系。
PUK2PUK2PUK2PUK2PUK2码(码(码(码(码(44444至至至至至88888位数字)位数字)位数字)位数字)位数字)
某些SIM卡会提供PUK2码,用于更改锁定的PIN2码。如果您丢失了该密
码,请同样与您的服务提供商联系。
安全密码(安全密码(安全密码(安全密码(安全密码(44444至至至至至88888位数字)位数字)位数字)位数字)位数字)
安全密码可防止他人未经授权使用您的手机。通常与手机一起提供。删
除所有电话条目和启动“初始设定”功能表时需要该密码。安全密码的
预设值为“00000000000000000000”。您也可以在保安功能表中更改。
第一次使用前第一次使用前第一次使用前第一次使用前第一次使用前
访问密码访问密码访问密码访问密码访问密码

19
简体中文
要选择电话簿中的功能表,
在待机模式下按<[电话本],
然后滚动到所需的对象。
访问功能表访问功能表访问功能表访问功能表访问功能表
电话簿电话簿电话簿电话簿电话簿
姓名姓名姓名姓名姓名 描述描述描述描述描述
1 查找查找查找查找查找 查找特定姓名、号码
2 增加号码增加号码增加号码增加号码增加号码 添加新姓名和号码
3 快速拨号快速拨号快速拨号快速拨号快速拨号 最多可指定8个(2-9)单键拨号
4 语音列表语音列表语音列表语音列表语音列表 列出附有语音的电话号码。
5 群组群组群组群组群组 显示群组列表
6 全部复制全部复制全部复制全部复制全部复制 将手机内存中的条目复制到SIM卡或将SIM卡中
的条目复制到手机内存。
7 全部删除全部删除全部删除全部删除全部删除 删除电话簿或SIM卡及手机内存的所有数据
8 设定设定设定设定设定 设定内存并通过变量、姓名和号码查找对象。
9 信息提示信息提示信息提示信息提示信息提示 可以检查内存状态、SDN(服务拨号)、
以及本手机号码。
20
简体中文
访问功能表访问功能表访问功能表访问功能表访问功能表
功能表一览功能表一览功能表一览功能表一览功能表一览
3 情景模式情景模式情景模式情景模式情景模式
1 振动
2 静音
3 私人
4 大声
5 耳机
6 汽车
4 设定设定设定设定设定
1 闹钟
2 日期和时间
3 手机设定
4 通话设定
5 保密
6 网络
7 恢复初始设定
2 通话记录通话记录通话记录通话记录通话记录
1 未接来电
2 已接来电
3 拨出电话
4 全部呼叫
5 清除最近记录
6 通话计费
7 GPRS信息
1 信息信息信息信息信息
1 写信息
2 收信箱
3 发信箱
4 小区广播
5 语音信箱
6 名片
7 常用短语
8 状态报告
9 设定
10 内存状态
21
简体中文
访问功能表访问功能表访问功能表访问功能表访问功能表
功能表一览功能表一览功能表一览功能表一览功能表一览
6 公文包公文包公文包公文包公文包
1 日程表
2 电话本
7 附件附件附件附件附件
1 我的文件夹
2 游戏
3 作曲家
4 图形编辑器
5 单位转换器
6 计算器
7 时区设置
8 互联网互联网互联网互联网互联网
1 主页
2 书签
3 PUSH信息
4. 上网设定
5 转到URL
6 缓存
7 安全认证
8 重设上网设定
9 SIMSIMSIMSIMSIM卡工具包卡工具包卡工具包卡工具包卡工具包
该功能视SIM卡和
网络服务而定。
5 呼叫转接呼叫转接呼叫转接呼叫转接呼叫转接
1 全部通话
2 正在通话时
3 无人接听时
4 无网络或关机时
5 所有数据来电
6 所有传真来电
7 全部取消

22
简体中文
该功能表包括与SMS(短信息服务)、语音邮件及网络服务信息相关的
功能。
写信息写信息写信息写信息写信息[[[[[功能表功能表功能表功能表功能表1-1]1-1]1-1]1-1]1-1]
您最多可写入并编辑918个字符的文本信息。您也可以查询字符数。
1. 按[[[[[选择]]]]]进入信息功能表。
2. 如果您想编写新信息,在功能表中选择写信息。
3. 使用eZieZieZieZieZi文本输入信息。详细内容请参见eZi文本(第32页)。
4. 当您写信息时,>键会更改为符号。
5. 当您写完信息时,按[选项]。然后将显示下列选项。
发送发送发送发送发送
发送文本信息。
1. 如果您想发送文本信息,请输入号码。
2. 手机提示您输入对方的号码。
3. 发送后,手机将提示您是否要储存所编辑的信息。
保存保存保存保存保存
手机提示您是否要保存所编辑的信息。
用常用短语用常用短语用常用短语用常用短语用常用短语
常用短语是预设信息。您可以将列表中的常用短语添加到要编辑的信息
中。
使用名片使用名片使用名片使用名片使用名片
名片项目为姓名、手机号码、公司电话号码、传真号码和电子邮件。您
可以将名片添加到信息中。
访问功能表访问功能表访问功能表访问功能表访问功能表
信息信息信息信息信息[[[[[功能表功能表功能表功能表功能表1]1]1]1]1]
23
简体中文
话音短信话音短信话音短信话音短信话音短信(EMS)(EMS)(EMS)(EMS)(EMS)功能功能功能功能功能
您可在发送消息时插入图片(包括动画)和声音。再使用添加键设置后,
会显示下列菜单:
• 符号符号符号符号符号
• 图片图片图片图片图片
• 动画动画动画动画动画
• 音乐音乐音乐音乐音乐
访问功能表访问功能表访问功能表访问功能表访问功能表
注意注意注意注意注意
• 您可在我的目录中[功能表7-1]找到对方发送的信息内容。
字典字典字典字典字典
• 添加字典添加字典添加字典添加字典添加字典 ( ( ( ( (仅仅仅仅仅在英文输人在英文输人在英文输人在英文输人在英文输人状态状态状态状态状态下有下有下有下有下有效效效效效)))))
如果您想添加经常使用的词语,可以通过按键输入该词。
1.1.1.1.1. 进入功能表。
2.2.2.2.2. 滚动屏幕以突出显示添加,然后按[选择]。
3.3.3.3.3. 输入要添填加的词语,然后按[添加]。
• 字典列表字典列表字典列表字典列表字典列表 ( ( ( ( (仅仅仅仅仅在英文输人在英文输人在英文输人在英文输人在英文输人状态状态状态状态状态下有下有下有下有下有效效效效效)))))
您可以查看已存储到字典列表的词语列表。
1.1.1.1.1. 进入功能表。
2.2.2.2.2. 滚动屏幕以突出显示字典列表,然后按[选择]。
3.3.3.3.3. 您可以查询词语列表。
4.4.4.4.4. 如果您想删除字词,按[删除]。
5.5.5.5.5. 如果您想删除列表中的所有词语,按[选择]以选择列表底部的
全部删除。
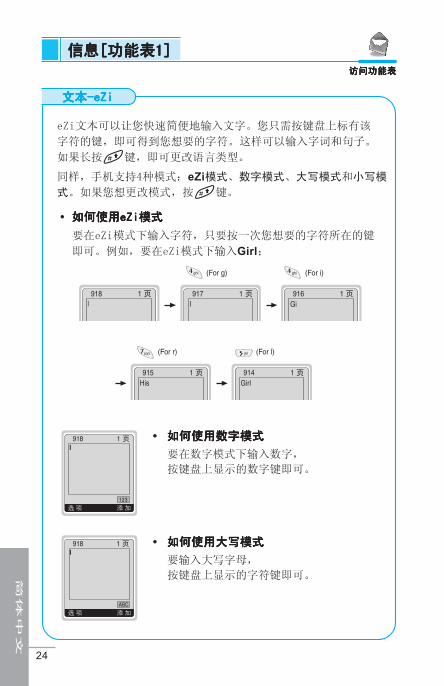
24
简体中文
访问功能表访问功能表访问功能表访问功能表访问功能表
信息信息信息信息信息[[[[[功能表功能表功能表功能表功能表1]1]1]1]1]
eZi文本可以让您快速简便地输入文字。您只需按键盘上标有该
字符的键,即可得到您想要的字符。这样可以输入字词和句子。
如果长按#键,即可更改语言类型。
同样,手机支持4种模式:eZi模式、数字模式、大写模式和小写模
式。如果您想更改模式,按#键。
• 如何使用如何使用如何使用如何使用如何使用eZieZieZieZieZi模式模式模式模式模式
要在eZi模式下输入字符,只要按一次您想要的字符所在的键
即可。例如,要在eZi模式下输入Girl;
文本文本文本文本文本-eZi-eZi-eZi-eZi-eZi
• 如何使用数字模式如何使用数字模式如何使用数字模式如何使用数字模式如何使用数字模式
要在数字模式下输入数字,
按键盘上显示的数字键即可。
• 如何使用大写模式如何使用大写模式如何使用大写模式如何使用大写模式如何使用大写模式
要输入大写字母,
按键盘上显示的字符键即可。
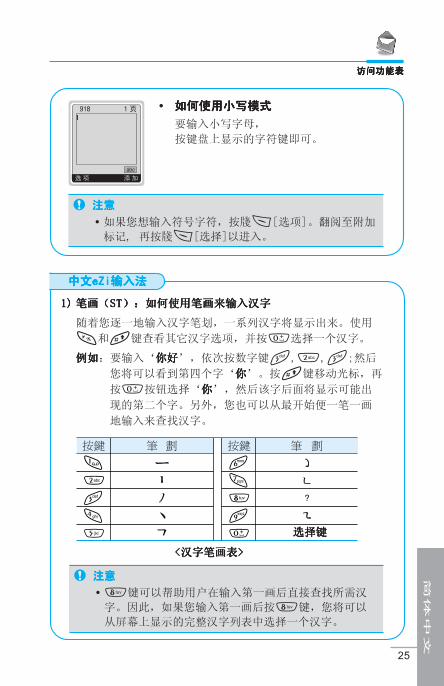
25
简体中文
访问功能表访问功能表访问功能表访问功能表访问功能表
注意注意注意注意注意
• 如果您想输入符号字符,按牋<[选项]。翻阅至附加
标记, 再按牋<[选择]以进入。
• 如何使用小写模式如何使用小写模式如何使用小写模式如何使用小写模式如何使用小写模式
要输入小写字母,
按键盘上显示的字符键即可。
中文中文中文中文中文eZieZieZieZieZi输入法输入法输入法输入法输入法
1)1)1)1)1) 笔画(笔画(笔画(笔画(笔画(STSTSTSTST):如何使用笔画来输入汉字):如何使用笔画来输入汉字):如何使用笔画来输入汉字):如何使用笔画来输入汉字):如何使用笔画来输入汉字
随着您逐一地输入汉字笔划,一系列汉字将显示出来。使用
*和#键查看其它汉字选项,并按0选择一个汉字。
例如例如例如例如例如:要输入‘你好你好你好你好你好’,依次按数字键3,2,3;然后
您将可以看到第四个字‘你你你你你’。按#键移动光标,再
按0按钮选择‘你你你你你’,然后该字后面将显示可能出
现的第二个字。另外,您也可以从最开始便一笔一画
地输入来查找汉字。
<<<<<汉字笔画表汉字笔画表汉字笔画表汉字笔画表汉字笔画表>>>>>
选择键选择键选择键选择键选择键
注意注意注意注意注意
• 8键可以帮助用户在输入第一画后直接查找所需汉
字。因此,如果您输入第一画后按8键,您将可以
从屏幕上显示的完整汉字列表中选择一个汉字。
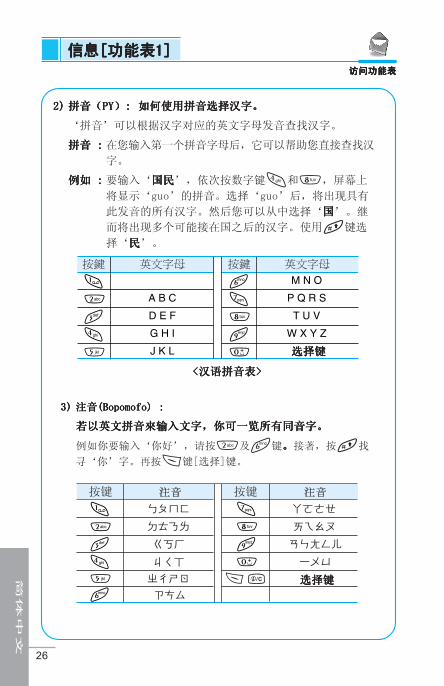
26
简体中文
访问功能表访问功能表访问功能表访问功能表访问功能表
信息信息信息信息信息[[[[[功能表功能表功能表功能表功能表1]1]1]1]1]
3)3)3)3)3) 注音注音注音注音注音(Bopomofo) :(Bopomofo) :(Bopomofo) :(Bopomofo) :(Bopomofo) :
若以英文拼音來输入文字,你可一览所有同音字。若以英文拼音來输入文字,你可一览所有同音字。若以英文拼音來输入文字,你可一览所有同音字。若以英文拼音來输入文字,你可一览所有同音字。若以英文拼音來输入文字,你可一览所有同音字。
例如你要输入‘你好’,请按2及6键。。。。。接著,按#找
寻‘你’字。再按<键[选择]键。
选择键选择键选择键选择键选择键
A B C
D E F
G H I
J K L
M N O
P Q R S
T U V
W X Y Z
<<<<<汉语拼音表汉语拼音表汉语拼音表汉语拼音表汉语拼音表>>>>>
选择键选择键选择键选择键选择键
2)2)2)2)2) 拼音(拼音(拼音(拼音(拼音(PYPYPYPYPY))))): : : : : 如何使用拼音选择汉字。如何使用拼音选择汉字。如何使用拼音选择汉字。如何使用拼音选择汉字。如何使用拼音选择汉字。
‘拼音’可以根据汉字对应的英文字母发音查找汉字。
拼音拼音拼音拼音拼音 : : : : : 在您输入第一个拼音字母后,它可以帮助您直接查找汉
字。
例如例如例如例如例如 : : : : : 要输入‘国民国民国民国民国民’,依次按数字键4和8,屏幕上
将显示‘guo’的拼音。选择‘guo’后,将出现具有
此发音的所有汉字。然后您可以从中选择‘国国国国国’。继
而将出现多个可能接在国之后的汉字。使用#键选
择‘民民民民民’。

27
简体中文
收信箱收信箱收信箱收信箱收信箱[[[[[功能表功能表功能表功能表功能表1-2]1-2]1-2]1-2]1-2]
当您接收文本信息时,手机将显示符号并将它存储在接收的信息列表
中。使用U,D滚动到所要的信息。此外,您也可以看到列表下方
的全部删除,用于删除所有接收的信息。读取信息时,按[选项]访问可
用选项。
回复短信回复短信回复短信回复短信回复短信
您可以发送信息回复发送者。
转发转发转发转发转发
您可以将所选信息转发给第三方。
删除删除删除删除删除
删除所选信息。
保存号码保存号码保存号码保存号码保存号码
如果所选信息附有电话号码,您可以提取电话号码并将它保存在电话簿
中。同样,您也可以通过该号码呼叫对方。
储存附件储存附件储存附件储存附件储存附件
您可以保存符号、图片、动画和声音等附件。
回复电话回复电话回复电话回复电话回复电话
您可以自动回复发送者。
发信箱发信箱发信箱发信箱发信箱[[[[[功能表功能表功能表功能表功能表1-3]1-3]1-3]1-3]1-3]
进入该功能表时,您可以看到已拨电话列表。使用U,D滚动到所
想要的信息并按<查看信息。如果您想退出发信箱功能表,按>。
此外,您可以查看列表底部的全部删除,即删除所有发出的信息。
读取信息时,按[选项]访问下列子功能表。
转发转发转发转发转发
您可以将所选信息转发给第三方。
访问功能表访问功能表访问功能表访问功能表访问功能表
信息信息信息信息信息[[[[[功能表功能表功能表功能表功能表1]1]1]1]1]

28
简体中文
删除删除删除删除删除
删除所选信息。
保存号码保存号码保存号码保存号码保存号码
如果所选信息附有电话号码,您可以提取电话号码并将它保存在电话簿
中。同样,您也可以通过该号码呼叫对方。
小区广播小区广播小区广播小区广播小区广播[[[[[功能表功能表功能表功能表功能表1-4]1-4]1-4]1-4]1-4]
视网络和您所申请的服务而定视网络和您所申请的服务而定视网络和您所申请的服务而定视网络和您所申请的服务而定视网络和您所申请的服务而定
小区广播信息(CB信息)是网络向GSM手机用户提供的文本信息。它们
提供一般的信息,例如,天气预报、交通、出租车和药房信息以及股票
价格。每种信息类型都有一个号码;因此,您可以与服务提供商联系。
当您接收到CB信息时,您可以按以下顺序读取:
读取读取读取读取读取
1. 当您接收到CB信息时,屏幕上显示该信息内容。您可以滚动U、、、、、
D来读取信息。
2. 读完信息后,按E返回待机模式。此外,您可以将它保存直到有新
信息到达。
收小区广播收小区广播收小区广播收小区广播收小区广播
• 是是是是是
如果您选择该功能表,您的手机将接收小区广播信息。
• 否否否否否
如果您选择该功能表,您的手机将不再接收小区广播信息。
来电提示来电提示来电提示来电提示来电提示
• 是是是是是
如果您选择该功能,当您收到小区广播信息时,手机将发出一声蜂
鸣声。
• 否否否否否
如果您选择该功能表,尽管您收到小区广播信息,您的手机不会发
出蜂鸣声。
访问功能表访问功能表访问功能表访问功能表访问功能表
29
简体中文
语言选择语言选择语言选择语言选择语言选择
您可以选择您想要的语言。然后手机将以您所选的语言来接收小区广播
信息。
栏目栏目栏目栏目栏目(((((视网络和您所申请的服务而定视网络和您所申请的服务而定视网络和您所申请的服务而定视网络和您所申请的服务而定视网络和您所申请的服务而定)[)[)[)[)[功能表功能表功能表功能表功能表1-4-5]1-4-5]1-4-5]1-4-5]1-4-5]
• 添加添加添加添加添加
如果您选择该功能表,您将在手机内存中添加CB信息种类并加上昵
称。
• 查看列表查看列表查看列表查看列表查看列表
如果您选择该功能表,您即可查看添加的CB信息种类。如果您按[选
项],您可以更改和删除添加的CB信息种类。
• 当前列表当前列表当前列表当前列表当前列表
您可以按[选择]在启动列表中选择CBCBCBCBCB信息种类。
语音信息语音信息语音信息语音信息语音信息[[[[[功能表功能表功能表功能表功能表1-5]1-5]1-5]1-5]1-5]
您可以听取语音信息并获得语音中心号码。
收听语音信息收听语音信息收听语音信息收听语音信息收听语音信息
如果您想接听语音信息,您可以拨打语音中心号码。
语音中心语音中心语音中心语音中心语音中心
如果您的网络服务提供商支持该功能,您即可获得语音邮件。当新语音
邮件已接收,屏幕上将显示符号。请向您的网络服务提供商查询服务详
情,以便相应地配置手机。
1. 在待机模式下长按1键。
2. 您可以查看以下子功能表。
• 本地中心本地中心本地中心本地中心本地中心
在本地网络时拨打该号码听取语音邮件。
• 漫游地中心漫游地中心漫游地中心漫游地中心漫游地中心
使用其它网络时拨打该号码听取语音邮件。
访问功能表访问功能表访问功能表访问功能表访问功能表
信息信息信息信息信息[[[[[功能表功能表功能表功能表功能表1]1]1]1]1]
30
简体中文
名片名片名片名片名片[[[[[功能表功能表功能表功能表功能表1-6]1-6]1-6]1-6]1-6]
用于更改名片。名片项目为姓名、手机号码、公司电话号码、传真号码
和电子邮件。
• 编辑编辑编辑编辑编辑 : 您可以更改名片。
• 删除删除删除删除删除 : 您可删除名片。
常用短语常用短语常用短语常用短语常用短语[[[[[功能表功能表功能表功能表功能表1-7]1-7]1-7]1-7]1-7]
用于更改预设信息。您可以在列表中查看11条预设信息。您可以在更改
前保存6条常用短语。但是您可以更改它们。其它为〈空〉。
• 编辑编辑编辑编辑编辑 : 您可以更改常用短语。
• 重设重设重设重设重设 : 您可以删除常用短语。
状态报告状态报告状态报告状态报告状态报告[[[[[功能表功能表功能表功能表功能表1-8]1-8]1-8]1-8]1-8]
您可以读取和删除已发送信息报告。
设定设定设定设定设定[[[[[功能表功能表功能表功能表功能表1-9]1-9]1-9]1-9]1-9]
信息类型信息类型信息类型信息类型信息类型
文本、语音、传真、国内传呼、文本、语音、传真、国内传呼、文本、语音、传真、国内传呼、文本、语音、传真、国内传呼、文本、语音、传真、国内传呼、X.400、电子邮件、、电子邮件、、电子邮件、、电子邮件、、电子邮件、ERMES
通常,信息类型设定为文本格式。您可以将文本信息转换为其它格式,
以配合接收信息的设备。要获取有关该功能的信息,请联系您的服务提
供商。
信息有效期信息有效期信息有效期信息有效期信息有效期
该网络服务可让您在发送信息时设定文本信息在信息中心储存的期限。
状态报告状态报告状态报告状态报告状态报告
如果您在该功能表中设定是,您即可查询您的信息是否已成功发送。
回复付费回复付费回复付费回复付费回复付费
发送信息时,可以让接收信息者回复并将回复费用记入您的话费清单。
访问功能表访问功能表访问功能表访问功能表访问功能表

31
简体中文
短信中心短信中心短信中心短信中心短信中心
如果您想发送文本信息,您可以通过该功能表获得SMS中心地址。
墙纸墙纸墙纸墙纸墙纸
您可以在写信息时选择您想要的信纸。
内存状态内存状态内存状态内存状态内存状态[[[[[功能表功能表功能表功能表功能表1-0]1-0]1-0]1-0]1-0]
如果您选择该功能表,手机将显示已用内存和内存总量。内存总量是
SIM卡和手机内存之和。
访问功能表访问功能表访问功能表访问功能表访问功能表
信息信息信息信息信息[[[[[功能表功能表功能表功能表功能表1]1]1]1]1]

32
简体中文
访问功能表访问功能表访问功能表访问功能表访问功能表
通话记录通话记录通话记录通话记录通话记录[[[[[功能表功能表功能表功能表功能表2]2]2]2]2]
未接来电未接来电未接来电未接来电未接来电[[[[[功能表功能表功能表功能表功能表2-1]2-1]2-1]2-1]2-1]
该功能表显示最近的未接来电。您可以呼叫该号码,可以保存、查看日
期和时间,也可以写信息发送到该号码。
已接来电已接来电已接来电已接来电已接来电[[[[[功能表功能表功能表功能表功能表2-2]2-2]2-2]2-2]2-2]
该功能表显示最近的已接来电。您可以呼叫该号码,可以保存、查看日
期和时间,也可以写信息发送到该号码。
拨出电话拨出电话拨出电话拨出电话拨出电话[[[[[功能表功能表功能表功能表功能表2-3]2-3]2-3]2-3]2-3]
该功能表显示最近拨打的电话。您可以呼叫该号码,可以保存、查看日
期和时间,也可以写信息发送到该号码。
全部呼叫全部呼叫全部呼叫全部呼叫全部呼叫[[[[[功能表功能表功能表功能表功能表2-4]2-4]2-4]2-4]2-4]
您可以保存电话号码,查看号码的日期和时间。而且,您可以拨打电话
给第三方,也可以写信息。
清除最近记录清除最近记录清除最近记录清除最近记录清除最近记录[[[[[功能表功能表功能表功能表功能表2-5]2-5]2-5]2-5]2-5]
您可以删除所有通话记录。
通话计费通话计费通话计费通话计费通话计费[[[[[功能表功能表功能表功能表功能表2-6]2-6]2-6]2-6]2-6]
在这些子功能表中,您可以查看通话计时和通话费用。
通话计时通话计时通话计时通话计时通话计时
该功能表可让您查看最后通话、所有通话、已接来电和拨出电话的确切
时间。您也可以将通话计时器复零。
1. 在待机模式下按[功能表]。
2. 按2直接进入或使用U和D进入通话记录。
3. 滚动屏幕以突出显示通话计费,然后通话计时,并按[选择]。
33
简体中文
访问功能表访问功能表访问功能表访问功能表访问功能表
注意注意注意注意注意
• 您的服务提供商所收取的实际通话费用可能会因网络功能、
计费法和税收而异。
通话记录通话记录通话记录通话记录通话记录[[[[[功能表功能表功能表功能表功能表2]2]2]2]2]
通话费用通话费用通话费用通话费用通话费用
该功能表可让您查询最后通话、所有通话的费用,余额并将费用复零。
要将费用复零,您需要PIN2码。
1. 在待机模式下按[功能表]。
2. 按2直接进入或使用U和D进入通话记录。
3. 滚动屏幕以突出显示通话计费,然后通话计时,并按[选择]进入。
下列4个子功能表:最后通话、全部通话、余额和全部清零。
话费设定话费设定话费设定话费设定话费设定[[[[[取决于取决于取决于取决于取决于SIMSIMSIMSIMSIM卡卡卡卡卡]]]]]
• 通话费率通话费率通话费率通话费率通话费率
您可以设定货币类型和单价。与您的服务提供商联系以获得计费单
价。要在该功能表选择货币或单位,您需要PIN2码。
1. 在待机模式下按[功能表]。
2. 按2直接进入或使用U和D进入通话记录。
3. 滚动屏幕以突出显示话费设定,并按[选择]进入。
4. 选择设通话费率费表。
• 设定话费设定话费设定话费设定话费设定话费
该网络服务可让您通过选择计费单位来限制您的通话费用。如果您
选择读取,将显示余额的单位。如果您选择更改,您可以更改计费
限制。
1. 在待机模式下按[功能表]。
2. 按2直接进入或使用U和D进入通话记录。
3. 滚动屏幕以突出显示话费设定,并按[选择]进入。
4. 选择设定话费。
注意注意注意注意注意
• 一旦用完全部单位, 除了紧急电话外,不能拨打任何电话。根
据SIM卡,您需要PIN2码来设定通话费用限制。
34
简体中文
访问功能表访问功能表访问功能表访问功能表访问功能表
• 自动显示自动显示自动显示自动显示自动显示
该网络服务可让您自动查看最后通话的费用。如果您在自动显示功
能表中选择是,通话结束时,您即可查看最后通话的费用。
1. 在待机模式下按[功能表]。
2. 按2直接进入或使用U和D进入通话记录。
3. 滚动屏幕以突出显示话费设定, , , , , 并按[选择]进入。
4. 选择自动显示。
GPRSGPRSGPRSGPRSGPRS信息信息信息信息信息[[[[[菜单菜单菜单菜单菜单2-7]2-7]2-7]2-7]2-7]
你可以查看通过GPRS在网络上传输的数据量。另外,您还可以查看您的
在线时间。
通话计时通话计时通话计时通话计时通话计时
您可以查看GPRS的通话计时。您也可以将通话计时器复零。
• 最后通话
• 全部通话
• 全部清零
数据量数据量数据量数据量数据量
您可以查看数据量。
• 已传送
• 已接
• 全部
• 全部清零

35
简体中文
进入功能表进入功能表进入功能表进入功能表进入功能表
情景模式情景模式情景模式情景模式情景模式[[[[[功能表功能表功能表功能表功能表3]3]3]3]3]
注意注意注意注意注意
• 若手机连接到诸如耳机和免提之类的配件,您不能手动启动情
景模式功能表。
• 除了以上的耳机和乘车模式外,其它情景模式功能表都拥有
“启动”子功能表,以便您随时设定。
在该功能表中,您可以为不同事件、环境和来电群组调节并定制电话提
示音。(例如:当手机连接到免提组合时,将自动设定到乘车情景模式
功能表;当手机连接到耳机时,将自动设定到耳机情景模式功能表。)
振动振动振动振动振动[[[[[功能表功能表功能表功能表功能表3-1]3-1]3-1]3-1]3-1]
• 启动 : 如果您需要振动模式,可以将情景模式调节为振动。
静音静音静音静音静音[[[[[功能表功能表功能表功能表功能表3-2]3-2]3-2]3-2]3-2]
• 启动 : 如果您在安静的场所,可以将情景模式调节为无声。
• 更改 : 您可以更改情景模式子功能表的值。
私人私人私人私人私人[[[[[功能表功能表功能表功能表功能表3-3]3-3]3-3]3-3]3-3]
• 启动 : 如果您需要普通模式,可以将情景模式调节为普通。
• 更改 : 您可以更改情景模式子功能表的值。
大声大声大声大声大声[[[[[功能表功能表功能表功能表功能表3-4]3-4]3-4]3-4]3-4]
• 启动 : 如果您处于嘈杂的环境中,可以将情景模式调节为大声。
• 更改 : 您可以更改情景模式子功能表的值。
耳机耳机耳机耳机耳机[[[[[功能表功能表功能表功能表功能表3-5]3-5]3-5]3-5]3-5]
• 启动 : 当您戴上耳机时,可以将情景模式调节为耳机。
• 更改 : 您可以更改情景模式子功能表的值。
36
简体中文
进入功能表进入功能表进入功能表进入功能表进入功能表
汽车汽车汽车汽车汽车[[[[[功能表功能表功能表功能表功能表3-6]3-6]3-6]3-6]3-6]
• 启动 : 当您启动免提车用组合时,可以调节该情景模式为乘车。
• 更改 : 您可以更改情景模式子功能表的值。
更改模式功能表更改模式功能表更改模式功能表更改模式功能表更改模式功能表[[[[[功能表功能表功能表功能表功能表3-x-x]3-x-x]3-x-x]3-x-x]3-x-x]
情景模式功能表的子功能表如下所示。
来电提示来电提示来电提示来电提示来电提示
根据不同环境提示来电。
铃声类型铃声类型铃声类型铃声类型铃声类型
根据不同环境设定铃声类型。
铃声音量铃声音量铃声音量铃声音量铃声音量
根据不同环境设定铃声音量。
短信提示短信提示短信提示短信提示短信提示
当收到信息时,根据不同环境发出提示音:蜂鸣、振动、静音。
按键音量按键音量按键音量按键音量按键音量
根据不同环境设定按键音量。
自动应答自动应答自动应答自动应答自动应答
可让您根据不同环境设定到自动应答。请注意只有乘车和耳机模式拥有
该子功能表,以便您能启动该功能。
• 关闭关闭关闭关闭关闭
即使您的手机响铃,也不会自动应答。
• 5秒后秒后秒后秒后秒后
在5秒后自动应答。
• 10秒后秒后秒后秒后秒后
在10秒后自动应答。

37
简体中文
注意注意注意注意注意
• 如果您在手机上设定了免提车用组合模式,则不可以启动与来
电提示或信息提示声功能表相关的振动。在免提功能表中,您
可以查看下列子功能表:
- - - - - 来电提示 : : : : : 铃声、静音
- - - - - 短信提示 : : : : : 蜂鸣、静音。
情景模式情景模式情景模式情景模式情景模式[[[[[功能表功能表功能表功能表功能表3]3]3]3]3]进入功能表进入功能表进入功能表进入功能表进入功能表
38
简体中文
设定设定设定设定设定[[[[[功能表功能表功能表功能表功能表4]4]4]4]4]进入功能表进入功能表进入功能表进入功能表进入功能表
您可以按照自己喜好和方便的方式设定下列功能表。
闹钟闹钟闹钟闹钟闹钟[[[[[功能表功能表功能表功能表功能表4-1]4-1]4-1]4-1]4-1]
在该功能表中,您可以设定手机在规定时间发出闹铃。
启动启动启动启动启动
您可以设定启动闹铃的时间[小时和分钟]。
1. 进入功能表。
2. 按[选择]选择启动,然后输入您需要的闹铃时间。
3. 按[确定]。
4. 选择重复周期:一次、每天、每周和每月。
5. 如果您在关闭闹铃中选择是,即使手机已关机,闹铃仍然会在您设
定的时间进行提示。
关闭关闭关闭关闭关闭
您可以取消闹铃时间。
1. 进入功能表。
2. 按[选择]选择关闭。
3. 显示清除闹钟信息。
4. 如果您想取消,按[是]。如果不想,按[否]。
日期和时间日期和时间日期和时间日期和时间日期和时间[[[[[功能表功能表功能表功能表功能表4-2]4-2]4-2]4-2]4-2]
日期日期日期日期日期
• 日期设定日期设定日期设定日期设定日期设定
在该功能表中,您可以设定手机日期。
1. 进入功能表。
2. 按[选择]选择日期设定。
3. 输入您想要的日期的好码。
4. 按[确定]。
39
简体中文
进入功能表进入功能表进入功能表进入功能表进入功能表
设定设定设定设定设定[[[[[功能表功能表功能表功能表功能表4]4]4]4]4]
• 日期格式日期格式日期格式日期格式日期格式
在该功能表中,您可以设定日期格式。
时间时间时间时间时间
手机拥有本身的时钟。在该功能表中,您可以设定时间格式为12小时或
24小时。
1. 进入功能表。
2. 按[选择]滚动到突出显示的时间。
• 时间设定时间设定时间设定时间设定时间设定
在该功能表中,您可以设定手机时间。
1. 按[选择]选择时间设定。
2. 输入您想要设定的时间的号码。
3. 按U、、、、、D键选择您想要设定的AM/PM时间格式。
4. 按[确定]。
• 时间格式时间格式时间格式时间格式时间格式
您可以选择时间格式为12小时或24小时。
1. 按[选择]滚动到突出显示的时间格式。
2. 按[选择]选择您想要的12小时或24小时格式。
手机设定手机设定手机设定手机设定手机设定[[[[[功能表功能表功能表功能表功能表4-3]4-3]4-3]4-3]4-3]
您可以按需要完成手机设定。滚动屏幕以突出显示手机设定功能表,然
后按[选择]。
显示设定显示设定显示设定显示设定显示设定
• 屏幕保护屏幕保护屏幕保护屏幕保护屏幕保护
如果您在20秒内不启动任何功能,待机模式下将显示该图片。
• 呼叫呼叫呼叫呼叫呼叫
您可以设定拔打电话的动画。

40
简体中文
进入功能表进入功能表进入功能表进入功能表进入功能表
• 墙纸墙纸墙纸墙纸墙纸
您可以在待机模式下选择背景图片。
• 欢迎词欢迎词欢迎词欢迎词欢迎词
您可以设定开机时简短显示的信息。
• 问候语问候语问候语问候语问候语
如果您选择是,该功能表可让您选择待机显示。在文本模式下,您
可以编辑文本。
• 网络名称网络名称网络名称网络名称网络名称
如果您选择启动,在待机模式下手机将显示所使用的网络名称。
• 背景灯背景灯背景灯背景灯背景灯
您可以设定按键时背景灯开启的时间。
• 屏幕对比度屏幕对比度屏幕对比度屏幕对比度屏幕对比度
您可以按U、、、、、D设定您想要的屏幕对比
度。
连接端口连接端口连接端口连接端口连接端口
• 传真传真传真传真传真
当使用传真服务时,串行端口的速率需要被设置为电脑与传真之间
使用的19200bps。
• GPRSGPRSGPRSGPRSGPRS和数据和数据和数据和数据和数据
当使用GPRS服务和数据服务时,串行端口的速率需要被设置为电脑
使用的115200bps。
语言选择语言选择语言选择语言选择语言选择
您可以选择手机上显示的语言。

41
简体中文
进入功能表进入功能表进入功能表进入功能表进入功能表
注意注意注意注意注意
• 如何使用免提功能:
当接到来电时,如果您想使用免提功能(耳机),可以在将
耳机插入接口后长按按钮。
设定设定设定设定设定[[[[[功能表功能表功能表功能表功能表4]4]4]4]4]
通话设定通话设定通话设定通话设定通话设定[[[[[功能表功能表功能表功能表功能表4-4]4-4]4-4]4-4]4-4]
在设定功能表中,您可以按[选择]设定和通话相关的功能表。
任意键接听任意键接听任意键接听任意键接听任意键接听
• 开开开开开
如果您选择该功能,您可以按任意键接听来电,E键除外。
• 关关关关关
如果您选择这一功能,您将只能通过按S键接听来电。
发送号码发送号码发送号码发送号码发送号码
(视网络和所申请的服务而定)
• 开开开开开
如果您选择该功能,您可以将手机号码发送给对方。即,接收方手
机上将显示您的手机号码。
• 关关关关关
如果您选择该功能,您将不能发送您的手机号码。
呼叫等待呼叫等待呼叫等待呼叫等待呼叫等待
(视网络而定)
如果启用该服务,您可以接收待接来电。
• 启动启动启动启动启动
启动相应服务。
• 关闭关闭关闭关闭关闭
取消相应服务。
42
简体中文
进入功能表进入功能表进入功能表进入功能表进入功能表
• 查询状态查询状态查询状态查询状态查询状态
查看服务状态。
分钟提示分钟提示分钟提示分钟提示分钟提示
如果您选择开启,可以在通话期间通过每分钟的蜂鸣声检查通话时间。
自动重拨自动重拨自动重拨自动重拨自动重拨
• 开开开开开
当该功能设定为开启时,您的手机在连接失败后将再进行多达10次
的连接尝试。
• 关关关关关
连接失败后,您的手机将不再进行连接尝试。
线路选择线路选择线路选择线路选择线路选择
仅在服务提供商支持选择线路服务时才可以使用该功能。手机可注册两
个独立的号码。该功能可让您选择当前使用的号码。如果您的服务提供
商支持该功能,将显示以下功能表。
1. 线路1 : 选择线路1作为当前的手机号码。
2. 线路2 : 选择线路2作为当前的手机号码。
保密保密保密保密保密[[[[[功能表功能表功能表功能表功能表4-5]4-5]4-5]4-5]4-5]
PIN码码码码码
在该功能表中,您可以设定手机在开机时需要SIM卡的PIN码。如果启动
该功能,您将被要求输入PIN码。
1. 在待机模式下按[功能表]。
2. 按4键直接进入或使用U和D进入设定。
3. 滚动到突出显示的保密功能表。
4. 按[选择]选择PIN码。
5. 您可以查看以下子功能表。
• 启动 : 启动要求PIN码。
• 关闭 : 取消要求PIN码。

43
简体中文
进入功能表进入功能表进入功能表进入功能表进入功能表
注意注意注意注意注意
• 如果您想手动锁定键盘,进入顶部功能表并按*键。
• 如果您想解锁键盘,按*解锁]键,然后按*键。但是如果
您之前启动了自动键盘锁定,手机键盘将被解锁,但25秒后将
自动重新锁定。
设定设定设定设定设定[[[[[功能表功能表功能表功能表功能表4]4]4]4]4]
手机锁手机锁手机锁手机锁手机锁
您可以使用保密码防止他人未经授权使用您的手机。如果您将手机锁设
定为“启动”,则开机时手机将要求您输入安全密码。如果您将手机锁
设定为“自动”,则只有当您更换SIM卡时,手机才要求您输入安全密
码。
• 启动启动启动启动启动
• 关闭关闭关闭关闭关闭
• 自动自动自动自动自动
自动键盘锁自动键盘锁自动键盘锁自动键盘锁自动键盘锁
当您启动自动键盘锁定时,待机模式下如果25秒内不按任何键,键盘将
自动锁定。
• 启动启动启动启动启动
• 关闭关闭关闭关闭关闭

44
简体中文
进入功能表进入功能表进入功能表进入功能表进入功能表
呼叫限制呼叫限制呼叫限制呼叫限制呼叫限制
呼叫限制服务可以防止您的手机拨打或接听某种电话。该功能需要呼叫
限制密码。您可以查看以下子功能表。
• 所有拨出电话所有拨出电话所有拨出电话所有拨出电话所有拨出电话:::::
您可以限制所有拨出电话。
• 国际电话国际电话国际电话国际电话国际电话:::::
您可以限制拨出国际长途。
• 国际漫游电话国际漫游电话国际漫游电话国际漫游电话国际漫游电话:::::
您可以限制除本地网外的所有拨出电话。
• 所有来电:所有来电:所有来电:所有来电:所有来电:
您可以限制所有来电。
• 国际漫游时:国际漫游时:国际漫游时:国际漫游时:国际漫游时:
您可以限制国外漫游时来电。
• 全部取消:全部取消:全部取消:全部取消:全部取消:
您可以取消所有限制服务。
• 更换密码:更换密码:更换密码:更换密码:更换密码:
您可以更改呼叫限制服务的密码。
固定拨号固定拨号固定拨号固定拨号固定拨号(((((需需需需需SIM卡支持卡支持卡支持卡支持卡支持)))))
您可以限制拨电话号码的拨打。这些号码由PIN2码保护。
1. 在待机模式下按[功能表]。
2. 按4键直接进入或使用U和D进入设定。
3. 滚动到突出显示的保密功能表。
4. 按[选择]选择固定拨号。
5. 如果PIN2码正确,您可以查看以下子功能表。
• 开启: 您可以限制的电话号码的拨打。
• 关闭: 您可以不限制打电话号码的拨打。
• 成员列表: 您可以查看保存为固定拨号的号码列表。

45
简体中文
进入功能表进入功能表进入功能表进入功能表进入功能表
设定设定设定设定设定[[[[[功能表功能表功能表功能表功能表4]4]4]4]4]
更改密码更改密码更改密码更改密码更改密码
您可以更改访问密码:PIN码、PIN2码、安全密码
1. 在待机模式下按[功能表]。
2. 按4键直接进入或使用U和D进入设定。
3. 滚动到突出显示的保密功能表。
4. 按[选择]选择更改密码。
5. 如果您想更改PIN码/PIN2码/安全密码,输入您的原始密码,然后
按[确认]。
6. 输入新的PIN码/PIN2码/安全密码,然后确认您更改的密码。
网络网络网络网络网络[[[[[功能表功能表功能表功能表功能表4-6]4-6]4-6]4-6]4-6]
您可以选择能够自动或手动注册的网络。通常,手机网络选择设定为自
动。
自动自动自动自动自动
手机会自动选择在您区域内的可用网络。
手动手动手动手动手动
手机会找到可用的网络列表并显示出来。然后您可以选择您想使用的网
络,前提是该网络与您本地网络运营商已签订漫游协议。
首选网络首选网络首选网络首选网络首选网络
您可以设定手机在注册其它网络前首先注册的首选网络列表。该列表从
手机预设的已知网络列表中创建。
自定义自定义自定义自定义自定义
您可以添加条目或从网络列表中删除新条目。当中甚至可包括手机所未
知网络密码的新网络。要实现以上操作,请选择后输入网络密码、国家
代码和网络名称。
恢复初始设定恢复初始设定恢复初始设定恢复初始设定恢复初始设定[[[[[功能表功能表功能表功能表功能表4-7]4-7]4-7]4-7]4-7]
您可以通过选择该功能表将手机恢复为预设配置。然后,您需要保密码
启动该功能。

46
简体中文
进入功能表进入功能表进入功能表进入功能表进入功能表(((((视网络和您申请的服务而定视网络和您申请的服务而定视网络和您申请的服务而定视网络和您申请的服务而定视网络和您申请的服务而定)))))
呼叫转接呼叫转接呼叫转接呼叫转接呼叫转接[[[[[功能表功能表功能表功能表功能表5]5]5]5]5]
呼叫转移服务可让您将语音来电、传真来电和数据来电转移到其它号
码。要获取更多信息,请联系您的服务提供商。
全部通话全部通话全部通话全部通话全部通话[[[[[功能表功能表功能表功能表功能表5-1]5-1]5-1]5-1]5-1]
无条件转移语音来电。
正在通话时正在通话时正在通话时正在通话时正在通话时[[[[[功能表功能表功能表功能表功能表5-2]5-2]5-2]5-2]5-2]
当手机正在使用时转移语音来电。
无人接听时无人接听时无人接听时无人接听时无人接听时[[[[[功能表功能表功能表功能表功能表5-3]5-3]5-3]5-3]5-3]
转移您没有应答的语音来电。
无网络或关机时无网络或关机时无网络或关机时无网络或关机时无网络或关机时[[[[[功能表功能表功能表功能表功能表5-4]5-4]5-4]5-4]5-4]
当手机关机或不在服务区时转移语音来电。
所有数据来电所有数据来电所有数据来电所有数据来电所有数据来电[[[[[功能表功能表功能表功能表功能表5-5]5-5]5-5]5-5]5-5]
无条件转移到使用PC连接的号码。
所有传真来电所有传真来电所有传真来电所有传真来电所有传真来电[[[[[功能表功能表功能表功能表功能表5-6]5-6]5-6]5-6]5-6]
无条件转移到使用传真连接的号码。
47
简体中文
注意注意注意注意注意
• 您可以在常用功能表中选择您想要的号码。
进入功能表进入功能表进入功能表进入功能表进入功能表
呼叫转接呼叫转接呼叫转接呼叫转接呼叫转接[[[[[功能表功能表功能表功能表功能表5]5]5]5]5](((((视网络和您申请的服务而定视网络和您申请的服务而定视网络和您申请的服务而定视网络和您申请的服务而定视网络和您申请的服务而定)))))
子功能表子功能表子功能表子功能表子功能表[[[[[功能表功能表功能表功能表功能表5-x-x]5-x-x]5-x-x]5-x-x]5-x-x]
呼叫转移功能表的子功能表如下所示。
启动启动启动启动启动
启动相应服务。
• 其它号码其它号码其它号码其它号码其它号码
转发到信息中心。该功能不包括在所有数据来电和所有传真来电功
能表中。
• 常用号码常用号码常用号码常用号码常用号码
输入接受转移呼叫的电话号码。
• 语音信箱语音信箱语音信箱语音信箱语音信箱
您可以查询5个转移号码。
关闭关闭关闭关闭关闭
取消相应服务。
查询状态查询状态查询状态查询状态查询状态
查看相应服务的状态。
全部取消全部取消全部取消全部取消全部取消[[[[[功能表功能表功能表功能表功能表5-7]5-7]5-7]5-7]5-7]
取消全部呼叫转移服务。

48
简体中文
进入功能表进入功能表进入功能表进入功能表进入功能表
公文包公文包公文包公文包公文包[[[[[功能表功能表功能表功能表功能表6]6]6]6]6]
日程表日程表日程表日程表日程表[[[[[功能表功能表功能表功能表功能表6-1]6-1]6-1]6-1]6-1]
屏幕顶端是日期和图标部分。在您更改日期后,日历会按照该日期更
新。方形光标也将标示于该日期上。如果日历下方有横线,表示当天已
设定日程表。该功能可以提醒您记住您的日程表和备忘录。如果您已设
定提示,手机将发出提示音。
更改日、月、年。
添加添加添加添加添加
您可以编辑最多30个字符的提示,选择下列提示类型。您最多可以设定
20个提示。
• 日程表日程表日程表日程表日程表
按[选择]输入标题、日程表时间、重复时间、闹铃时间。
• 重复重复重复重复重复
- 一次 : : : : : 无重复。
- 每天 : : : : : 每天重复日程表,连续5天。
- 每周 : 每周重复日程表,连续5周。
- 每月 : : : : : 每月重复日程表,连续5个月。
- 每年 : : : : : 每年重复日程表,连续5年。
• 闹铃时间闹铃时间闹铃时间闹铃时间闹铃时间
- 准时 : : : : : 在您设定的时间准时发出闹铃。
- 10分钟前 : : : : : 在您设定时间的10分钟前发出闹铃。
- 30分钟前 : : : : : 在您设定时间的30分钟前发出闹铃。
- 1小时前 : : : : : 在您设定时间的1小时前发出闹铃。
- 1天前 : : : : : 在您设定时间的1天前发出闹铃。
键键键键键 说说说说说 明明明明明 键键键键键 说说说说说 明明明明明
如果您短按这些键,
可以设定每日闹钟。
长按这些键可以设定
每周闹钟。
1 3 每年
* # 每月
U
D

49
简体中文
进入功能表进入功能表进入功能表进入功能表进入功能表
• 备忘录备忘录备忘录备忘录备忘录
1. 按[选择]选择新增备忘录。
2. 滚动屏幕以突出显示备忘录。
3. 按[选择]。
4. 输入备忘录,然后按[选择]。
查看今天查看今天查看今天查看今天查看今天
显示您所选日期的对应提示。使用U、、、、、D浏览提示列表。如果您已
经设定提示闹铃,会显示闹钟提示图标。按[选项]删除或编辑您选择的
提示。
• 选项选项选项选项选项
• 编辑编辑编辑编辑编辑
您可以通过按[选择]编辑标题、时间、重复时间和闹铃时间。
• 删除删除删除删除删除
您可以删除提示。
查看全部查看全部查看全部查看全部查看全部
显示为所有日子所设定的提示。使用U、、、、、D浏览提示列表。按[选
项]后,您可以进入与“查看日期”相同的功能表。
删除已过日程删除已过日程删除已过日程删除已过日程删除已过日程
您可以删除最后一项提醒过的日程表。
全部删除全部删除全部删除全部删除全部删除
您可以删除所有提示。
公文包公文包公文包公文包公文包[[[[[功能表功能表功能表功能表功能表6]6]6]6]6]
50
简体中文
进入功能表进入功能表进入功能表进入功能表进入功能表
电话本电话本电话本电话本电话本[[[[[功能表功能表功能表功能表功能表6-2]6-2]6-2]6-2]6-2]
查找查找查找查找查找
(从电话簿呼叫)
1. 首先,在待机模式下按[电话本]打开电话簿。
2. 按[选择]进入查找。
3. 根据设定的查找方式,可能不显示以下功能表。
• 姓名
• 号码
4. 您可以通过姓名和号码查找条目。
5. 选择[查找]。
6. 您可以按[列表]查找姓名和号码。
7. 如果您想编辑、删除、复制和为条目添加语音,选择[选项]。将显
示以下功能表。
• 编辑 : 您可以按[确认]来编辑姓名、号码、电子邮件和传
真。
• 删除 : 您可以删除条目。
• 写信息 : 您可以写信息。
• 复制 : 您可以将条目从SIM卡复制到手机或从手机复制到SIM
卡。
• 呼叫 : 您可以呼叫所选条目。
• 语音 : 您可以将语音添加到条目上或更改语音标签。
• 主要号码 : 您可以从手机号码、家庭电话号码或公司电话号码中
选择一个您常用的号码。如果您设定了该功能表,将
最先显示主号码。

51
简体中文
公文包公文包公文包公文包公文包[[[[[功能表功能表功能表功能表功能表6]6]6]6]6]进入功能表进入功能表进入功能表进入功能表进入功能表
增加号码增加号码增加号码增加号码增加号码
您可以使用该功能添加电话簿条目。
手机内存容量为200个条目。SIM卡内存容量取决于移动电话服务提供
商。您可以在手机内存中保存含20个字符的姓名,或将其保存在SIM卡
上。可保存的数量取决于SIM卡的功能。
1. 首先,在待机模式下按[电话本]打开电话簿。
2. 滚动屏幕以突出显示新增条目,并按 [选择]进入。
3. 选择您想要保存的内存:SIM卡或手机。
• SIM卡卡卡卡卡 : 您可以添加条目的姓名和号码。
a. 输入要添加的姓名。
b. 按[确认],然后输入号码。
c. 按[确认]。
d. 如果您想要添加语音,按[确认]。
• 手机手机手机手机手机 : 按[选择],您可以添加姓名、手机号码、家庭电话号
码和公司电话号码。
a. 您可以按[选择]在手机号码、家庭电话和公司
电话中选择。
b. 输入要添加的姓名。
c. 输入号码作为手机号码、家庭电话、公司电话,
按[下一个]进入下一步,按[清除]取消,按C保存或退出。
d. 如果您想要添加语音,按[是]。
您应该在2秒内说出词语,然后手机会要求您再说一遍,以确保语音可
以准确识别。语音辨认结束后,会自动附加语音。
注意注意注意注意注意
• 只有您设定的主号码可以附加语音。例如,如果您更改主号
码,语音会自动附加到更改的号码上。
• 您可以在SIM卡中添加语音标签到手机号码。取下或更换SIM卡
将删除语音标签。当您更改SIM卡时,原有的SIM卡中手机号码
上附加的语音标签可以附加到另外的号码上。这是因为SIM卡
中不包括语音标签的信息。

52
简体中文
进入功能表进入功能表进入功能表进入功能表进入功能表
快速拨号快速拨号快速拨号快速拨号快速拨号
您可以为姓名列表指定按键2-9中的任一键。长按2-3秒即可直接呼叫。
1. 首先在待机模式下按[电话本]打开电话簿。
2. 滚动到快速拨号,然后按[选择]进入该功能表。
3. 将显示每个快速拨号。
4. 如果您想添加快速拨号,选择<空>。然后,您可以在电话簿中查找
姓名。
5. 如果您选择快速拨号指定的姓名,您可以查看下列子功能表。
• 更改 : 您可以更改指定的快速拨号。
• 取消 : 您可以删除指定的快速拨号号码。
语音列表语音列表语音列表语音列表语音列表
您可以查看所有包括语音的手机号码。您也可以按 [发送] 直接呼叫。
通过U和D按[选项]选择手机号码后,您可以看到下列子功能表。
• 播放 : 您可以播放附加到手机号码的语音。
• 更改 : 您可以更改附加到手机号码的语音。
• 删除 : 您可以删除附加到手机号码的语音。
• 呼叫 : 您可以选择该功能表进行呼叫。
群组群组群组群组群组
您可以为每个群组设定20个成员。共有7个群组可用。
1. 在待机模式下按[电话本]进入电话簿。
2. 滚动到群组对象,然后按[选择]进入该功能表。
3. 将显示每个群组列表:家庭、、、、、朋友、、、、、同事、、、、、重要人士、、、、、群组1、、、、、
群组2和其他。
4. 按[选择]选择要管理的群组名称。
53
简体中文
5. 然后将显示下列子功能表。
• 成员列表成员列表成员列表成员列表成员列表
- 您可以查看通话群组的号码列表。
- 您可以按[选项]选择您想要的成员,然后您可以启动编辑、、、、、删
除、、、、、写信息、、、、、复制、、、、、语音和主要号码等子功能表。
• 群组来电铃声设定群组来电铃声设定群组来电铃声设定群组来电铃声设定群组来电铃声设定
您可以为不同群组设定不同铃声。
• 群组来电标志设定群组来电标志设定群组来电标志设定群组来电标志设定群组来电标志设定
您可以设定每个群组的动画。
• 添加成员添加成员添加成员添加成员添加成员
您可以添加通话群组的成员。
1. 滚动到突出显示添加成员,然后按[选择]进入该功能表。
2. 群组成员不得超过20名。否则,将显示错误信息。
3. 按[确认]添加成员。
• 删除成员删除成员删除成员删除成员删除成员
您可以删除已保存在电话簿的成员。
• 重命名重命名重命名重命名重命名
您可以更改群组名称。
全部复制全部复制全部复制全部复制全部复制
您可以将条目从SIM卡内存复制/移动到手机内存或从手机内存复制/移
动到SIM卡内存。
1. 首先,在待机模式下按[电话本]打开电话簿。
2. 滚动到全部复制,然后按[选择]进入该功能表。
3. 然后将显示下列子功能表。
• SIMSIMSIMSIMSIM卡转到手机卡转到手机卡转到手机卡转到手机卡转到手机 :将SIM卡中的条目复制到手机内存。
• 手机转到手机转到手机转到手机转到手机转到SIMSIMSIMSIMSIM卡卡卡卡卡 :将手机内存中的条目复制到SIM卡。
公文包公文包公文包公文包公文包[[[[[功能表功能表功能表功能表功能表6]6]6]6]6]进入功能表进入功能表进入功能表进入功能表进入功能表
54
简体中文
全部删除全部删除全部删除全部删除全部删除
您可以删除SIM卡、、、、、手机和语音中的所有条目。该功能需要保密码。
1. 在待机模式下按[电话本]进入电话簿。
2. 滚动到全部删除,然后按[选择]。
3. 然后选择要清除的内存:SIM卡、、、、、手机或语音。
4. 然后您将被要求输入保密码。
5. 按[确认],或按[返回]取消。
设定设定设定设定设定
您可以设定包括变量、、、、、SIM卡或手机的首选内存,优先查找包括变量、
姓名和号码。
1. 首先,在待机模式下按[电话本]打开电话簿。
2. 滚动到设定,然后按[选择]进入。
3. 然后将显示下列子功能表。
• 保存至保存至保存至保存至保存至
1. 滚动到突出显示的保存至,然后按[选择]进入该功能表。
2. 显示3个子功能表。
- 自选 : 如果您选择变量,只要您在电话簿中添加条目,手
机都会询问您保存位置。
- SIM卡 :如果您选择SIM卡,手机会在SIM中直接添加条目
而不会询问保存位置。
- 手机 : 如果您选择手机,手机会直接添加条目而不会询问
保存位置。
• 查找方式查找方式查找方式查找方式查找方式
1. 滚动到突出显示的查找方式,然后按[选择]进入该功能表。
2. 将显示3个子功能表。
- 自选 : 如果您选择变量,手机会询问您如何查找条目。
- 姓名 : 如果您选择姓名,手机会通过姓名查找条目。
- 号码 : 如果您选择号码,手机会通过号码查找条目。
进入功能表进入功能表进入功能表进入功能表进入功能表
55
简体中文
信息提示信息提示信息提示信息提示信息提示
• 特别服务号码特别服务号码特别服务号码特别服务号码特别服务号码
使用该功能访问您的网络提供商所提供的特殊服务列表(如果SIM卡
支持)。
1. 首先,在待机模式下按[电话本]打开电话簿。
2. 滚动到特别服务号码,然后按[选择]进入。
3. 将显示可用服务的名称。
4. 使用U、、、、、D选择一个服务,按[发送]。
• 内存状态内存状态内存状态内存状态内存状态
该功能可让您查看电话簿的已用内存和可用
内存。
1. 首先,在待机模式下按[电话本]打开电话
簿。按[选择]选择信息。
2. 滚动到内存状态,然后按[选择]进入该功
能表。
• 本手机号码(需本手机号码(需本手机号码(需本手机号码(需本手机号码(需SIMSIMSIMSIMSIM卡支持)卡支持)卡支持)卡支持)卡支持)
您可以通过SIM卡查询本手机号码。
公文包公文包公文包公文包公文包[[[[[功能表功能表功能表功能表功能表6]6]6]6]6]进入功能表进入功能表进入功能表进入功能表进入功能表
56
简体中文
进入功能表进入功能表进入功能表进入功能表进入功能表
注意注意注意注意注意
每个游戏的控制键各不异。但每种游戏屏幕上都会显示主要控制
键说明(参见控制键信息)。一般控制键如下所示。
[[[[[一般按键功能一般按键功能一般按键功能一般按键功能一般按键功能]]]]]
• < [软键1] : 开始游戏、保存积分和确认键
• C [控制键] : 暂停
• > [软键2] : 返回
• E [结束键] : 退出
• 0~9 : 选择等级
• U、、、、、D [上/下键] : 选择音量
• * [星形键] : 左导航
• # [快键] : 右导航
我的文件夹我的文件夹我的文件夹我的文件夹我的文件夹[[[[[功能表功能表功能表功能表功能表7-1]7-1]7-1]7-1]7-1]
所有通过多媒体服务或者EMS下载的图片,音乐等内容,都将被存储到
我的文件夹,在这里您可以浏览、编辑这些内容,或将它们设置为墙纸
和铃音。若要在铃声类型中使用下载的合旋铃音,必须在菜单铃声中将
其设为铃声,而且您一次只能将一首铃声添加到铃声类型中。
附件附件附件附件附件[[[[[功能表功能表功能表功能表功能表7]7]7]7]7]
游戏游戏游戏游戏游戏[[[[[功能表功能表功能表功能表功能表7-2]7-2]7-2]7-2]7-2]
手机为您提供多种有趣的游戏。
注意注意注意注意注意
您可以在作曲家[功能表7-3]和图片编辑器[功能表7-4]中编辑
EMS音乐和图片。也可以如写信息[功能表1-1]所描述的那样,
在EMS短信中插入音乐或图片。

57
简体中文
进入功能表进入功能表进入功能表进入功能表进入功能表
注意注意注意注意注意
在编辑模式中,默认设定为移动模式和画图状态。通过*,
您可以在图素中快速移动。
作曲家作曲家作曲家作曲家作曲家[[[[[功能表功能表功能表功能表功能表7-3]7-3]7-3]7-3]7-3]
您可以自编想要的铃声。
当您进入该功能时,将显示您以前编辑的铃声。您可以重编铃声或更改
原有铃声:
1. 输入您想要的音符。(1~7:CDEFGAB)
2. 要调整音符,步骤如下。
• 持续时间持续时间持续时间持续时间持续时间 :8缩短和9加长音符或休止音。
• 停顿停顿停顿停顿停顿 :0插入一个长度和前一个音符一样的休止音。
• 自编音乐自编音乐自编音乐自编音乐自编音乐 :*设定新音符的八度和音。
• 高辅音高辅音高辅音高辅音高辅音 :#设定音符的音高。
• 清除清除清除清除清除 :C删除每个音符。
例如)28#fi8#d1
图片编辑器图片编辑器图片编辑器图片编辑器图片编辑器[[[[[功能表功能表功能表功能表功能表7-4]7-4]7-4]7-4]7-4]
您可以通过一个现有的图像文件按需要编辑图片或图形。
1. 编辑,选择想要的图片。
2. 调整图片,步骤如下:
• 模式更改模式更改模式更改模式更改模式更改 :在播放模式和移动模式之间切换。
• 画图和擦除画图和擦除画图和擦除画图和擦除画图和擦除 :在画图和擦除之间切换。
3. 需要帮助,请长按0。
附件附件附件附件附件[[[[[功能表功能表功能表功能表功能表7]7]7]7]7]
58
简体中文
单位转换器单位转换器单位转换器单位转换器单位转换器[[[[[功能表功能表功能表功能表功能表7-5]7-5]7-5]7-5]7-5]
该功能可将任何单位转换为您需要的单位。有4种
可以转换的单位类型:长度、面积、重量和体积。
1. 您可以通过按[下一个]键选择4种单位类型中的
一种。
2. 按U和D选择您想转换的单位。
3. 您可以长按U和D在当前值和转换值之间切
换。
4. 您可以按#在小数点后输入数字。
5. 您可以按C删除数字。
6. 如果您想结束转换过程,按E键或[返回]键。
计算器计算器计算器计算器计算器[[[[[功能表功能表功能表功能表功能表7-6]7-6]7-6]7-6]7-6]
该功能表包含的标准功能包括 +、-、×、÷:加、减、乘、除。
1. 通过按数字键输入数字。
2. 按U键一次求和,长按求乘。按D一次求减,长按求除。
3. 您可以按*键输入素数,按#键输入负数。
4. 您可以按[结果]键查看计算结果。
5. 如果您想继续计算,重复以上步骤。
6. 您可以按C删除数字或符号。
7. 如果您想结束计算过程,按E键。
时区设置时区设置时区设置时区设置时区设置[[[[[功能表功能表功能表功能表功能表7-7]7-7]7-7]7-7]7-7]
您可以查看世界各个城市的时间。
短按U、、、、、D时,您可以查看属于不同时区的城市时间;长按U、、、、、
D时,您可以查看同一时区的所有城市时间。
如果您想选择您要的国家,按[设定]键。
进入功能表进入功能表进入功能表进入功能表进入功能表

59
简体中文
进入功能表进入功能表进入功能表进入功能表进入功能表
您的手机支持基于无线应用协议(WAP)的服务。您可以访问您的网
络运营商所支持的服务。该服务功能表可让您获取有关新闻、天气预报
和飞机航班表之类的信息。
主页主页主页主页主页[[[[[功能表功能表功能表功能表功能表8-1]8-1]8-1]8-1]8-1]
您可以连接到启动的情景模式所设定的主页。
书签书签书签书签书签[[[[[功能表功能表功能表功能表功能表8-2]8-2]8-2]8-2]8-2]
当您进入该功能表,您可以看到书签。然后按<扭进入可用的选项或
按>退出。
• 连接连接连接连接连接 : : : : : 连接到所选书签。
• 添加添加添加添加添加 : : : : : 手动新增书签。
• 编辑编辑编辑编辑编辑 : : : : : 更改所选书签的标题和地址。
• 删除删除删除删除删除 : : : : : 从书签列表中删除所选书签。
PUSHPUSHPUSHPUSHPUSH信息信息信息信息信息[[[[[功能表功能表功能表功能表功能表8-3]8-3]8-3]8-3]8-3]
您将可以接收含有WAP网络地址(URL)的信息,进而使您能够直接连接
到信息所示的WAP网络地址。
收信箱收信箱收信箱收信箱收信箱
您可以读取或删除服务信息。
设定设定设定设定设定
您可以设定服务信息。
互联网互联网互联网互联网互联网[[[[[功能表功能表功能表功能表功能表8]8]8]8]8]

60
简体中文
进入功能表进入功能表进入功能表进入功能表进入功能表
上网设定上网设定上网设定上网设定上网设定[[[[[功能表功能表功能表功能表功能表8-4]8-4]8-4]8-4]8-4]
您可以设定最多5个情景模式,但每次只能启动其中一个。
滚动到所要的情景模式并按<进入可用的选项。
• 启动启动启动启动启动
您可以启动所选的情景模式。
• 设定设定设定设定设定
编辑和更改所选情景模式的WAP设定。
- 主页主页主页主页主页
该设定可让您输入您想作为主页使用的网站地址(URL)。您不
需要在每个URL前键入“http://”,因为WAP浏览器会自动加入。
- 显示图象显示图象显示图象显示图象显示图象
您可以选择是否要显示WAP卡上的图像。
- 连接类型连接类型连接类型连接类型连接类型
连接类型的选项为临时或持续,视网关而定。
临时连接临时连接临时连接临时连接临时连接
非固定(无线)的连接服务。
连续连接连续连接连续连接连续连接连续连接
固定的传输机制,会增加网络通信量。
- 连接选项连接选项连接选项连接选项连接选项
该选项可以设定为开启或关闭,视网关而定。
- 网关信息网关信息网关信息网关信息网关信息
大多数WAP网关不需要用户名和密码。如果您的网关需要它们才
能连接,您的网络应该提供用户名和密码,浏览WAP站点前您必
须正确设置。
- 连接方式连接方式连接方式连接方式连接方式
数据数据数据数据数据
GPRSGPRSGPRSGPRSGPRS(通用分组无线业务)(通用分组无线业务)(通用分组无线业务)(通用分组无线业务)(通用分组无线业务)
61
简体中文
进入功能表进入功能表进入功能表进入功能表进入功能表
- 数据设定数据设定数据设定数据设定数据设定
这些设定值由您的网络提供。
IP地址地址地址地址地址 : 输入访问WAP网关的IP地址。
拨叫号码拨叫号码拨叫号码拨叫号码拨叫号码 : 输入访问WAP网关的拨号号码。
呼叫类型呼叫类型呼叫类型呼叫类型呼叫类型 : 选择数据来电的类型:模拟或ISDN(数码)。
连接速度连接速度连接速度连接速度连接速度 : 数据连接的速度。
用户名用户名用户名用户名用户名 : 拨号服务器(不是WAP网关)的用户身份。
密码密码密码密码密码 : 拨号服务器(不是WAP网关)识别您身份所需的密
码。
- GPRS设定设定设定设定设定
只有当选择GPRS作为载体服务时,服务设定才可用。
- 空闲时限空闲时限空闲时限空闲时限空闲时限
您可以设定30-300秒间的限制时间。超过此时间限制而没有数据
输入或传输时,服务将自动关闭。
• 重命名重命名重命名重命名重命名
编辑情景模式名称。
• 邮件服务器邮件服务器邮件服务器邮件服务器邮件服务器
保存您经常使用的电子邮件服务器URL。
- 连接连接连接连接连接
连接到您配置为电子邮件服务器的URL。
- 编辑地址编辑地址编辑地址编辑地址编辑地址
编辑电子邮件服务器的URL。
转到转到转到转到转到URL [[[[[功能表功能表功能表功能表功能表8-5]8-5]8-5]8-5]8-5]
您可以直接连接到想要的站点。您需要输入想直接连接的特定URL。
互联网互联网互联网互联网互联网[[[[[功能表功能表功能表功能表功能表8]8]8]8]8]
62
简体中文
缓存缓存缓存缓存缓存[[[[[功能表功能表功能表功能表功能表8-6]8-6]8-6]8-6]8-6]
您可以删除缓存内容,更改缓存模式。
清空缓存清空缓存清空缓存清空缓存清空缓存
缓存内容将被清除。
缓存查询缓存查询缓存查询缓存查询缓存查询
您可以更改查询缓存的时间。
• 经常查询经常查询经常查询经常查询经常查询
只要下载或浏览URL,就会查询缓存。
• 启动时查询启动时查询启动时查询启动时查询启动时查询
只有启动WAP时才查询缓存。
• 关闭关闭关闭关闭关闭
从不查询缓存。
安全认证安全认证安全认证安全认证安全认证[[[[[功能表功能表功能表功能表功能表8-7]8-7]8-7]8-7]8-7]
显示可用证明列表。
重设上网设定重设上网设定重设上网设定重设上网设定重设上网设定[[[[[功能表功能表功能表功能表功能表8-8]8-8]8-8]8-8]8-8]
您可以将情景模式的所有当前设定复零为初始设定。
进入功能表进入功能表进入功能表进入功能表进入功能表
63
简体中文
进入功能表进入功能表进入功能表进入功能表进入功能表
在线功能表在线功能表在线功能表在线功能表在线功能表
在线时,您可以查看下列功能表。
❏❏❏❏❏ 主页主页主页主页主页
与[功能表8-1]相同
❏❏❏❏❏ 刷新刷新刷新刷新刷新
下载当前页面。
❏❏❏❏❏ 书签书签书签书签书签
与[功能表8-2]相同
❏❏❏❏❏ 添加书签添加书签添加书签添加书签添加书签
将当前URL保存为书签。您也可以更改书签标题。
❏❏❏❏❏ 转到转到转到转到转到URLURLURLURLURL
与[功能表8-5]相同
❏❏❏❏❏ 电子邮件电子邮件电子邮件电子邮件电子邮件
将当前URL连接到电子邮件服务器。
❏❏❏❏❏ 邮件服务器设定邮件服务器设定邮件服务器设定邮件服务器设定邮件服务器设定
将当前URL保存为电子邮件服务器。
❏❏❏❏❏ 存储图片存储图片存储图片存储图片存储图片
保存浏览的图像。
64
简体中文
要使用数据或传真服务,您需要另外购买数据套件及支持软件(为可选配
件)。在使用这些功能前,请字仔细阅读支持软件,并确认您的手机已经
连接到计算机或一个兼容设备上。
发送数据或传真呼叫发送数据或传真呼叫发送数据或传真呼叫发送数据或传真呼叫发送数据或传真呼叫
1. 将计算机与手机连接。
2. 启动通信软件后,可以拨打电话、发送数据或传真。
3. 数据或传真发送后,您只需关闭通信软件、按[结束]。
接收数据或传真来电接收数据或传真来电接收数据或传真来电接收数据或传真来电接收数据或传真来电
如果您的语音、数据和传真电话具有不同的号码,手机可以识别来电类
型。
接收数据或传真来电接收数据或传真来电接收数据或传真来电接收数据或传真来电接收数据或传真来电 ------ - - - - 不同号码不同号码不同号码不同号码不同号码(((((多号码多号码多号码多号码多号码)))))
要使用数据或传真服务,屏幕会显示您接收的电话类型。
要接收数据或传真来电
1. 将计算机连接到手机。
2. 启动通信软件后,接听来电和接收数据或传真(如果它没有自动应
答)。
3. 接收数据或传真后,您只要关闭通信软件、按[结束]。
如何使用数据和传真呼叫如何使用数据和传真呼叫如何使用数据和传真呼叫如何使用数据和传真呼叫如何使用数据和传真呼叫附加功能附加功能附加功能附加功能附加功能

65
简体中文
接收数据或传真来电接收数据或传真来电接收数据或传真来电接收数据或传真来电接收数据或传真来电 ------ - - - - 单一号码单一号码单一号码单一号码单一号码
如果您的SIM卡不支持不同语音、数据和传真号码,手机就不能识别来
电类型。
要使用数据或传真服务,请确信您要使用数据或传真来电模式。您首先
必须从呼叫模式子功能表中选择一个选项(设定→通话设定→下一个来
电)。
要接收数据或传真来电
1. 在待机模式下,按[功能表]。
2. 选择您所要的呼叫类型(语音、数据或传真)并按[选择]。
3. 将计算机与手机连接。
4. 启动通信软件后,接听来电、接收数据或传真(如果它没有自动应
答)。
5. 接收数据或传真后,您只需关闭通信软件、按[结束]。
一旦您设定手机接收特定来电,手机会保留该设定直到您更改它。
语音备忘录可以录制多达3段语音信息且每段备忘录可长达10秒。当您
手上没有纸和笔记录指示或信息时,该备忘录就会派上用场。
附加功能附加功能附加功能附加功能附加功能
PC PC PC PC PC 同步同步同步同步同步
PC同步是通过数据电缆实现PC和手机之间数据交换的程序。因
此,如果您想使用该功能,就需要购买附件工具包。要获取有关
的使用指导之详细信息,清参阅CD内PC同步说明文件。

66
简体中文
1 1 1 1 1 通话中通话中通话中通话中通话中
1-1 1-1 1-1 1-1 1-1 保持保持保持保持保持
您只需按[发送]键即可保持通话或存取电话。拨打电话或应答来电后,
按[发送]键可保持通话。当一个通话被保持时,按[发送]键即可启动
它。
1-2 1-2 1-2 1-2 1-2 拨打第二个电话拨打第二个电话拨打第二个电话拨打第二个电话拨打第二个电话
您可以从电话簿中获得一个拨号号码以拨打第二个电话。按[电话本]
键,然后选择查找。要在通话时将拨号号码保存在电话簿,按[电话本]
键然后选择增加号码。
1-3 1-3 1-3 1-3 1-3 在两通电话间切换在两通电话间切换在两通电话间切换在两通电话间切换在两通电话间切换
要在两通电话间切换,选择[选项]键,然后选择切换或按[发送]键。
您可以通过按上/下箭头键拨打其中一个通话。如果您想结束其中一个
通话,选择您想结束的通话,然后按[结束]键。
1-4 1-4 1-4 1-4 1-4 接听来电接听来电接听来电接听来电接听来电
要在手机发出响铃时接听来电,只需按[发送]键即可。
当您在通话过程中有来电,手机也会提醒您。听筒会发出提示音,显示
屏会显示第二个来电正在等待中。该功能被称为呼叫等待,只有在您的
网络支持它时才可用。要获取有关如何启动和关闭呼叫等待的详细信
息,请参见呼叫等待。
如果启动呼叫等待,您可以通过按[发送]或选择[接听]键,然后选择保
持并接听,保持第一个通话电并接听第二个来电。
您可以选择[功能表]键,然后选择结束并接听来结束当前来电并接听待
接来电。
1-5 1-5 1-5 1-5 1-5 拒接来电拒接来电拒接来电拒接来电拒接来电
不在通话中时,您只需按[结束]键就可以拒接来电。
在通话中时,您可以按[功能表]键并选择多方通话/拒接或按[结束]键
拒接来电。
附加功能附加功能附加功能附加功能附加功能
通话中功能表通话中功能表通话中功能表通话中功能表通话中功能表
67
简体中文
1-6 1-6 1-6 1-6 1-6 控制通话中音量控制通话中音量控制通话中音量控制通话中音量控制通话中音量
您可以按[选项]键并选择音量来控制通话中音量。
1-7 1-7 1-7 1-7 1-7 将话筒静音将话筒静音将话筒静音将话筒静音将话筒静音
在通话中,您可以按[选项]键然后选择静音将话筒静音。按[取消]可以
将手机取消静音。
将手机静音后,呼叫者就无法听到您讲话,但您仍可以听到对方讲话。
1-8 1-8 1-8 1-8 1-8 通话中开启双音多频音通话中开启双音多频音通话中开启双音多频音通话中开启双音多频音通话中开启双音多频音
要在通话中开启双音多频音,例如:要让您的手机利用自动电话交换
台,可以选择[选项]键,然后选择开启双音多频。也可按同样步骤关闭
双音多频音。
1-9 1-9 1-9 1-9 1-9 进入主功能表进入主功能表进入主功能表进入主功能表进入主功能表
按[选项]键,然后选择主功能表可以从通话中功能表进入信息和SIM卡
工具包主功能选项。只有当手机中的SIM卡支持SIM卡工具包服务时才显
示SIM卡工具包功能表。
2 2 2 2 2 多方通话或会议通话多方通话或会议通话多方通话或会议通话多方通话或会议通话多方通话或会议通话
如果您的网络服务提供商支持多方通话或会议通话,您可以同时与超过
一个呼叫者通话。
只有当您有一通进中的电话并有另一个保持通话,且这两个电话已经接
听时才可设置多方通话。一旦设置多方通话,您就可以添加、断开或分
开来电(即从多方通话中移除,但仍与您连接)。这些选项都包括在通
话中功能表内,并分组排列。
多方通话可容许最多五名成员。启动后,由您控制多方通话,也只有您
可以将来电添加到多方通话。
2-1 2-1 2-1 2-1 2-1 拨打第二个电话拨打第二个电话拨打第二个电话拨打第二个电话拨打第二个电话
在通话中您也可以拨打第二个电话。只要输入第二个电话号码并按[发
送]即可。当您拨打第二个电话时,第一个电话会自动保持。您可以通
过选择[选项]键,然后选择切换在两通电话间切换。
附加功能附加功能附加功能附加功能附加功能
68
简体中文
2-2 2-2 2-2 2-2 2-2 设置多方通话设置多方通话设置多方通话设置多方通话设置多方通话
您可以选择[选项]键,然后选择多方通话/全部加入将保持中通话与当
前通话连接并组成一个多方通话。
2-3 2-3 2-3 2-3 2-3 保持多方通话保持多方通话保持多方通话保持多方通话保持多方通话
要保持多方通话,请选择[选项]键,然后选择多方通话/全部保持。
2-4 2-4 2-4 2-4 2-4 启动保持中的多方通话启动保持中的多方通话启动保持中的多方通话启动保持中的多方通话启动保持中的多方通话
要启动保持中的多方通话,请选择[选项]键,然后选择多方通话/全部
加入。
2-5 2-5 2-5 2-5 2-5 将来电添加到多方通话将来电添加到多方通话将来电添加到多方通话将来电添加到多方通话将来电添加到多方通话
要将当前通话添加到保持中的多方通话中,请选择[选项]键,然后选择
多方通话/全部加入。
2-6 2-6 2-6 2-6 2-6 在多方通话中显示呼叫者在多方通话中显示呼叫者在多方通话中显示呼叫者在多方通话中显示呼叫者在多方通话中显示呼叫者
要在手机屏幕上滚动显示组成多方通话的来电号码,请选择U和D键。
2-7 2-7 2-7 2-7 2-7 保持多方通话的成员保持多方通话的成员保持多方通话的成员保持多方通话的成员保持多方通话的成员
要保持多方通话中选择的呼叫者(显示在屏幕上的当前号码),请选择
[功能表]键,然后选择多方通话/全部保持。
2-8 2-8 2-8 2-8 2-8 多方通话中的私人通话多方通话中的私人通话多方通话中的私人通话多方通话中的私人通话多方通话中的私人通话
要在多方通话中与其中一个呼叫者进行私人通话,请在屏幕上显示您想
进行对话的呼叫者号码,然后选择[选项]键和多方通话/私人以保持其
他呼叫者。
2-9 2-9 2-9 2-9 2-9 结束多方通话结束多方通话结束多方通话结束多方通话结束多方通话
可以按[结束]键与当前显示的多方通话呼叫者断开。要结束多方通话,
请按[选项]键,然后选择多方通话/结束多方通话。
选择[选项]键,然后选择多方通话/全部结束,结束全部当前和保持中
通话。
2-10 2-10 2-10 2-10 2-10 直接转移通话(直接转移通话(直接转移通话(直接转移通话(直接转移通话(ECTECTECTECTECT)))))
如果您有一个保持中通话和一个当前通话,可以将它们连接起来然后离
开通话。该功能可以通过从通话中功能表选择多方通话/转移选项实现。
附加功能附加功能附加功能附加功能附加功能
通话中功能表通话中功能表通话中功能表通话中功能表通话中功能表
69
简体中文
使用手机时,请遵循以下基本安全注意事项。使用手机时,请遵循以下基本安全注意事项。使用手机时,请遵循以下基本安全注意事项。使用手机时,请遵循以下基本安全注意事项。使用手机时,请遵循以下基本安全注意事项。
• 请勿用湿手接触充电器。
• 请勿拆卸手机。(如果需要修理,请找合格的专业技术人员帮忙。)
• 请远离电子仪器,例如:电视机、收音机或个人计算机。
• 请将手机远离热源,例如:电器或电热烹饪设备。
• 小心轻放。
• 请勿使手机受到机械振动或晃动。
• 如果使用手机套或塑料手机套可能会损坏手机外壳涂层。
• 请用干布擦拭手机外壳。(请勿使用溶解物,如:苯、稀释剂或酒
精。)
• 请勿将手机暴露在过多烟雾或灰尘的环境中。
• 勿手机放于信用或磁附近;因影磁上的信息。
• 切勿用利器敲幕;否,手机。
• 不要手机置于液或潮的境中。
• 小心使用耳机等配件。有必要,不要摸天。
保养和维护保养和维护保养和维护保养和维护保养和维护
70
简体中文
保养和维护保养和维护保养和维护保养和维护保养和维护
����� 保管电池保管电池保管电池保管电池保管电池
• 在重新充电前,不必完全放电。与其他电池不同,本电池不会因
电池的记忆功能影响其使用性能。
• 请只使用东方通信电池和充电器。东方通信充电器可以最大化电
池使用寿命。
• 请勿拆卸或使电池短路。
• 请保持金属触点和电池清洁。
• 请在电池无法满足性能要求时进行更换。电池可以充数百次电,
直到需要更换。
• 如果长时间不用电池,请重新充电,以延长使用时间。
• 请勿将电池充电器暴露在阳光下或在湿度高的地方使用,如浴
室。
• 请勿将电池放置在过热或过冷的地方,这样会影响电池性能。
71
简体中文
技术数据技术数据技术数据技术数据技术数据
常规常规常规常规常规
产品名称 : G5300
系统 : GSM 900/DCS 1800
环境温度环境温度环境温度环境温度环境温度
最高 : +55 °C
最低 : -10 °C

72
简体中文
备忘录备忘录备忘录备忘录备忘录
ENGLISH
GPRS PhoneUSER’S MANUAL
MODEL: G5300Please read this manual carefully before operating your set. Retain it for future reference.

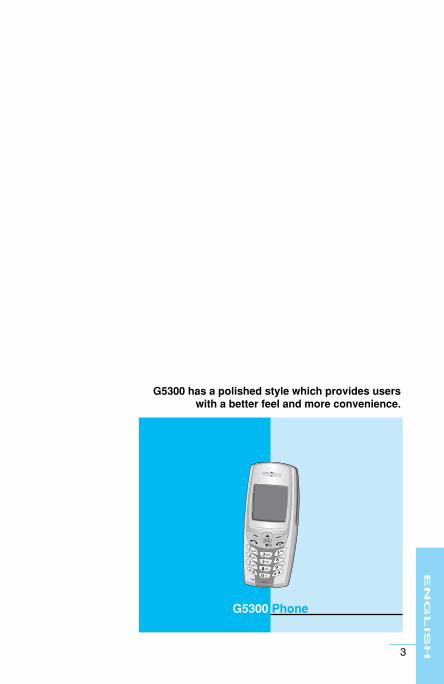
EN
GL
IS
H
3
G5300 Phone
G5300 has a polished style which provides userswith a better feel and more convenience.
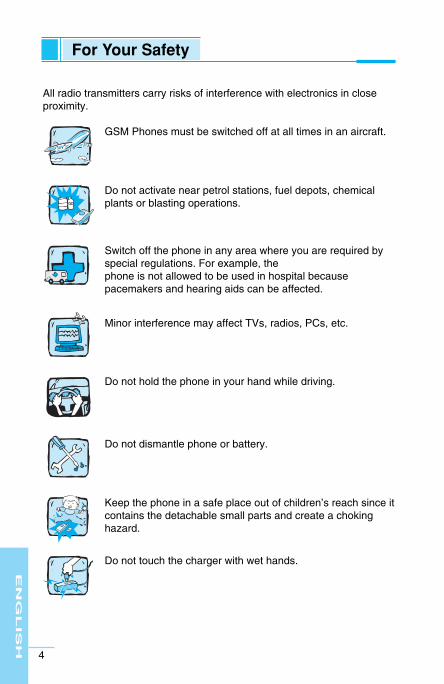
For Your Safety
EN
GL
IS
H
4
All radio transmitters carry risks of interference with electronics in closeproximity.
GSM Phones must be switched off at all times in an aircraft.
Do not activate near petrol stations, fuel depots, chemicalplants or blasting operations.
Switch off the phone in any area where you are required byspecial regulations. For example, thephone is not allowed to be used in hospital becausepacemakers and hearing aids can be affected.
Minor interference may affect TVs, radios, PCs, etc.
Do not hold the phone in your hand while driving.
Do not dismantle phone or battery.
Keep the phone in a safe place out of children’s reach since itcontains the detachable small parts and create a chokinghazard.
Do not touch the charger with wet hands.
EN
GL
IS
H
5
Please note:
Unusable batteries should be disposed of in accordance withrelevant legislation.
Only use ORIGINAL accessories to avoid damage to yourphone.
Emergency call may not be available under all cellularnetworks. Therefore, you should never depend solely on thephone for essential communications such as medicalemergencies.
Important Information
This user’s guide contains important information on the use andoperation of this phone. Please read all the information carefully foroptimal performance and to prevent any damage to or misuse of thephone. Any changes or modifications not expressly approved in thisuser’s guide could void your warranty for this equipment.
For your safety, use ONLY specified ORIGINAL batteries andchargers.
EN
GL
IS
H
6
OverviewAccessories ...................................................................................... 9
Part of the Phone .......................................................................... 10• Front of the Phone ........................................................................ 10• Rear of the Phone......................................................................... 11
Key Description .............................................................................. 12• Alphanumeric Keys ....................................................................... 13
Display InformationDisplay Information........................................................................ 14• On-Screen Icons ........................................................................... 14
Getting StartedInstallation ...................................................................................... 16• Inserting the SIM Card .................................................................. 16• Installing the Battery .................................................................... 17• Charging the Battery .................................................................... 17• Disconnecting the charger ............................................................ 18
Powering On Sequence ................................................................. 19• To get started with the phone ....................................................... 19• To turn off the phone..................................................................... 19
Access Codes................................................................................. 20• PIN code (4 to 8 digits) ................................................................ 20• PIN2 code (4 to 8 digits) .............................................................. 20• PUK code (4 to 8 digits) ............................................................... 20• PUK2 code (4 to 8 digits) ............................................................. 20• Security code (4 to 8 digits) ......................................................... 20
Accessing the MenuPhonebook ..................................................................................... 21
Menu Tree ...................................................................................... 22
Messages [Menu 1] ....................................................................... 24• Write message [Menu 1-1]............................................................ 24• Inbox [Menu 1-2] .......................................................................... 28• Outbox [Menu 1-3] ........................................................................28• Info service [Menu 1-4] ................................................................ 29
Contents
EN
GL
IS
H
7
• Voice mail [Menu 1-5] .................................................................. 30• Namecard [Menu 1-6] .................................................................. 31• Templates [Menu 1-7] .................................................................. 31• Delivery reports [Menu 1-8] .......................................................... 31• Settings [Menu 1-9] ...................................................................... 32• Memory status [Menu 1-0] ........................................................... 32
Call Register [Menu 2] ....................................................................33• Missed calls [Menu 2-1] ................................................................ 33• Received calls [Menu 2-2] ............................................................ 33• Dialled calls [Menu 2-3]................................................................. 33• All calls list [Menu 2-4] ...................................................................33• Delete recent calls [Menu 2-5] ...................................................... 33• Call charge [Menu 2-6].................................................................. 33• GPRS information [Menu 2-7]....................................................... 35
Profiles [Menu 3] ............................................................................ 36• Vibrate only [Menu 3-1]................................................................. 36• Quiet [Menu 3-2] ........................................................................... 36• General [Menu 3-3] ...................................................................... 36• Loud [Menu 3-4] ........................................................................... 36• Headset [Menu 3-5] ..................................................................... 37• Car [Menu 3-6] ............................................................................. 37
Settings [Menu 4] .......................................................................... 39• Alarm clock [Menu 4-1] ................................................................ 39• Date & time [Menu 4-2] ................................................................ 39• Phone settings [Menu 4-3] ........................................................... 40• Call settings [Menu 4-4] ............................................................... 42• Security settings [Menu 4-5] ........................................................ 44• Network settings [Menu 4-6] ........................................................ 47• Reset setting [Menu 4-7] .............................................................. 47
Call Divert [Menu 5] ....................................................................... 48• All voice calls [Menu 5-1] ............................................................. 48• If busy [Menu 5-2] ........................................................................ 48• If no reply [Menu 5-3] ................................................................... 48• If out of reach [Menu 5-4] ............................................................. 48• All data calls [Menu 5-5] ............................................................... 48• All fax calls [Menu 5-6] ................................................................. 48• Cancel all [Menu 5-7] ................................................................... 49

EN
GL
IS
H
8
Organizer [Menu 6] .........................................................................50• Scheduler [Menu 6-1] ................................................................... 50• Phone book [Menu 6-2] ................................................................ 52
Fun & Tools [Menu 7]..................................................................... 58• My folder [Menu 7-1] ..................................................................... 58• Game [Menu 7-2] .......................................................................... 58• Melody composer [Menu 7-3] ....................................................... 59• Graphic editor [Menu 7-4] ............................................................. 59• Unit converter [Menu 7-5] ............................................................ 59• Calculator [Menu 7-6].................................................................... 60• World time [Menu 7-7] .................................................................. 60
WAP services [Menu 8].................................................................. 61• Home [Menu 8-1] ......................................................................... 61• Bookmarks [Menu 8-2] ................................................................. 61• Push messages [menu 8-3] ......................................................... 61• Profiles [Menu 8-4] ...................................................................... 61• Go to URL [Menu 8-5] .................................................................. 63• Cache settings [Menu 8-6] ........................................................... 64• Security certifications [Menu 8-7] ................................................. 64• Reset profiles [Menu 8-8] ............................................................. 64
Internet On-line menu .................................................................... 65
Additional FunctionsHow to Use Data and Fax call ...................................................... 66• Sending Data or Fax Calls ........................................................... 66• Receiving Data or Fax Calls ........................................................ 66
In call Menu .................................................................................... 681. During a call ............................................................................... 682. Multiparty or Conference Calls ................................................... 70
Care and Maintenance .................................................................. 72
Technical Data ............................................................................... 73

EN
GL
IS
H
9
AccessoriesOverview
Check to make sure that you have all the parts shown below.
Handset
Travel Adapter
Portable Handsfree
User’s manualStandard Battery
Data Kit/CD
Card(s)
<Optional Accessories>
Cigar Lighter Adapter
Handsfree Kit
Neckstrap
• Information and specification in this menu is subject to changewithout prior notice.
• Accessories may be different in different regions; please checkwith our regional service company or agent for further enquiries.

EN
GL
IS
H
10
Part of the PhoneOverview
Front of the Phone
1 Earpiece2 Display Screen3 Soft Left Key4 Navigation Keys5 Send Key6 Star Key7 Soft Right Key
8 END/PWR keys9 Numeric Keys
10 Hash Key11 Microphone12 Ear Microphone
Connector13 WAP Hotkey/
Clear key
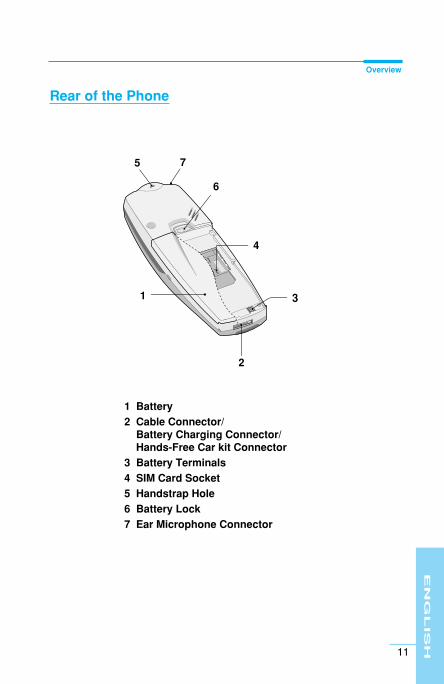
Overview
EN
GL
IS
H
11
Rear of the Phone
1 Battery
2 Cable Connector/ Battery Charging Connector/Hands-Free Car kit Connector
3 Battery Terminals
4 SIM Card Socket
5 Handstrap Hole
6 Battery Lock
7 Ear Microphone Connector
6
5 7
4
3
2
1
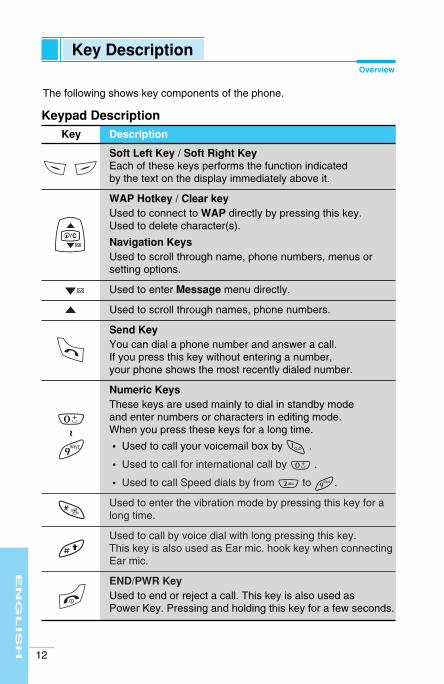
EN
GL
IS
H
12
Key DescriptionOverview
The following shows key components of the phone.
Keypad DescriptionKey Description
Soft Left Key / Soft Right KeyEach of these keys performs the function indicated by the text on the display immediately above it.
WAP Hotkey / Clear keyUsed to connect to WAP directly by pressing this key.Used to delete character(s).
Navigation KeysUsed to scroll through name, phone numbers, menus orsetting options.
Used to enter Message menu directly.
Used to scroll through names, phone numbers.
Send KeyYou can dial a phone number and answer a call. If you press this key without entering a number, your phone shows the most recently dialed number.
Numeric KeysThese keys are used mainly to dial in standby mode and enter numbers or characters in editing mode. When you press these keys for a long time.
• Used to call your voicemail box by 1 .
• Used to call for international call by 0 .
• Used to call Speed dials by from 2 to 9.
Used to enter the vibration mode by pressing this key for along time.
Used to call by voice dial with long pressing this key. This key is also used as Ear mic. hook key when connectingEar mic.
END/PWR KeyUsed to end or reject a call. This key is also used as Power Key. Pressing and holding this key for a few seconds.
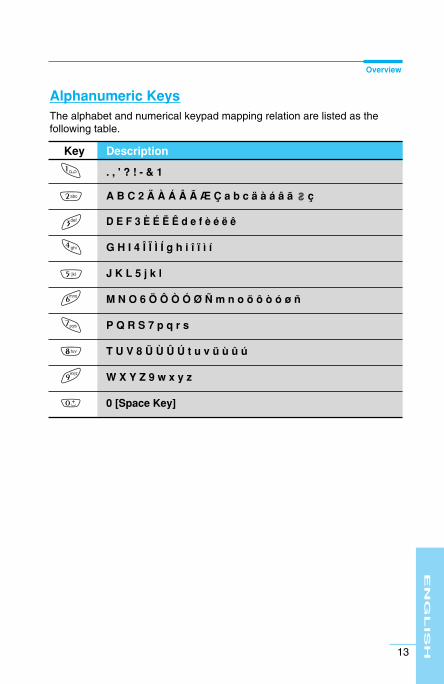
EN
GL
IS
H
13
Overview
Alphanumeric KeysThe alphabet and numerical keypad mapping relation are listed as thefollowing table.
Key Description
. , ' ? ! - & 1
A B C 2 Ä À Á Â Ã Æ Ç a b c ä à á â ã ç
D E F 3 È É Ë Ê d e f è é ë ê
G H I 4 Î Ï Ì Í g h i î ï ì í
J K L 5 j k l
M N O 6 Ö Ô Ò Ó Ø Ñ m n o ö ô ò ó ø ñ
P Q R S 7 p q r s
T U V 8 Ü Ù Û Ú t u v ü ù û ú
W X Y Z 9 w x y z
0 [Space Key]

EN
GL
IS
H
14
Display InformationDisplay Information
The screen displays several icons the following describe each of them youmay see on the phone.
On-Screen Icons
Icon/Indicator Description
Tells you the strength of the network signal.
Call is connected.
You can use GPRS service.
Shows that you are using a roaming service.
Line 1/2 is in use for outgoing calls – If you subscribe tothe Two Line Service.
The alarm has been set and is on.
Tells you the status of the battery.
You have received a text message.
You have received a voice message.
You have received an E-mail.
You can view your schedule.
All audible signals are turned off.
General menu in profile.
Loud menu in profile.
Quiet menu in profile.
Headset menu in profile.
Car menu in profile.
You can divert a call.
You can use Push message service through WAP.
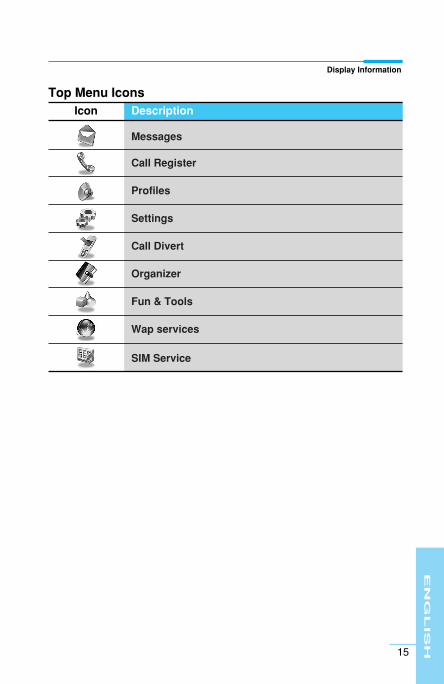
EN
GL
IS
H
15
Display Information
Icon Description
Messages
Call Register
Profiles
Settings
Call Divert
Organizer
Fun & Tools
Wap services
SIM Service
Top Menu Icons

EN
GL
IS
H
16
Installation Getting Started
Inserting the SIM CardLocate the SIM card socket in the back of the phone. Follow the steps below to install the SIM card.
1. Remove the battery if attached.
2. Slide the SIM card into the slot, under thesilvery holders, with the golden connectorsfacing down and the cut corner to theright.
3. If you need to remove the SIM card,press the upper part of SIM card with thethumb, then carefully slide it out of theSIM card slot.
Notice• Before installing always make sure that the phone is switched off
and remove the battery.
• The metal contact of the SIM card can be easily damaged byscratches. Pay special attention to the SIM card when you handleand install. Follow the instructions supplied with the SIM card.
�
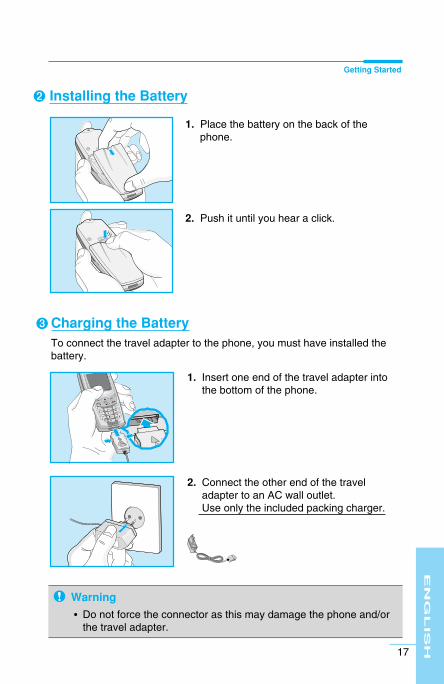
EN
GL
IS
H
17
Getting Started
�
1. Place the battery on the back of thephone.
2. Push it until you hear a click.
Installing the Battery
Charging the BatteryTo connect the travel adapter to the phone, you must have installed thebattery.
1. Insert one end of the travel adapter intothe bottom of the phone.
�
2. Connect the other end of the traveladapter to an AC wall outlet.Use only the included packing charger.
Warning
• Do not force the connector as this may damage the phone and/orthe travel adapter.

EN
GL
IS
H
18
Disconnecting the charger
Disconnect the travel adapter from the phoneby pressing its side buttons.
�
Notice• The battery delivered with your phone has to be fully charged
before using it.
• Do not remove your battery or the SIM card while charging.
• “Battery Charging” is displayed on the screen after connecting thetravel adapter. Only if the battery is totally empty, Back light is onwithout displaying “Battery Charging”.
• The moving bars of battery icon will stop after chargingcompletely.
Installation Getting Started

EN
GL
IS
H
19
Powering On SequenceGetting Started
To get started with the phone
1. Press and hold E key until you hear atone.
2. Depending on setting PIN code request,you can enter PIN code or not.
3. If your phone connects to a network, thenetwork name will be displayed shortly.
To turn off the phoneIn standby mode, press and hold E key until you hear a tone.
�
�

You can use the access codes described in this section to avoidunauthorised use of your phone. The access codes (except PUK1 andPUK2 codes) can be changed by using [Menu 4-5-6].
PIN code (4 to 8 digits)The PIN (Personal Identification Number) code protects your SIM cardagainst unauthorised use. The PIN code is usually supplied with the SIMcard. When PIN code request is set Enable, your phone will request thePIN code every time it is switched on. On the contrary, when PIN coderequest is set Disable, your phone connects to the network directlywithout the request PIN code.
PIN2 code (4 to 8 digits)The PIN2 code, supplied with some SIM cards, is required to access somefunctions such as Advice of call charge, Fixed Dial number. Thesefunctions are only available if supported by your SIM card.
PUK code (4 to 8 digits)The PUK(PIN Unblocking Key) code is required to change a blocked PINcode. The PUK code may be supplied with the SIM card. If not, contactyour local service provider for the code. If you lose the code, also contactyour service provider.
PUK2 code (4 to 8 digits)The PUK2 code, supplied with some SIM cards, is required to change ablocked PIN2 code. If you lose the code, also contact your serviceprovider.
Security code (4 to 8 digits)The security code protests the unauthorised use of your phone. It isusually supplied with the phone. This code is required to delete all phoneentries and to activate “Reset settings” menu. The default number is“0000”.
EN
GL
IS
H
20
Access Codes Getting Started

EN
GL
IS
H
21
To select a menu in phonebook, press[Names] in standby mode and then scroll to adesired item.
PhonebookAccessing the Menu
Name Description
1 Search Allows you to search for a specific name, number.
2 Add new Allows you to add new names and numbers.
3 Speed dials Allows you to assign up to 8 ( 2 - 9 ) one-touch dial allocations.
4 Voice list Allows you to list phone numbers which is attachedvoice.
5 Caller groups Allows you to show group list.
6 Copy all Allows you to copy entries from your Phonememory to SIM card or from SIM card to Phonememory.
7 Delete all Allows you to erase all the data in either yourphonebook or the SIM card to the phone memory.
8 Settings Allows you to set the memory and to search itemby Variable, name and number.
9 Information Allows you to check the status of memory, SDN(Service Dial Number), and Own number list.
Name Description
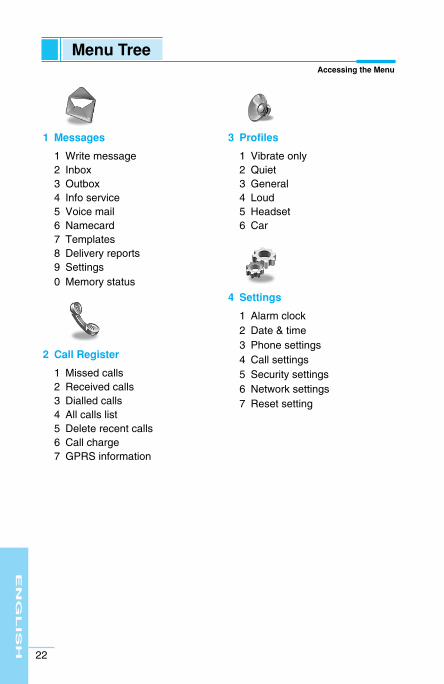
EN
GL
IS
H
22
Menu TreeAccessing the Menu
1 Messages
1 Write message2 Inbox3 Outbox4 Info service5 Voice mail6 Namecard7 Templates8 Delivery reports9 Settings0 Memory status
2 Call Register
1 Missed calls2 Received calls3 Dialled calls4 All calls list5 Delete recent calls6 Call charge7 GPRS information
3 Profiles
1 Vibrate only2 Quiet3 General4 Loud5 Headset6 Car
4 Settings
1 Alarm clock2 Date & time3 Phone settings4 Call settings5 Security settings6 Network settings7 Reset setting
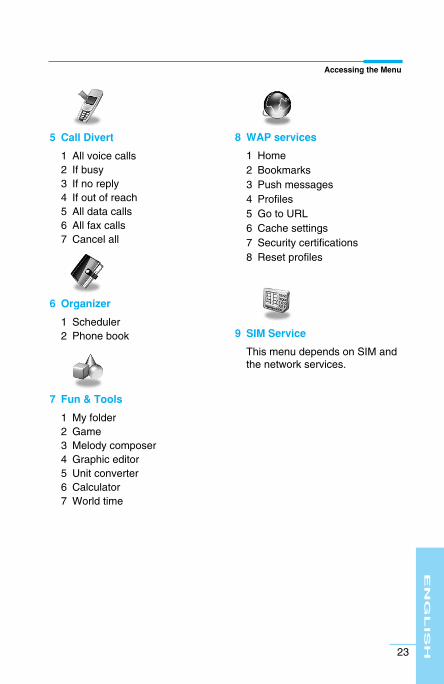
EN
GL
IS
H
23
Accessing the Menu
5 Call Divert
1 All voice calls2 If busy3 If no reply4 If out of reach5 All data calls6 All fax calls7 Cancel all
6 Organizer
1 Scheduler2 Phone book
7 Fun & Tools
1 My folder2 Game3 Melody composer4 Graphic editor5 Unit converter 6 Calculator7 World time
8 WAP services
1 Home2 Bookmarks3 Push messages4 Profiles5 Go to URL6 Cache settings7 Security certifications8 Reset profiles
9 SIM Service
This menu depends on SIM andthe network services.

This menu includes functions related to SMS (Short Message Service),voice mail, as well as the network’s service messages.
Write message [Menu 1-1]You can write and edit text message up to 918 characters. Also, you cancheck the number of characters.
1. Enter the Messages menu by pressing [Select].
2. If you want to write a new message, select Write message in themenu.
3. Input the message by using eZi text. For details, see eZi text (Page 32).
4. When you write the message, > key will be changed to attach.
5. When you finish writing your message, press [Options]. Then following option menu will be displayed.
SendSends the text message.
1. If you want to send the text message, enter the number you want.
2. Your phone asks you to enter the number that you want to send it to.
3. After sending it, your phone asks whether you will store the editedmessage.
SaveYour phone asks whether you will save the edited message.
Use templateThe template is pre-defined message. You can add the template of the listto the message when you edit it.
Use namecardThe items of the name card are a name, mobile, office, fax, and email.You can add a namecard to the message.
Messages [Menu 1]Accessing the Menu
EN
GL
IS
H
24
EN
GL
IS
H
25
Accessing the Menu
EMS functionPictures (including animations) and sounds can be inserted in sendingmessages. Press [Option] key to insert, then following menu will bedisplayed.
• Symbol
• Picture
• Animation
• Sound
Dictionary
• Add new
If you add a word you use often, you can input it by pressing a key oncefor each character.
1. Enter the menu.
2. Scroll to highlight Add new, and then press [Select].
3. Input a word, and then press [Add].
• List dictionary
You can view the list you already saved words in a dictionary.
1. Enter the menu.
2. Scroll to highlight List dictionary, and then press [Select].
3. You can check the word list.
4. If you want to delete a word, press [Delete].
5. If you want to delete all words in a list, select Delete all at the bottomof the list by pressing [Select].
Note• You can find received contents from other sender in My folder
[Menu 7-1].
EN
GL
IS
H
26
eZi-Text
The eZi text allows you to type easily and quickly. If you just press akey marked a character on the keypad, you can get a character youwant. It is useful to make a word and a sentence. If you press #key, you can change the type of language.
Also, the phone supports four modes: eZi Mode, Numeric mode,Capital mode, and Small mode. If you want to change mode, press# key.
• How to Use in eZi mode
To input a character in eZi text mode, you just press each key oncefor a character you want.
For example, to write Girl in eZi mode;
Messages [Menu 1]Accessing the Menu
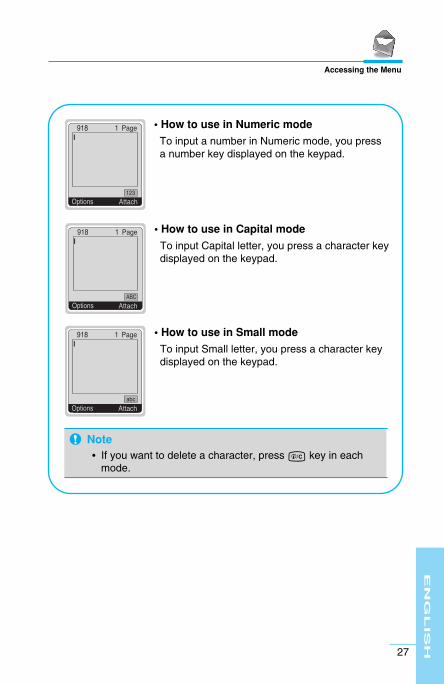
EN
GL
IS
H
27
• How to use in Numeric mode
To input a number in Numeric mode, you pressa number key displayed on the keypad.
• How to use in Capital mode
To input Capital letter, you press a character keydisplayed on the keypad.
• How to use in Small mode
To input Small letter, you press a character keydisplayed on the keypad.
Note• If you want to delete a character, press C key in each
mode.
Accessing the Menu

EN
GL
IS
H
28
Inbox [Menu 1-2]When you receive a text message, your phone shows the symbol andstores it in the incoming message lists. Scroll to the desired message byusing U , D . In addition, you can see Delete all for deleting allincoming messages at the bottom of the list. While reading the message,press [Options] to access the available options.
ReplyYou can reply to the sender by message.
ForwardYou can forward the selected message to the other party.
DeleteThe selected message is deleted.
Get numberIf the selected message has the phone number, you can extract and saveit in a phonebook. Also, you can call by this number.
Save attachmentsYou can save the attachment file such as symbol, picture, animation, andsound.
Return callYou can call back to the sender who sent the message automatically.
Outbox [Menu 1-3]When you enter this menu, you can see the outgoing call list. Scroll to thedesired message by using U , D and press < to see the message.And if you want to exit Outbox menu, press >.
In addition, you can see Delete all for deleting all outgoing messages atthe bottom of the list.
While reading message, press [Options] to access the followingsubmenus.
Messages [Menu 1]Accessing the Menu
EN
GL
IS
H
29
ForwardYou can forward the selected message to the other party.
DeleteThe selected message is deleted.
Get numberIf the selected message has the phone number, you can extract and saveit in a phonebook. Also, you can call by this number.
Info service [Menu 1-4](Dependent to network and subscription)
Cell Broadcast messages (CB Message) are text messages by thenetwork to GSM phone users. They provide general information such asweather reports, traffic news, taxis, pharmacies, and stock prices. Eachtype of information has the number; therefore, you can contact serviceprovider. When you receive CB message, you can read it followingsequence:
Read 1. When you receive CB message, it will be displayed on the screen. You
can read the message by scrolling U , D .2. After reading the message, press E to return to the standby mode. In
addition, you can save it until another message is reached.
Receive
• Yes
If you select this menu, your phone will receive the Cell Broadcastmessage.
• No
If you select this menu, your phone will not receive the Cell Broadcastmessage any more.
Accessing the Menu
EN
GL
IS
H
30
Alert
• Yes
If you select this menu, your phone will beep when Cell broadcastmessage is received.
• No
If you select this menu, your phone will not beep despite Cell broadcastmessage is received.
Languages You can select the language you want. Then your phone will receive thecell broadcast message in your chosen language.
Topics (Dependent to network and subscription)
• Add new
If you select this menu, you will add the CB message category in Phonememory with its nickname.
• View list
If you select this menu, you can see CB message category which youadded. If you press [Option], you can edit and delete CB messagecategory which you added.
• Active list
You can select the CB message category in active list by pressing[Select].
Voice mail [Menu 1-5]You can listen to your voice message(s) and get the voicemail centrenumber.
Listen to voice mail You can call voicemail centre if you want to listen to voice message.
Messages [Menu 1]Accessing the Menu
EN
GL
IS
H
31
Voice mail centre You can get the voicemail if this feature is supported by the networkservice provider. When new voicemail is arrived, the symbol will bedisplayed on the screen. Please check with your network service providerfor details of their service in order to configure the handset accordingly.
1. Press key for 1 a long time in standby mode.
2. You can check the following submenus.
• Home
The number dialed on the home network to listen to voicemail.
• Roam
The number dialed when other networks to listen to voicemail.
Namecard [Menu 1-6]It’s for editing the namecard. The items of the namecard are a name,mobile, office, fax, and email.
• Edit : You can edit a namecard.
• Delete : You can delete a namecard.
Templates [Menu 1-7]It’s for editing pre-defined messages. You can see 11 pre-definedmessages in the list. You can save 6 templates before you edit.But you can change them. The others are <empty>.
• Edit : You can edit a template.
• Reset : You can delete the template.
Delivery reports [Menu 1-8]You can read and delete delivery report messages.
Accessing the Menu
EN
GL
IS
H
32
Settings [Menu 1-9]
Message types Text, Voice, Fax, Natl. paging, X.400, E-mail, ERMES
Usually, the type of message is set to Text. You can convert your text intoalternative formats, which are suitable for the device that will be receivedthe message. Contact your service provider for the availability of thisfunction.
Validity period This network service allows you to set how long your text messages willbe stored at the message center while attempts are made to deliver themto you.
Delivery report If you set Yes in this menu, you can check whether your message is sentsuccessfully or not.
Pay for reply? When a message is sent, it allows the person to whom you sent themessage to reply and charges the cost of the reply to your telephone bill.
SMS centre If you want to send the text message, you can get the address of SMScentre through this menu.
Paper You can choose one of papers you want while writing messages.
Memory status [Menu 1-0] If you select this menu, the phone shows an used memory and totalamount of memory. The total memory is the sum of SIM and Phonememory.
Messages [Menu 1]Accessing the Menu

EN
GL
IS
H
33
Missed calls [Menu 2-1]This menu shows recently missed numbers. You can call by this number,also save and view date and time this menu as well as writing messages.
Received calls [Menu 2-2]This menu shows recently received numbers. You can call by this number,also save and view date and time, as well as writing messages.
Dialled calls [Menu 2-3]This menu shows recently dialed numbers. You can call by this number,also save and view date and time, as well as writing messages.
All calls list [Menu 2-4]You can save the phone number and check the date and time for a call.Moreover, you can call back to the other party, as well as writingmessages.
Delete recent calls [Menu 2-5]You can delete the all call records.
Call charge [Menu 2-6]Within these submenus, you can view the duration and the call cost ofyour calls.
Call duration This function allows you to view the duration of your Last Call, All Calls,Received calls and Dialled calls in hours, minutes and seconds. You canalso reset the call timers.
1. Press [Menu] in standby mode.
2. Press 2 for direct access or use U and D to enter Call register.
3. Scroll to highlight Call charge then Call duration and press [Select].
Call Register [Menu 2]Accessing the Menu

EN
GL
IS
H
34
Show call costs This function allows you to check the cost of your last call, all calls,remaining and reset the costs. To reset the cost, you need the PIN2 code.
1. Press [Menu] in standby mode.
2. Press 2 for direct access or use U and D to enter Call register.
3. Scroll to highlight Call charge then Show call costs and press [Select] to enter.The following 4 submenus : Last call, All calls, Remaining cost and
Reset all.
Settings [SIM Dependent]
• Set tariff
You can set the currency type and the unit price. Contact your servicesproviders to obtain charging unit prices. To select the currency or unit inthis menu, you need the PIN2 code.
1. Press [Menu] in standby mode.
2. Press 2 for direct access or Use U and D to enter Callregister.
3. Scroll to highlight Settings and Press [Select] to enter.
4. Select Set tariff.
• Set credit
This network service allows you to limit the costs of your calls byselected charging units. If you select Read, the number of remaining unitis shown. If you select Change, you can change your charge limit.
1. Press [Menu] in a standby mode.
2. Press 2 for direct access or use U and D to enter Callregister.
3. Scroll to highlight Settings and press [Select] to enter.
4. Select Set credit.
Call Register [Menu 2]Accessing the Menu
Note• The actual call cost may be different depending on network
features, billing, and tax.
EN
GL
IS
H
35
• Auto display
This network service allows you to see automatically cost of your lastcall. If you select Yes in Auto display menu, you can see the last costwhen the call is released.
1. Press [Menu] in standby mode.
2. Press 2 for direct access or use U and D to enter Callregister.
3. Scroll to highlight Settings and press [Select] to enter.
4. Select Auto display.
GPRS information [Menu 2-7]You can check the amount of data transferred over the network throughGPRS. In addition, you can also view how much time you are online.
Call duration You can check the duration of GPRS call. You can also reset the calltimers.
• Last call
• All calls
• Reset
Data volume You can check the data volume.
• Sent
• Received
• All
• Reset all
Accessing the Menu
Note• When all units have been used, no calls can be made except
emergency calls. Depending on SIM card, you need the PIN2code to set a call cost limit.
EN
GL
IS
H
36
Profiles [Menu 3]Accessing the Menu
In this menu, you can adjust and customize the phone tones for differentevents, environments and caller’s group.
Vibrate only [Menu 3-1]• Activate : You can adjust the profile as Vibration if you need vibration
mode.
Quiet [Menu 3-2]• Activate : You can adjust the profile as Quiet if you are in quiet
place.
• Personalise : You can change the values of Profile submenus.
General [Menu 3-3]• Activate : You can adjust the profile as General.
• Personalise : You can change the values of Profile submenus.
Loud [Menu 3-4]• Activate : You can adjust the profile as Loud if you are in a noisy
environment.
• Personalise : You can change the values of Profile submenus.
Note• When your phone is connected to the Handsfree kit, it’ll be
automatically set to the Car profiles menu and when your phoneis connected to the Earmic, it’ll be automatically set to Headsetprofiles menu then each submenu related to them will bedisplayed automatically.

EN
GL
IS
H
37
Accessing the Menu
Headset [Menu 3-5]• Activate : You can adjust the Profiles as Headset when you put on a
headset.
• Personalise : You can change the values of Profile submenus.
Car [Menu 3-6]• Activate : You can adjust the Profiles as Car when you activate
Handsfree Kit.
• Personalise : You can change the values of Profile submenus.
A Group of Profiles submenus [Menu 3-x-x]Profiles menu have the submenus as shown below.
Incoming alert type Allows to alert for the incoming call for adjusting environment.
Ring tone Allows to set the ringing tone for adjusting environment.
Ring volume Allows to set the ring volume for adjusting environment.
Message alert type Allows to alert when receiving a message for adjusting environment:Ring once, Vibrate, Silent.
Keypad volume Allows to set the keypad volume for adjusting environment.

EN
GL
IS
H
38
Auto answer Allows to set to answer automatically for adjusting environment. Pleasenote that only Car and Headset has this sub menu so that you can activatethis function.
• Off
Even though your phone is ringing, your phone will not answerautomatically.
• After 5 secs
After 5 seconds your phone will answer automatically.
• After 10 secs
After 10 seconds your phone will answer automatically.
Note• If you set the Handsfree kit to the phone, you can’t activate the
vibration related with Incoming alert or Message alert menu.Therefore, in Handsfree menu, you can view the followingsubmenus;
- Incoming alert : Ring, Silent
- Message alert : Ring Once, Silent
Profiles [Menu 3]Accessing the Menu
EN
GL
IS
H
39
Settings [Menu 4]Accessing the Menu
You can set the following menus for your convenience and preferences.
Alarm clock [Menu 4-1]You can set the phone to alarm at a specified within this menu.
OnYou can set the time (Hour and Minute) for raising the alarm.
1. Enter the menu.
2. Select On by pressing [Select], and then enter the alarm time you want.
3. Press [OK].
4. Select the repeat period: Once, Daily, Weekly, and Monthly.
5. If you set Yes in Power off alarm, the alarm signal sounds at the timeyou set even if the phone is turned off.
Off You can cancel setting the alarm time.
1. Enter the menu.
2. Select Off by pressing [Select].
3. Clear alarm message is displayed.
4. If you want to cancel, press [Yes]. If not, press [No].
Date & time [Menu 4-2]
Date
• Set date
In this menu, you can set the date of your phone.
1. Enter the menu.
2. Select Set date by pressing [Select].
3. Enter the number you want to set the date.
4. Press [OK].
EN
GL
IS
H
40
• Date format
You can set the Date format in this menu.
Time The phone has its own clock. In this menu you can set the time and selectbetween the 12-hour or 24-hour time formats.
1. Enter the menu.
2. Scroll to highlight Time by pressing [Select].
• Set time:
You can set time of your phone in this menu.
1. Select Set time by pressing [Select].
2. Enter the number you want to set the time.
3. Select the AM/PM you want to set the time format by long pressingU , D key.
4. Press [OK].
• Time format:
Your can select time format between 12-hour or 24-hour.
1. Scroll to highlight Time format by pressing [Select].
2. Select 12 hour or 24 hour you want by pressing [Select].
Phone settings [Menu 4-3]You can set the phone figures you want. Scroll to highlight Phonesettings menu, and then press [Select].
Display settings
• Screen saver
If you don’t activate any function for 20 seconds, the picture will bedisplayed in a standby mode.
Settings [Menu 4]Accessing the Menu
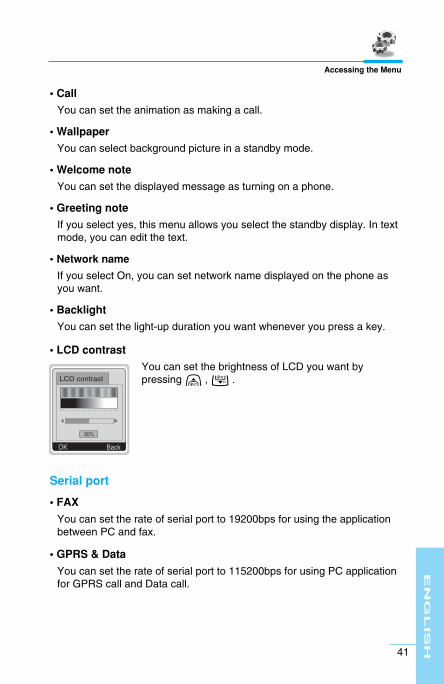
EN
GL
IS
H
41
• Call
You can set the animation as making a call.
• Wallpaper
You can select background picture in a standby mode.
• Welcome note
You can set the displayed message as turning on a phone.
• Greeting note
If you select yes, this menu allows you select the standby display. In textmode, you can edit the text.
• Network name
If you select On, you can set network name displayed on the phone asyou want.
• Backlight
You can set the light-up duration you want whenever you press a key.
• LCD contrast
You can set the brightness of LCD you want bypressing U , D .
Serial port
• FAX
You can set the rate of serial port to 19200bps for using the applicationbetween PC and fax.
• GPRS & Data
You can set the rate of serial port to 115200bps for using PC applicationfor GPRS call and Data call.
LCD contrast
Accessing the Menu

Languages You can select the language will be displayed.
Call settings [Menu 4-4]You can set the menu relevant to a call by pressing [Select] in Settingmenu.
Anykey answer
• On
If you select this menu, you can receive a call by pressing any keyexcept E key.
• Off
If you select this menu, you can receive an incoming call by onlypressing S key.
Send my number (network and subscription dependent)
• On
If you select this, you can send your phone number to the other party.That is, your phone number will be displayed on receiver’s phone.
• Off
If you select this, you can’t send your phone number.
EN
GL
IS
H
42
Note• How to use Handfree portable:
If you want to use the handsfree portable(earphone), pleasepress the button # for a long time after inserting it to theconnector when incoming a call.
Settings [Menu 4]Accessing the Menu

EN
GL
IS
H
43
Call waiting (network dependent)
If this service is Enable, you can accept a waiting (incoming) call.
• On
Activating the corresponding service.
• Off
Deactivating the corresponding service.
• View status
Checking the Status of the service.
Minute minder If you select On, you can check the call duration by beep sound everyminute during a call.
Auto redial
• On
When this function is set on, your phone will make up to 10 attempts fora call after not connecting.
• Off
Your phone will not make any attempts to connect the call after notconnecting.
Select line This function is only used if Alternate line service supported by theService Provider. Two independent phone numbers are registered for thephone. This function provides you with the selection the currently usedphone number. If this function is supported by your service provider, thefollowing menu will be displayed.
• Line 1 : Select Line 1 as the current phone number.
• Line 2 : Select Line 2 as the current phone number.
Accessing the Menu

EN
GL
IS
H
44
Security settings [Menu 4-5]
PIN code request In this menu, you can set the phone to ask for the PIN code of your SIMcard when the phone is switched on. If this function is activated, you’ll berequested to enter the PIN code.
1. Press [Menu] in standby mode.
2. Press 4 key for direct access or use U and D to enter Settings.
3. Scroll to highlight Security settings menu.
4. Select PIN code request by pressing [Select].
5. You can view the following submenus.
• On : Enable PIN code request.
• Off : Disable PIN code request.
Phone lock You can use security code to avoid unauthorized use of your phone. Whenyou switch on your phone, your phone will request security code always ifyou set phone lock to “On”. If you set phone lock to “Automatic”, yourphone will request security code only when you change your SIM card.
• On
• Off
• Automatic
Automatic key lock When you enable Automatic key lock, keypad will be lock automatically onan idle screen after 25 seconds without any key requesting.
• On
• Off
Settings [Menu 4]Accessing the Menu
EN
GL
IS
H
45
Call barring The Call barring service prevents your phone from making or receivingcertain category of calls. This function requires the call barring password.You can view the following submenus.
• All outgoing :
The barring service of all outgoing calls.
• International :
The barring service of all outgoing international calls.
• International except home :
The barring service of all international outgoing calls except homenetwork.
• All incoming :
The barring service of all incoming calls.
• Incoming when abroad :
The barring service of all incoming calls when abroad.
• Cancel all :
You can cancel all barring service.
• Change passwd :
You can change the password for Call Barring Service.
Note• If you want to lock your phone keypad manually, enter Top menu
and press * key.
• If you want to unlock your phone keypad, press < [unlock] keyand then press * key. But if you enabled Automatic key lockbefore, your phone keypad will be unlock and then after 25seconds the keypad will be lock up again automatically.
Accessing the Menu

EN
GL
IS
H
46
Fixed dial number (SIM dependent)You can restrict your outgoing calls to selected phone number. Thenumbers are protected by your PIN2 code.
1. Press [Menu] in standby mode.
2. Press 4 key for direct access or use U and D to enter Settings.
3. Scroll to highlight Security settings menu.
4. Select Fixed dial number by pressing [Select].
5. If the PIN 2 code is correct, you can view the following submenus.
• Activate : You can restrict your outgoing calls to selected phonenumber.
• Cancel : You can call without restricting phone number.
• Number list : You can view the number list saved as Fixed dialnumber.
Change codes You can change the access codes : PIN, PIN2, Security code.
1. Press [Menu] in standby mode.
2. Press 4 for direct access or use U and D to enter Settings.
3. Scroll to highlight Security settings menu.
4. Select Change codes by pressing [Select].
5. If you want to change the PIN/PIN2/Security code, input your originalcode, and then press [OK].
6. Input new PIN/PIN2/Security code, and verify them.
Settings [Menu 4]Accessing the Menu
EN
GL
IS
H
47
Network settings [Menu 4-6]You can select the network which you will be registered eitherautomatically or manually. Usually, the selection of the network used bythe handset is automatic.
Automatic The phone automatically selects network which is available in the area.
Manual The phone will find the list of available networks and show you them. Thenyou can select the network which you want to use if this network has aroaming agreement with your home network operator.
Preferred You can set a list of preferred networks the handset should attempt toregister with first, before attempting to register to any other networks. Thislist is created from the handset’s predefined list of known networks.
User define You can add entries or delete new ones from the network list. This caneven include new networks whose network codes are not known to thehandset. To do this, select and then enter the network code, country codeand network name.
Reset setting [Menu 4-7]You can set the handset to the default configuration by selecting thismenu. In addition, you need Security code to activate this function.
Accessing the Menu
EN
GL
IS
H
48
Call Divert [Menu 5]Accessing the Menu(network and subscription dependent)
The Call divert service allows to divert incoming voice calls, fax calls, anddata calls to another number. For details, contact your service provider.
All voice calls [Menu 5-1]Diverts voice calls unconditionally.
If busy [Menu 5-2]Diverts voice calls when the phone is in progress.
If no reply [Menu 5-3]Diverts voice calls which you do not answer.
If out of reach [Menu 5-4]Diverts voice calls when the phone is switched off or out of range.
All data calls [Menu 5-5]Diverts to a number with a PC connection unconditionally.
All fax calls [Menu 5-6] Diverts to a number with a fax connection unconditionally.
The submenus [Menu 5-x-x]Call Divert menus have the submenus as shown below.
Activate Activating the corresponding service.
• To other number
Inputs the number for diverting.
EN
GL
IS
H
49
Accessing the Menu(network and subscription dependent)
• To favorite number
You can check 5 diverted numbers.
• To voicemail
Forwards to message center. This function doesn’t include All data callsand All fax calls menus.
Cancel Deactivating the corresponding service.
View status Checking the Status of the corresponding service.
Cancel all [Menu 5-7]Cancels all call divert service.
Note• You can select the number you want in Favorite menu.
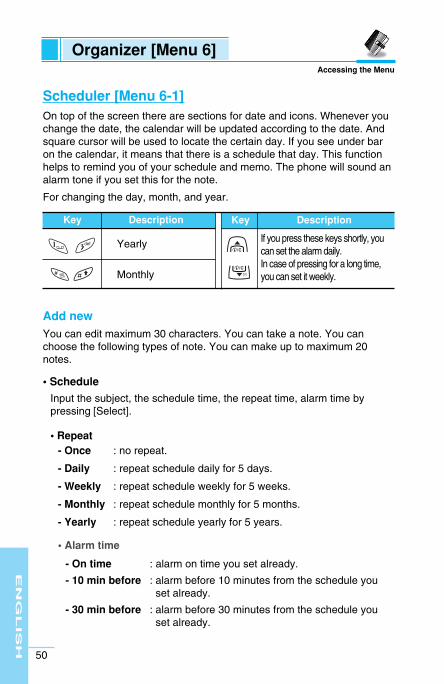
EN
GL
IS
H
50
Organizer [Menu 6]Accessing the Menu
Scheduler [Menu 6-1] On top of the screen there are sections for date and icons. Whenever youchange the date, the calendar will be updated according to the date. Andsquare cursor will be used to locate the certain day. If you see under baron the calendar, it means that there is a schedule that day. This functionhelps to remind you of your schedule and memo. The phone will sound analarm tone if you set this for the note.
For changing the day, month, and year.
Add new You can edit maximum 30 characters. You can take a note. You canchoose the following types of note. You can make up to maximum 20notes.
• Schedule
Input the subject, the schedule time, the repeat time, alarm time bypressing [Select].
• Repeat - Once : no repeat.
- Daily : repeat schedule daily for 5 days.
- Weekly : repeat schedule weekly for 5 weeks.
- Monthly : repeat schedule monthly for 5 months.
- Yearly : repeat schedule yearly for 5 years.
• Alarm time
- On time : alarm on time you set already.
- 10 min before : alarm before 10 minutes from the schedule youset already.
- 30 min before : alarm before 30 minutes from the schedule youset already.
Key Description Key Description
Yearly
Monthly
If you press these keys shortly, youcan set the alarm daily. In case of pressing for a long time,you can set it weekly.
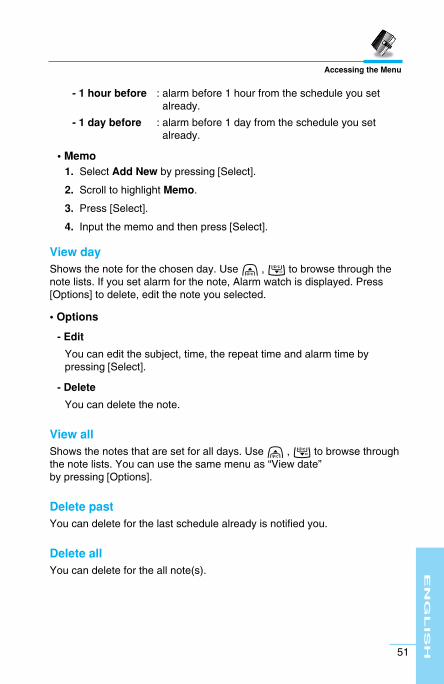
EN
GL
IS
H
51
Accessing the Menu
- 1 hour before : alarm before 1 hour from the schedule you setalready.
- 1 day before : alarm before 1 day from the schedule you setalready.
• Memo 1. Select Add New by pressing [Select].
2. Scroll to highlight Memo.
3. Press [Select].
4. Input the memo and then press [Select].
View day Shows the note for the chosen day. Use U , D to browse through thenote lists. If you set alarm for the note, Alarm watch is displayed. Press[Options] to delete, edit the note you selected.
• Options
- Edit
You can edit the subject, time, the repeat time and alarm time bypressing [Select].
- Delete
You can delete the note.
View all Shows the notes that are set for all days. Use U , D to browse throughthe note lists. You can use the same menu as “View date” by pressing [Options].
Delete past You can delete for the last schedule already is notified you.
Delete all You can delete for the all note(s).

EN
GL
IS
H
52
Phone book [Menu 6-2]
Search (Calling from phonebook)
1. Open the phonebook first by pressing [Names] in a standby mode.
2. Search by Pressing [Select] to enter.
3. Depending on setting Search by, the below menu may not appear.
• Name
• Number
4. You can find an entry by name and number.
5. Select [Search].
6. You can check the names and numbers by pressing [List].
7. If you want to edit, delete, copy an entry, or to add the voice to one,select [Options]. The below menu will be displayed.
• Edit : You can edit the name, number, E-mail, and fax bypressing [OK].
• Delete : You can delete an entry.
• Write message : You can write message.
• Copy : You can copy an entry from SIM to phone or fromphone to SIM.
• Call : You can call thru the chosen entry.
• Voice : You can add the voice to the entry or change thevoice tag.
• Main number : You can select the one out of mobile, home, officethat you often use. The main number will be displayedfirst, if you set this.
Add new You can add phonebook entry by using this function. Phone memory capacity is 200 entries. SIM card memory capacitydepends on the service provider. You can also save 20 characters of name in the Phone memory, and youcan save characters in the SIM card. The number of character is SIMdependent feature.
Organizer [Menu 6]Accessing the Menu
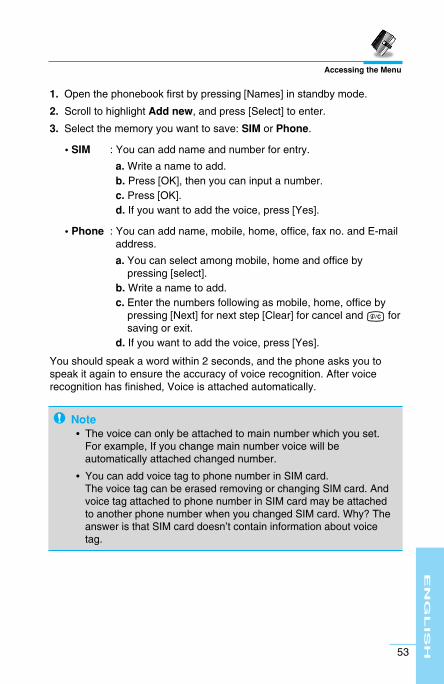
EN
GL
IS
H
53
1. Open the phonebook first by pressing [Names] in standby mode.
2. Scroll to highlight Add new, and press [Select] to enter.
3. Select the memory you want to save: SIM or Phone.
• SIM : You can add name and number for entry.
a. Write a name to add.b. Press [OK], then you can input a number.c. Press [OK].d. If you want to add the voice, press [Yes].
• Phone : You can add name, mobile, home, office, fax no. and E-mailaddress.
a. You can select among mobile, home and office bypressing [select].
b. Write a name to add.c. Enter the numbers following as mobile, home, office by
pressing [Next] for next step [Clear] for cancel and C forsaving or exit.
d. If you want to add the voice, press [Yes].
You should speak a word within 2 seconds, and the phone asks you tospeak it again to ensure the accuracy of voice recognition. After voicerecognition has finished, Voice is attached automatically.
Accessing the Menu
Note• The voice can only be attached to main number which you set.
For example, If you change main number voice will beautomatically attached changed number.
• You can add voice tag to phone number in SIM card. The voice tag can be erased removing or changing SIM card. Andvoice tag attached to phone number in SIM card may be attachedto another phone number when you changed SIM card. Why? Theanswer is that SIM card doesn’t contain information about voicetag.

EN
GL
IS
H
54
Speed dials You can associate any of the keys 2 to 9 with a Name list entry. You can call directly by pressing this key for 2-3 seconds.
1. Open the phonebook first by pressing [Names] in a standby mode.
2. Scroll to Speed dials, then press [Select] to enter this menu.
3. Every Speed dials will be displayed.
4. If you want to add Speed dials, select <Empty>. Then, you can searchthe name in phonebook.
5. If you select allocated name by Speed dials, you can view following thesubmenus.
• Change : You can change the allocation of Speed dials number.
• Cancel : You can cancel the allocated Speed dials number.
Voice list You can see all phone numbers which contain voice. You can also calldirectly by pressing [Send]. After selecting phone number by using Uand D press [Options], you can see following the submenus.
• Play : You can play voice which is attached to phone number.
• Change : You can change voice which is attached to phone number.
• Delete : You can delete voice which is attached to phone number.
• Call : You can call by selecting this menu.
Caller groups You can list up to 20 members per one group. There are 7 groups you canmake lists to.
1. Press [Names] to enter into the phonebook in standby mode.
2. Scroll to Caller groups item then press [Select] to enter this menu.
3. Every Group list will be displayed.: Family, Friend, Colleague, VIP,Group1, Group2 and Others.
4. Select Group name that you want to manage by pressing [Select].
5. Then submenus below will be displayed.
• View member
- You can view the number list in Caller groups.
Organizer [Menu 6]Accessing the Menu
EN
GL
IS
H
55
- You can select the member you want by pressing [Options] thenyou can enable the submenu such as Edit, Delete, Writemessage, Copy, Voice and Main number.
• Group ring tone
You can set the ring tone depending on Group.
• Group animation
You can set the animation for each group.
• Add member
You can add the member in Caller groups.
1. Scroll to highlight Add member, and then press [Select] to enter.
2. The group member souldn’t be exceeded 20. Otherwise, the errormessage will be displayed.
3. Press [OK] to add member.
• Delete member
You can delete the member already saved in phonebook.
• Rename
You can change group name.
Copy all You can copy/move entries from SIM card memory to Phone memory orfrom Phone memory to SIM card memory.
1. Open the phonebook first by pressing [Names] in standby mode.
2. Scroll to Copy all, then press [Select] to enter this menu.
3. Then submenus below will be displayed.
• SIM to Phone : You can copy the entry from SIM Card to Phonememory.
• Phone to SIM : You can copy the entry from Phone memory to SIMCard.
Accessing the Menu

EN
GL
IS
H
56
Delete all You can delete all entries in SIM, Phone, and Voice. This functionrequires Security code.
1. Press [Names] to enter into the phonebook in standby mode.
2. Scroll to Delete all, then press [Select].
3. Then select a memory to erase: SIM, Phone, Voice.
4. And then you will be requested to enter Security code.
5. Press [OK] or, press [Back] to cancel.
Settings You can set preferred memory which includes Variable, SIM or Phoneand preferred search which includes Variable, Name and Number.
1. Open the phonebook first by pressing [Names] in a standby mode.
2. Scroll to Settings, then Press [Select] to enter.
3. Then submenus below will be displayed.• Set memory
1. Scroll to highlight Set memory, then press [Select] to enter.
2. The three submenus are displayed.
- Variable : If you select Variable, the phone asks you where tostore whenever you add entries in Phonebook.
- SIM : If you select SIM, the phone stores entries to SIMdirectly without asking you where to store.
- Phone : If you select Phone, the phone stores entries toPhone directly without asking you where to store.
• Search by
1. Scroll to highlight Search by,then press [Select] to enter.
2. The three submenus are displayed.
- Variable : If you select Variable, the phone asks you how tosearch the entries.
- Name : If you select Name, the phone searches entries byname.
- Number : If you select Number, the phone searches entries bynumber.
Organizer [Menu 6]Accessing the Menu
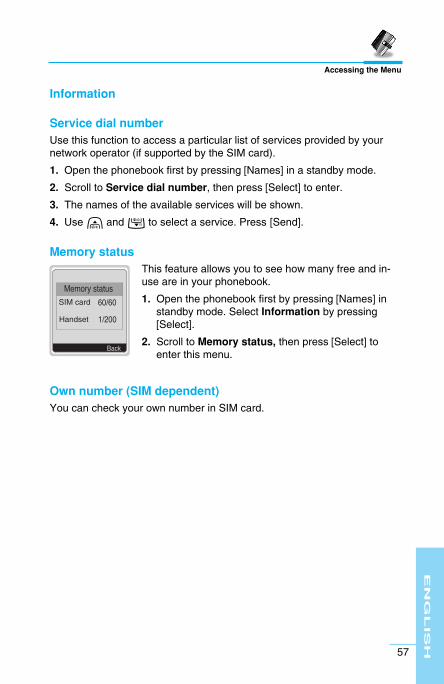
EN
GL
IS
H
57
Information
Service dial numberUse this function to access a particular list of services provided by yournetwork operator (if supported by the SIM card).
1. Open the phonebook first by pressing [Names] in a standby mode.
2. Scroll to Service dial number, then press [Select] to enter.
3. The names of the available services will be shown.
4. Use U and D to select a service. Press [Send].
Memory status This feature allows you to see how many free and in-use are in your phonebook.
1. Open the phonebook first by pressing [Names] instandby mode. Select Information by pressing[Select].
2. Scroll to Memory status, then press [Select] toenter this menu.
Own number (SIM dependent)You can check your own number in SIM card.
Accessing the Menu
Fun & Tools [Menu 7]Accessing the Menu
EN
GL
IS
H
58
My folder [Menu 7-1]All the contents downloaded through M-service or EMS such asimages,ringtones and etc, are available in the My folder menu.
In this menu you can check the contents, edit their name and, eventually,set them as wallpapers or ringtones.
Downloaded polyphonic ringtones must be activated in this menu in orderto make them available in the audio profiles ringtones list. You can activate just one downloaded ringtone at once.
Game [Menu 7-2]The phone offers you enjoyable games to play with.
Note
You can edit EMS sounds and images respectively in the Melodycomposer [Menu 7-3] and Graphic editor [Menu 7-4]. You can alsoattach this objects in an EMS message as described in the WriteSMS chapter [Menu 1-1].
Note
The Control keys are different for each game. But each game hasscreens to explain the main control key (see key info.). Othercommon control keys are below.
[Common Key Function]
• < [Soft 1 Key] : Start game, and Ok key
• C [CLR] : Pause
• > [Soft 2 Key] : Back
• E [END] : Exit
• 0 ~ 9 : Stage and level control.
• U , D [Up,down key] : Volume control
• * [Star key] : Navigation to the left
• # [Sharp key] : Navigation to the right
EN
GL
IS
H
59
Melody composer [Menu 7-3]You can compose ringing sounds as you want.
When you enter this function, the tone that you created previously isdisplayed. To enter a new or edit an existing tone:
1. Enter the desired notes. ( 1 ~ 7 : CDEFGAB)
2. To adjust the characters of the note, do as follows:
• Duration : 8 shortens and 9 lengthens the duration of thenote or rest.
• Rest : 0 inserts a rest of the same duration as the previous note.
• Octave : * sets the octave for new notes.
• Sharp note : # makes the note sharp.
• Clear : C deletes each note.
e.g) 28# fi 8#d1
Graphic editor [Menu 7-4]You can edit picture or graphic from an existing image file as you want.
1. To edit, choose the desired picture.
2. To adjust the picture, do as follows :
• Mode change :
Toggle between play mode and move mode.
• Drawing and Erasing :
Toggle between drawing and erasing.
3. For help, press 0 for a long time.
Accessing the Menu
Note
In edit mode, default is set in move mode and drawing.
With a * , you can move fast between pixels.

EN
GL
IS
H
60
Unit converter [Menu 7-5]This converts any measurement into a unit you want.There are 4 types that can be converted into units:Length, Area, Weight, and Volume.
1. You can select one of four unit types by pressing[Next] key.
2. Select the unit you want to convert by pressing Uand D .
3. You can toggle between Current and Convert by long pressingU and D .
4. You can input the prime number after the decimal place by pressing#.
5. You can delete the number you want by pressing C.
6. Press E key or [Back] key if you want to end the process forconverting the value.
Calculator [Menu 7-6]This contains the standard functions such as +, –, *, ÷ : Add, Subtract,Multiply, Divide.
1. Input the numbers by pressing numeric keys.
2. Press U key once for Add and long press for Multiply. Press D keyonce for Subtract and long press for divide.
3. Press * key to input Prime number and # key to input Negativenumber.
4. You can view the result by pressing [Result] key.
5. If you want to continue the calculation, repeat the process.
6. You can delete the number or sign you want by pressing C .
7. Press E key if you want to end the calculation process.
World time [Menu 7-7]You can view the time for each city around the world.
when you press U , D shortly, you can view the city belonged to thedifferent time zone and when you press U , D long, you can view theall of city on the same time zone.
If you want to select the country you want, press [set] key.
Fun & Tools [Menu 7]Accessing the Menu
Length
EN
GL
IS
H
61
Your phone supports services based on Wireless Application Protocol(WAP). You can access services supported by your network. The servicesmenu allows you to get the information such as news, weather reports,and flight times.
Home [Menu 8-1]You can connect to the configured homepage of the activated profile.
Bookmarks [Menu 8-2]When you enter this menu, you can see the bookmarks. Then press< button to access available option, or press > to exit it.
• Connect : Connect to selected bookmark.
• Add new : Add a new bookmark manually.
• Edit : Edit the title and the address of the selected bookmark.
• Delete : Delete the selected bookmark from the bookmark list.
Push messages [menu 8-3]You can receive messages related with WAP which is included URL. Soyou can connect to indicated URL directly.
Inbox You can read or delete the push messages.
Setting You can set push the messages.
Profiles [Menu 8-4]You can make up to 5 profiles and activate only one of them. Scroll to thedesired profile and press < to access available options.
• Activate
You can activate the selected profile.
• Settings
You can edit and change WAP settings of the selected profile.
WAP services [Menu 8]Accessing the Menu
EN
GL
IS
H
62
- Homepage
This setting allows you to enter the address (URL) of the site you wantto use as homepage. You do not need to type “http://” in front of eachURL as the WAP Browser will automatically add it.
- Display image
You can select whether images on WAP cards are displayed or not.
- Conn. type
The options for connection type are Continuous or Temporary anddepend on the gateway.
Temporary
A non-confirmed (connectionless) service.
Continuous
A confirmed delivery mechanism but generates more network traffic.
- Conn. security
The options are On and Off depend on the gateway you are using.
- Gateway information
Most of WAP gateways do not require a User ID and Password. If your gateway need them to connect to it, then your network shouldprovide them, and you must set them up correctly before trying tobrowse a WAP site.
- Bearer
Data
GPRS
- Data settings
These values of setting are provided by yours network.
IP address : Enter the IP address of the WAP gateway you areusing to access.
Dial number : Enter the telephone number to dial to access your WAPgateway.
Call type : Select the type of data call.: Analogue or ISDN (Digital).
WAP services [Menu 8]Accessing the Menu

EN
GL
IS
H
63
Call speed : The speed of your data connection.
User ID : The user identity for your dial-up server (and NOT theWAP gateway).
Password : The password required by your dial-up server (andNOT the WAP gateway) to identify you.
- GPRS settings
The service settings are only available when GPRS is chosen as abearer service.
- Linger timer
You can input timeout periods between 30sec, and 300sec. if any datawasn’t input or transferred, the service will be unavailable.
• Rename
Edit the Profile Name.
• E-mail server
Save the URL of the E-mail server that you frequently use.
- Connect
Connect to the E-mail server that you configured.
- Edit address
Edit the URL of the E-mail server.
Go to URL [Menu 8-5]You can directly connect to the site that you want. You need to enter thespecific URL that you want to directly connect.
Accessing the Menu
EN
GL
IS
H
64
Cache settings [Menu 8-6]You can remove the contents of Cache memory and change the Cachecheck mode.
Clear cache The contents of Cache memory will be removed.
Check cache You can change the time for checking the Cache memory.
• Always The cache is always checked whenever URL is loaded or navigated.
• Start only The cache is only checked when the WAP is started.
• Off The cache is never checked.
Security certifications [Menu 8-7]A list of the available certificates is shown.
Reset profiles [Menu 8-8]You can reset all the current settings of profiles to the factory default.
WAP services [Menu 8]Accessing the Menu

EN
GL
IS
H
65
If you are on line, you can see the following menus.
❏ Home
This is the same as [Menu 8-1].
❏ Reload
This reloads the current page.
❏ Bookmarks
This is the same as [Menu 8-2].
❏ Save as bookmarks
Save the current URL as a bookmark. You can also edit the bookmarktitle.
❏ Go to URL
Same as [Menu 8-5].
❏ Go to e-mail server
Connect to the E-mail server that you configured.
❏ Set as e-mail server
Save the current URL as an E-mail server.
❏ Save image
Save the browsed image.
Internet On-line menuAccessing the Menu
EN
GL
IS
H
66
To be able to data or fax service, you need the communicate softwaresuch as a data or a fax program. Before using these functions, you needto connect your phone to a computer or make sure that your phone is inconnection with a compatible device.
Sending Data or Fax Calls1. Connect your computer to the phone.
2. After starting the communicate software, make a call and transmit adata or fax.
3. After the data or fax transmission, you can end the call by just ending ofthe communicate software, pressing [End].
Receiving Data or Fax CallsIf you have separate numbers for voice, data and fax calls, your phonerecognizes the type of call.
Receiving Data or Fax Calls– Separate numbers (Multi-numbers)To use a data or a fax service, the display shows which type of call youare receiving.
To receive a data or fax call.
1. Connect your computer to the phone.
2. After starting the communicate software, accept a call and receive adata or fax (if it is not answered automatically).
3. After the data or fax reception, you can end the call by just ending ofthe communicate software, pressing [End].
How to Use Data and Fax callAdditional Functions
EN
GL
IS
H
67
Receiving Data or Fax Calls– Single numberIf you have a SIM card that does not support separate voice, data and faxnumbers, the phone does not recognize the type of incoming call.
To use a data or a fax service, make sure that you want to receive a dataor fax call mode. You first have to set the phone to one of these options inthe call mode (Settings ➝ Call Setting ➝ Next Incoming) sub menu.
To receive a data or fax call.
1. Press [Menu] in standby mode.
2. Select the call type you want (Voice, Data or Fax) and press [Select].
3. Connect your computer to the phone.
4. After starting the communicate software, accept a call and receive adata or fax (if it is not answered automatically).
5. After the data or fax reception, you can end the call by just ending ofthe communicate software, pressing [End].
Once you have set your phone for a specific incoming call, it remains setuntil you change it.
Additional Functions
PC SyncPC Sync is a program for data exchange PC & Phone by data cable.Therefore, if you want to use this function, you have to buyaccessory kit. About more detail for using guide refers to PC SyncHelp file on the PC Sync CD.

EN
GL
IS
H
68
During a call, the following menus will be displayed, not in a standbymode.
1 During a call
1-1 Putting a Call on HoldYou can place a call on hold or retrieve by just pressing the [Send] key.When a call is made or answered, press the [Send] key to place it on hold.When a call is held, press the [Send] key to make it active.
1-2 Making a Second CallYou can get a dial number from phonebook to make a second call. Press [Names] key then select Search. To save the dial number intophonebook during call, press [Names] key then select Add new.
1-3 Swapping Between Two CallsTo switch between two calls, select the [Options] key, then select Swap orjust press [Send] key.
You can make one of two calls focused by pressing up/down arrow key. Ifyou want to end one of two calls, make the call you want to end focused,then press [End] key when the call you want to end is focused.
1-4 Answering an Incoming CallTo answer an incoming call, simply press the [Send] key.
The handset is also able to warn you of an incoming call while you arealready in a call. A tone sounds in the earpiece, and the display will showthat a second call is waiting.
If Call Waiting is on, you can put the first call on hold and answer thesecond, by pressing [Send] or by selecting the [Answer] key.
You can end the current call and answer the waiting call by selecting the[Menu] key, then End & Answer.
In call Menu Additional Functions
EN
GL
IS
H
69
1-5 Rejecting an Incoming CallYou can reject an incoming call without answering by simply pressing the[End] key.
When in a call you can reject an incoming call (1st call) by pressing the[Menu] key and selecting Multiparty/End and Answer or by pressing[End] key.
1-6 Controlling the volume during a callYou can control the volume during a call by pressing [Options] key andselecting Volume followed by U or D .
1-7 Muting the MicrophoneYou can mute the microphone during a call by pressing the [Options] keythen selecting Mute. The handset can be unmuted by pressing the[Unmute].
When the handset is muted, the caller cannot hear you, but you can stillhear them.
1-8 Switching DTMF Tones on During a CallTo turn DTMF tones on during a call, for example, to allow your handset tomake use of an automated switchboard, select the [Options] key, thenDTMF On. DTMF tones can be turned off the same way.
1-9 Calling up the messages or SIM Tool KitThe Messages and SIM Tool kit main menu options can be reached fromthe in-call menu by selecting the [Options] key, then Messages or SIMTool Kit (Screen name depends on the network operator’s SIM). SIM Toolkit menu is shown only when SIM in the handset supports SIM Tool kitservice.
Additional Functions

EN
GL
IS
H
70
2 Multiparty or Conference CallsThe multiparty or conference service provides you with the ability to havea simultaneous conversation with more than one caller, if your networkservice provider supports this feature.
A multiparty call can only be set up when you have one active call and onecall on hold, both calls having been answered. Once a multiparty call is setup, calls may be added, disconnected or separated (that is, removed fromthe multiparty call but still connected to you) by the person who set up themultiparty call. These options are all available from the in-call menu andare listed in Section.
The maximum callers in a multiparty call is five. Once started, you are incontrol of the multiparty call, and only you can add calls to the multipartycall.
2-1 Making a Second CallYou can make a second call while you are already in a call. To do this,enter the second number and press [Send]. When you get second call thefirst call is automatically put on hold. You can swap between calls byselecting the [Options] key then Swap.
2-2 Setting up a Multiparty CallYou can connect a call on hold to the currently active call to form amultiparty call by selecting the [Options] key then Multiparty/Join all.
2-3 Putting the Multiparty Call on HoldTo put a multiparty call on hold, select the [Options] key thenMultiparty/Hold all.
2-4 De-activate the Multiparty Call on HoldTo de-activate a multiparty call on hold, select the [Options] key thenMultiparty/Join all.
2-5 Adding Calls to the Multiparty CallTo join an active call to the held multiparty call, select the [Options] keythen Multiparty/Join all.
In call Menu Additional Functions
EN
GL
IS
H
71
2-6 Displaying Callers in a Multiparty CallTo scroll through the numbers of the callers who make up a multiparty callon the handset screen, press U and D keys.
2-7 Putting a Member of a Multiparty Call on HoldTo place one selected caller (whose number is currently displayed on-screen) of a multiparty call on hold, select the [Options] key thenMultiparty/Exclude.
2-8 A Private Call in a Multiparty CallTo have a private call with one caller of a multiparty call, display thenumber of the caller you wish to talk to on the screen, then select the[Options] key and Multiparty/Private to put all the other callers on hold.
2-9 Ending a Multiparty CallThe currently displayed caller of a multiparty call can be disconnected bypressing the [End] key. To end a multiparty call, press the [Options] keythen select Multiparty/End multiparty.
Selecting the [Options] key then Multiparty/End all, will end all the activeand held calls.
2-10 Explicit Call Transfer (ECT)If you have one caller on hold and another active call, you may connectone call party to another call party and then leave the call. This is done byselecting the Multiparty/Transfer option from the in-call menu.
Additional Functions
EN
GL
IS
H
72
When using this unit, basic safety precautions as below should bealways followed.
• Do not touch the adapter with wet hands.• Do not disassemble this unit. (Take it to a qualified service technician
when repair work is required.).• Away from electrical appliance such as a TV, radio or personal
computer.• The unit should be situated from heat sources such as radiators or
cookers.• Do not drop.• Do not subject this unit to mechanical vibration or shock.• The coating of the phone may be damaged if covered with wrap or vinyl
wrapper.• Use dry cloth to clean the exterior of the unit. (Do not use solvent such
as benzene, thinner or alcohol.)• Do not subject this unit to excessive smoke or dust.• Do not keep the phone next to credit cards or transport tickets; it can be
affected the information on the magnetic strips.• Do not tap the screen with a sharp object; otherwise, it may damage the
phone.• Do not expose the phone to liquid or moisture. • Use the accessories like an earphone cautiously. Do not touch the
antenna unnecessarily.
� Caring for the Battery• You do not need to completely discharge the battery before
recharging. Unlike other battery systems, there is no memory effectthat could compromise the battery’s performance.
• Use only LG batteries and chargers. LG chargers are designed tomaximize the battery life.
• Do not disassemble or short-circuit the battery pack.• Keep the metal contacts of the battery pack clean.• Replace the battery when it no longer provides acceptable
performance. The battery pack may be recharged hundreds of timesuntil it needs replacing.
• Recharge the battery if it has not been used for a long time tomaximize usability.
• Do not expose the battery charger to direct sunlight or use it in highhumidity, such as the bathroom.
• Do not leave the battery in hot or cold places, this may deterioratethe battery performance.
Care and Maintenance

EN
GL
IS
H
73
GeneralProduct Name : G5300
System : GSM 900/DCS 1800
Ambient TemperaturesMax : +55°C
Min : -10°C
Technical Data

EN
GL
IS
H
74