buku petunjuk pengguna - download.p4c.philips.com · 7 wadah jus dengan cerat (fungsi anti-tetes) 8...
TRANSCRIPT
3. Lepaskan corong beri (untuk tipe tertentu saja) dan pendorong dari tabung pengisi, lepaskan tutupnya (Gbr. 29), filter (Gbr. 30) dan pengumpul jus (Gbr. 31).
4. Kosongkan wadah ampas (Gbr. 32).5. Bersihkan semua komponen yang dapat dilepas dengan air panas
dan sedikit cairan pembersih atau dalam mesin cuci piring (Gbr. 33) dan bersihkan unit motor dengan kain lembap (Gbr. 34).
Jangan sekali-kali merendam unit motor di dalam air atau membilasnya di bawah keran.
PenyimpananGulung kabel listrik mengelilingi alat di bagian bawah unit motor.
Memesan aksesoriUntuk membeli aksesori atau suku cadang, kunjungi www.shop.philips.com/service atau pergi ke dealer Philips Anda. Anda juga dapat menghubungi Pusat Layanan Konsumen Philips di negara Anda (lihat pamflet garansi internasional untuk rincian kontak).
Mendaur ulangJangan membuang alat bersama limbah rumah tangga biasa jika alat sudah tidak bisa dipakai lagi, tetapi serahkan ke titik pengumpulan atau daur ulang resmi. Dengan melakukan hal ini, Anda ikut membantu melestarikan lingkungan.Patuhi peraturan mengenai pengumpulan terpisah produk-produk elektrik dan elektronik di negara Anda . Pembuangan produk secara benar akan membantu mencegah dampak negatif terhadap lingkungan dan kesehatan manusia.
Garansi dan dukunganJika Anda membutuhkan informasi atau dukungan, harap kunjungi www.philips.com/support atau bacalah pamflet garansi internasional.
PengejusModel: HR1855Daya: 500-700WTegangan: 220-240V, 50-60HzNegara Pembuat: CinaDiimpor oleh:
PT Philips Indonesia CommercialJl. Buncit Raya Kav. 99Jakarta 12510 Indonesia
Reg. No.: I.27.PIC2.00716.0517
PengejusModel: HR1863Daya: 500-700WTegangan: 220-240V, 50-60HzNegara Pembuat: CinaDiimpor oleh:
PT Philips Indonesia CommercialJl. Buncit Raya Kav. 99Jakarta 12510 Indonesia
Reg. No.: I.27.PIC1.00818.0517 3000 019 70941 B
User manualBuku Petunjuk Pengguna
2 3 4
5 6 7
8 9
1
2
4
6
7
8
10
11
12
13
14
5
9
3
1
1210 11
13 14 15 120°
16 17
19
18
20 21 120°
400-700ml
2322 24
2532
26 27 28
29 30 31
33 34
HR185XHR186X
ENGLISH
IntroductionCongratulations on your purchase and welcome to Philips! To fully benefit from the support that Philips offers, register your product at www.philips.com/welcome.
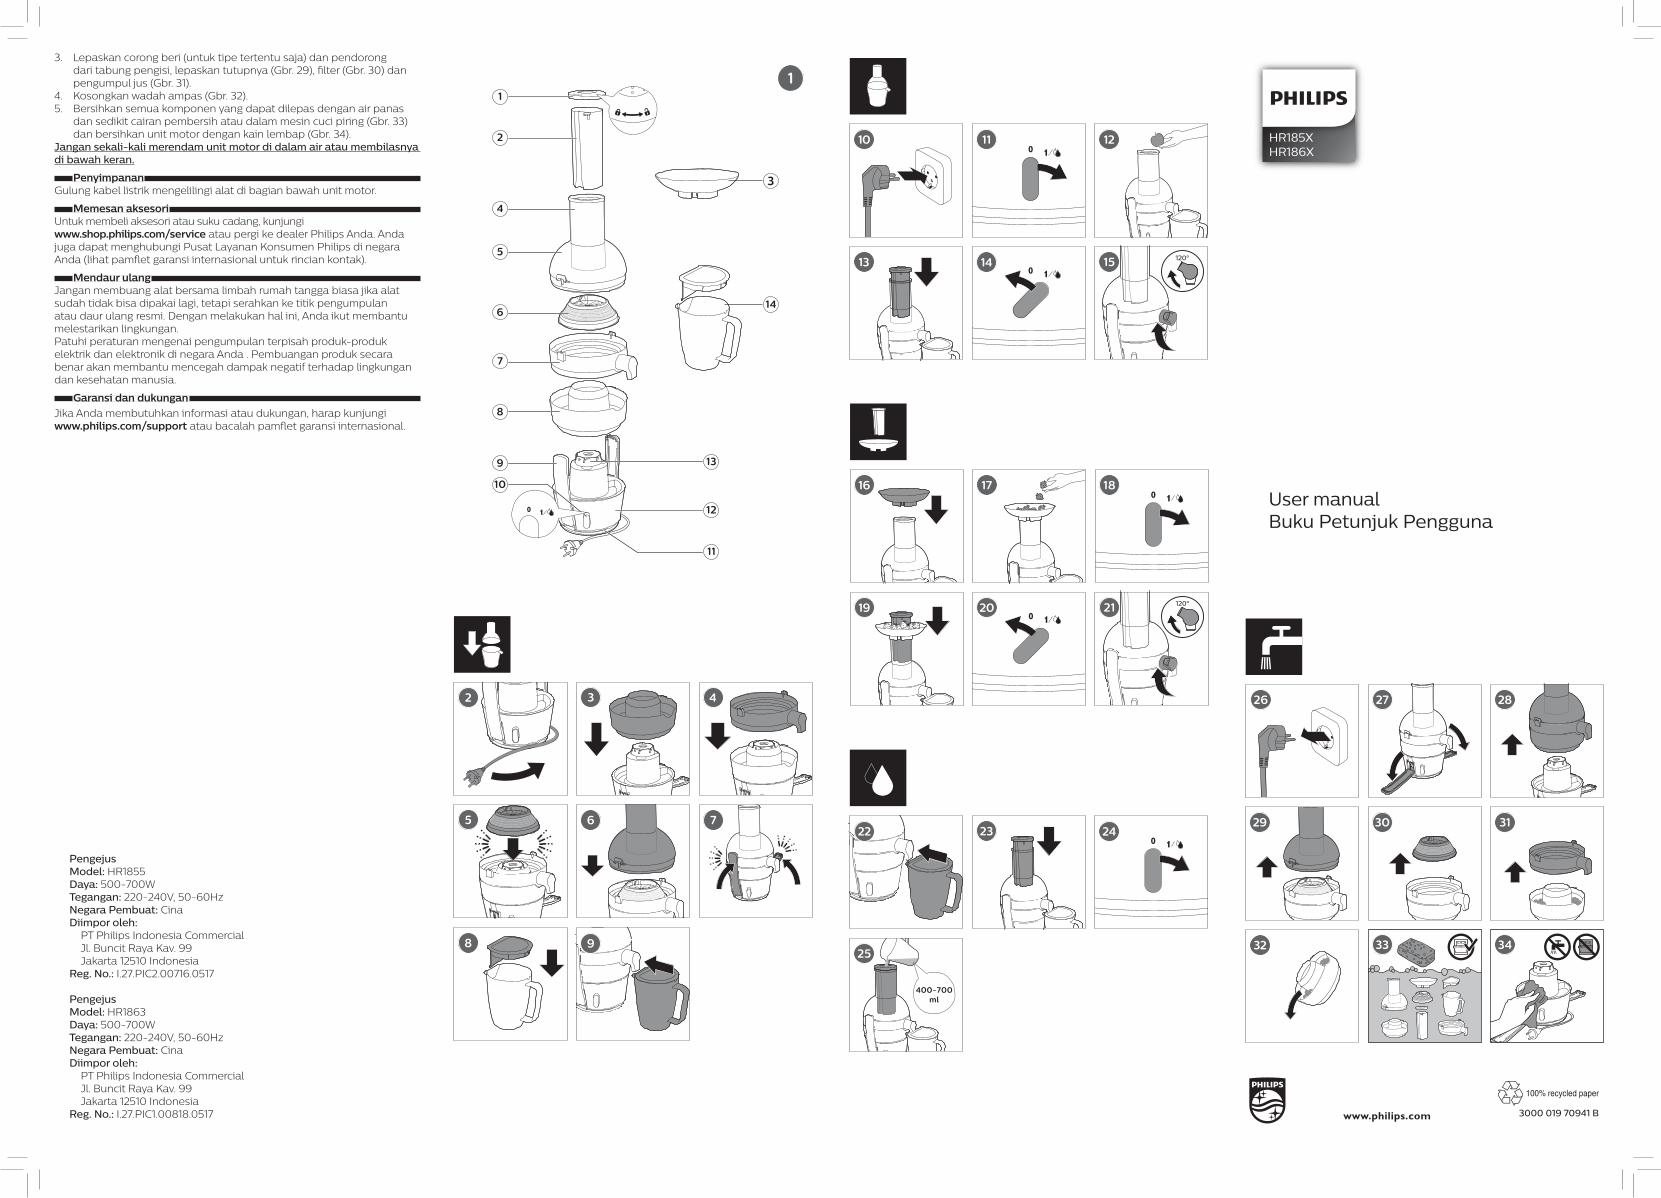
General description (Fig. 1)1 Cover of pusher2 Pusher3 Berry funnel (specific types only)4 Feeding tube5 Lid6 Filter7 Juice collector with spout (drip stop function)8 Integrated pulp container9 Safety clamps10 Control knob11 Cord storage compartment12 Motor unit 13 Driving shaft14 Juice jug and lid
ImportantRead this important information carefully before you use the appliance and save it for future reference.
Danger - Never immerse the motor unit in water or any other liquid, nor rinse it
under the tap. Warning
- If the supply cord is damaged, it must be replaced by Philips, its service agent or similarly qualified persons in order to avoid a hazard.
- Always disconnect the appliance from the mains if you leave it unattended or before you assemble, disassemble or clean it.
- Do not use the appliance if the sieve or the lid is damaged in any way or shows visible cracks and contact the nearest Philips service center.
- This appliance is intended for normal household use only. It is not intended for use in environments such as staff kitchens of shops, offices, farms or other work environments. Nor is it intended to be used by clients in hotels, motels, bed and breakfasts and other residential environments.
- This appliance is not intended for use by persons (including children) with reduced physical, sensory or mental capabilities, or lack of experience and knowledge, unless they have been given supervision or instruction concerning use of the appliance by a person responsible for their safety.
- Children should be supervised not to play with the appliance. - Do not use the appliance if the plug, the mains cord or other
components are damaged. - Never reach into the feeding tube with your fingers or an object while
the appliance is operating. Only use the pusher for this purpose. Do not insert other items than fruits, vegetables or the pusher into the feeding tube.
- Do not touch the small cutting blades in the base of the sieve. They are very sharp.
- Always place and use the appliance on a dry, stable and level surface. - To ensure that the appliance stands stably, keep the surface on
which the appliance stands and the bottom of the appliance clean. - Do not eat the pulp or use for preparing dishes. - Check if the voltage indicated on the base of the appliance
corresponds to the local mains voltage before you connect the appliance.
- Never let the appliance operate unattended. Caution
- Before you disassemble the appliance and before you clean it, set the control knob to off position and remove the plug from the wall socket. Then lower the locking arm to unlocked position.
- Only lower the locking arm to unlocked position after you have switched off the appliance and the sieve has stopped rotating.
- Always unplug the appliance after use. - Do not hold the appliance by the locking arm when you carry it. - Always unwind the power cord completely from the cord storage area
before use. - Never use any accessories or parts from other manufacturers or that
Philips does not specifically recommend. If you use such accessories or parts, your guarantee becomes invalid.
- Make sure all parts are correctly assembled before you switch on the appliance.
- Only use the appliance when the locking arm is in locked position.Electromagnetic fields (EMF)
This Philips appliance complies with all applicable standards and regulations regarding exposure to electromagnetic fields.
Before first useThoroughly clean all parts before you use the appliance for the first time (see chapter ‘Cleaning’).
Note: Make sure all parts are completely dry before you start using the appliance.
Preparing for use1. Unwind the power cord completely before you switch on the
appliance (Fig. 2). 2. Place the pulp container onto the motor unit (Fig. 3) and the juice
collector onto the pulp container (Fig. 4).3. Insert the filter into the pulp container until it clicks into the driving
shaft of the motor unit (Fig. 5). 4. Close the lid (Fig. 6).5. Fold the safety clamps over the lid until it clicks into position (Fig. 7).6. Close the lid of the jug (Fig. 8) and place the jug under the spout
(Fig. 9).
Using the appliance1. Plug in the appliance (Fig. 10)2. Turn the switch on speed level 1 (Fig. 11). 3. Put the washed pieces of fruits or vegetables in the feeding tube
(Fig. 12)4. Gently press them down towards the sieve with the pusher (Fig. 13).
Note: Always remove peels, stalks and stones of fruits you would not eat, e.g. watermelon peel, cherry stones, apple stalks.Never insert your fingers or any object into the feeding tube or juicing unit.5. When the juice flow has stopped, switch off the appliance by turning
the switch on speed level 0 and wait until the sieve has stopped rotating (Fig. 14).
Note: After you have processed all ingredients and the juice flow has stopped, turn the spout clockwise by about 120° to activate the drip stop function. (Fig. 15)
Tip: Clean the appliance immediately after use (see chapter ‘Cleaning’), because dried fruit pulp is more difficult to remove
Using the berry funnelWhen juicing small fruits like berries, place the berry funnel on the feeding tube (for specific types only).1. Put the berry funnel onto the feeding tube (Fig. 16).2. Put the washed pieces of fruits or vegetables into the berry funnel
(Fig. 17).3. Turn the switch on speed level 1 (Fig. 18). 4. Gently press the ingredients down towards the sieve with the pusher
(Fig. 19).5. When the juice flow has stopped, switch off the appliance by turning
the switch on speed level 0 and wait until the sieve has stopped rotating (Fig. 20).
Note: After you have processed all ingredients and the juice flow has stopped, turn the spout clockwise by about 120° to activate the drip stop function. (Fig. 21)
CleaningPre-cleaning (HR1855/1863/1864 only):
1. Place the jug under the spout (Fig. 22)2. Put the pusher in the feeding tube (Fig. 23).3. Turn the switch on level 1 (Fig. 24)4. Pour 400-700 ml of water into the pusher (Fig 25).
Cleaning:1. Unplug the appliance (Fig. 26).2. Unlock the safety clamps until it clicks (Fig. 27) and remove the juice
unit from the motor unit (Fig. 28).3. Remove the berry funnel (for specific types only) and the pusher from
the feeding tube, remove the lid (Fig. 29), the filter (Fig. 30) and the juice collector (Fig. 31).
4. Empty the pulp container (Fig. 32).5. Clean all detachable parts with hot water and some washing-up
liquid or in the dishwasher (Fig. 33) and clean the motor unit with a moist cloth (Fig. 34).
Never immerse the motor unit in water nor rinse it under the tap.
StorageWind the mains cord around the appliance in the base of the motor unit.
Ordering accessoriesTo buy accessories or spare parts, visit www.shop.philips.com/service or go to your Philips dealer. You can also contact the Philips Consumer Care Center in your country (see the worldwide guarantee leaflet for contact details).
RecyclingDo not throw away the product with the normal household waste at the end of its life, but hand it in at an official collection point for recycling. By doing this, you help to preserve the environment.
Follow your country’s rules for the separate collection of electrical and electronic products. Correct disposal helps prevent negative consequences for the environment and human health.
Guarantee and supportIf you need information or support, please visit www.philips.com/support or read the separate worldwide guarantee leaflet.
INDONESIA
PendahuluanSelamat atas pembelian Anda dan selamat datang di Philips! Untuk memanfaatkan sepenuhnya dukungan yang ditawarkan Philips, daftarkan produk Anda di www.philips.com/welcome.
Gambaran umum1 Tutup pendorong2 Pendorong3 Corong beri (tipe tertentu saja)4 Tabung pengisi5 Tutup6 Filter7 Wadah jus dengan cerat (fungsi anti-tetes)8 Wadah ampas terintegrasi9 Jepitan pengaman10 Kenop kontrol11 Wadah penyimpan kabel12 Unit motor13 Poros penggerak14 Tutup dan tabung jus
PentingBaca informasi penting ini dengan saksama sebelum menggunakan alat dan simpanlah untuk referensi nanti.
Bahaya - Jangan sekali-kali merendam unit motor di dalam air atau cairan lain
apa pun, jangan pula menyiramnya di bawah keran air. Peringatan
- Jika kabel listrik rusak, maka harus diganti oleh Philips, agen servisnya, atau personel dengan kualifikasi yang setara untuk menghindari bahaya.
- Selalu cabut steker alat dari stopkontak listrik jika Anda akan meninggalkan alat tanpa diawasi atau sebelum memasang, membongkar, atau membersihkannya.
- Jangan gunakan alat jika saringan atau tutup rusak atau ada retakan yang terlihat, dan hubungi pusat layanan Philips terdekat.
- Alat ini tidak diperuntukkan dalam lingkungan seperti dapur staf bengkel, kantor, pertanian, atau lingkungan kerja lainnya. Alat ini tidak ditujukan untuk digunakan di lingkungan seperti staf dapur, dapur toko/restoran, kantor, peternakan, atau lingkungan kerja lainnya. Alat juga tidak ditujukan untuk digunakan oleh klien di hotel, motel, akomodasi kamar & sarapan (“bed and breakfast”) atau lingkungan hunian serupa lainnya.
- Alat ini tidak dimaksudkan untuk digunakan oleh orang (termasuk anak-anak) dengan cacat fisik, indera atau kecakapan mental yang kurang, atau kurang pengalaman dan pengetahuan, kecuali jika mereka diberikan pengawasan atau petunjuk mengenai penggunaan alat oleh orang yang bertanggung jawab bagi keselamatan mereka.
- Anak kecil harus diawasi untuk memastikan mereka tidak bermain-main dengan alat ini.
- Jangan menggunakan alat jika steker, kabel listrik atau komponen lain ada yang rusak.
- Jangan sekali-kali memasukkan jari atau benda lainnya ke dalam tabung masukan sewaktu alat sedang bekerja. Hanya gunakan pendorong untuk melakukannya. Jangan memasukkan benda selain buah, sayur, atau penekan alat ini ke dalam tabung masukan.
- Jangan menyentuh pisau pemotong kecil yang terdapat di dasar saringan. Pisau tersebut sangat tajam.
- Selalu letakkan dan gunakan alat pada permukaan yang kering, stabil, dan rata.
- Untuk memastikan alat berdiri stabil, jagalah kebersihan permukaan tempat meletakkan alat dan bagian dasar alat.
- Jangan memakan ampas atau menggunakannya sebagai bahan makanan.
- Periksalah apakah voltase yang tertera di bagian bawah alat sudah sesuai dengan voltase listrik lokal sebelum Anda menghubungkan alatnya.
- Jangan sekali-kali membiarkan alat bekerja tanpa diawasi. Perhatian
- Sebelum membongkar alat dan sebelum membersihkannya, setel kenop kontrol ke posisi mati dan cabut steker dari stopkontak listrik. Lalu turunkan lengan pengunci ke posisi tidak terkunci.
- Hanya turunkan lengan pengunci ke posisi tidak terkunci setelah alat dimatikan dan saringan sudah berhenti berputar.
- Selalu mencabut steker setiap kali selesai menggunakan alat. - Jangan memegang alat pada bagian lengan pengunci ketika Anda
membawanya. - Selalu buka seluruh gulungan kabel daya dari tempat
penyimpanannya sebelum digunakan. - Jangan sekali-kali menggunakan aksesori atau komponen apa pun
dari produsen lain atau yang tidak secara khusus direkomendasikan oleh Philips. Jika Anda menggunakan aksesori atau komponen tersebut, garansi Anda menjadi batal.
- Pastikan semua bagian sudah dipasang dengan benar sebelum alat dihidupkan.
- Gunakan alat hanya jika lengan pengunci telah berada di posisi terkunci.Medan elektromagnet (EMF)
Alat Philips ini mematuhi semua standar dan peraturan yang berlaku terkait paparan terhadap medan elektromagnet.
Sebelum menggunakan alat pertama kali.Bersihkan semua komponen sebelum Anda menggunakan alat untuk pertama kali (lihat bab ‘Membersihkan’).
Catatan: Pastikan semua komponen benar-benar kering sebelum mulai menggunakan alat.
Menyiapkan penggunaan1. Lepas gulungan kabel sepenuhnya sebelum menghidupkan alat
(Gbr. 2). 2. Pasang wadah ampas pada unit motor (Gbr. 3) dan pengumpul jus
pada wadah ampas (Gbr. 4).3. Masukkan filter ke dalam wadah ampas hingga terkunci pada poros
penggerak unit motor (Gbr. 5). 4. Pasang tutupnya (Gbr. 6).5. Lipat jepitan pengaman ke atas tutup hingga terkunci pada posisinya
(bunyi “klik”) (Gbr. 7).6. Tutup tabung (Gbr. 8) dan pasang tabung di bawah cerat (Gbr. 9).
Menggunakan alat1. Masukkan steker alat ke stopkontak Gbr. 10)2. Putar kenob pada kecepatan level 1 (Gbr. 11). 3. Letakkan potongan buah atau sayuran yang sudah dicuci di tabung
pengisi (Gbr. 12)4. Tekan ke arah ayakan dengan pendorong (Gbr. 13).
Catatan: Selalu buang kulit, tangkai, dan biji buah yang tidak akan Anda makan, misalnya, kulit semangka, tangkai cherry, biji apel.Jangan sekali-kali memasukkan jari tangan atau benda apa pun ke dalam tabung pengisi atau unit juicer.5. Saat aliran jus berhenti, matikan alat dengan memutar kenop ke
kecepatan level 0 dan tunggu hingga ayakan berhenti berputar (Gbr. 14).
Catatan: Setelah Anda memproses semua bahan dan aliran jus sudah berhenti, putar cerat searah jarum jam sekitar 120° untuk mengaktifkan fungsi penghenti tetesan. (Gbr. 15)
Tip: Bersihkan alat segera setelah digunakan (lihat bab ‘Membersihkan’), karena ampas buah yang kering lebih sulit dibersihkan.
Menggunakan corong beriSaat membuat jus buah kecil seperti beri, tempatkan corong beri pada tabung pengisi (untuk tipe tertentu saja).1. Pasang corong beri ke tabung pengisi (Gbr. 16).2. Letakkan potongan buah atau sayuran yang sudah dicuci di corong
beri (Gbr. 17).3. Putar kenop pada kecepatan level 1 (Gbr. 18). 4. Tekan perlahan bahan-bahan ke arah ayakan dengan pendorong
(Gbr. 19).5. Saat aliran jus berhenti, matikan alat dengan memutar kenop ke
kecepatan level 0 dan tunggu hingga ayakan berhenti berputar (Gbr. 20).
Catatan: Setelah Anda memproses semua bahan dan aliran jus sudah berhenti, putar cerat searah jarum jam sekitar 120° untuk mengaktifkan fungsi penghenti tetesan. (Gbr. 21)
MembersihkanPembersihan awal (HR1855/1863/1864 saja):
1. Pasang tabung di bawah cerat (Gbr. 22)2. Masukkan pendorong ke dalam tabung pengisi (Gbr. 23).3. Putar kenop ke level 1 (Gbr. 24)4. Tuangkan 400-700 ml air ke dalam pendorong (Gbr. 25).
Membersihkan:1. Cabut steker alat (Gbr. 26).2. Buka kunci jepitan pengaman hingga berbunyi ‘klik’ (Gbr. 27) dan
lepaskan unit jus yang terpasang dari unit motor (Gbr. 28).